Lottie is a technology and file format for vector image animations.
The articles on creating Lottie animations, Figma and After Effects, covered the basics of Lottie, how to create animations, and how to export files. The previous implementation article introduced a simple HTML-focused implementation method.
This second implementation article introduces the basics of JavaScript-focused implementation, along with key points for performance considerations.
Do you think “Lottie = lightweight”? On websites, “light” and “heavy” can refer to data size or sluggish runtime behavior. Lottie is certainly lightweight in terms of data size, but Lottie animations can become heavy in terms of display and runtime load. This article digs into “heaviness” as runtime sluggishness. Read through to the end for the details.
Implementation with dotLottie-web
For this article, a demo was created that incorporates Lottie into a UI. The explanation focuses on where Lottie is used.
Click the magnifying glass to check the animation. You can try it without entering a keyword.
- Open the demo in a new window
- View the source code (HTML, JavaScript)
1. Import the library
Import the library according to the documentation.
If you want to load it from a CDN, import DotLottie from the CDN at the beginning of the JS file.
import { DotLottie } from "https://cdn.jsdelivr.net/npm/@lottiefiles/dotlottie-web/+esm";
If you use a package manager, install dotLottie and import DotLottie at the beginning of the JS file.
npm install @lottiefiles/dotlottie-web
import { DotLottie } from "@lottiefiles/dotlottie-web";
2. Prepare an empty DOM element and add an id
dotLottie-web draws to a canvas element. Add an id attribute to the canvas element so it can be referenced from JavaScript. In the demo, the canvas is placed inside a button element so it can be displayed as an icon button.
<button>
  <canvas id="lottie" class="lottie"></canvas>
</button>
3. Initialize with new DotLottie
Create an animation instance with new DotLottie().
- canvas: Pass the prepared
canvaselement. - src: Specify the file path for the Lottie data.
- The demo imports the file with Vite, a build tool.
- autoplay: Set to
falsebecause playback is handled manually.
import search from "@/assets/search.lottie";

const lottieContainer = document.querySelector("#lottie");

const anim = new DotLottie({
  canvas: lottieContainer,
  src: search,
  autoplay: false, // Do not autoplay. The default is false, so this can be omitted.
});
The main options available during initialization are shown below. For the full list, see the official documentation, dotLottie Web Player API Reference.
| Option name | Description |
|---|---|
| canvas (required) | The canvas element where Lottie is inserted |
| src or data | path: file path data: JSON object |
loop (default: false) |
true: play in an infinite loop false: play only once |
autoplay (default: false) |
true: start playback automatically when loaded false: do not start playback automatically |
| segment | Frame range to play. Specify the start frame as the first value and the final frame as the second value. |
4. Control the animation
Adjust the animation by referring to the list of animation instance methods.
In the demo, the original Lottie data had a relaxed animation speed, so the playback speed was adjusted with the setSpeed() method.
anim.setSpeed(1.7); // Adjust to a faster playback speed
The function called when the button is pressed also includes processing to manage animation playback.
The play() method starts animation playback. After waiting for a random number of seconds, the loop property is changed to false. This makes the animation stop automatically after the currently playing loop finishes.
const onSearch = async (anim) => {
  // Play the animation
  anim.setLoop(true); // Loop playback
  anim.play();

  // Wait a random amount of time as a loading-like effect
  await wait(Math.random() * 5000);

  // Change the setting so the animation does not loop.
  // The animation stops automatically when the current playback completes.
  anim.setLoop(false);
};
5. Add processing for Lottie events
Several event listeners are also available. For example, by adding a complete event listener to the animation instance, you can run processing after the animation finishes. In the demo, the loading screen is hidden after completion.
anim.addEventListener("complete", () => {
  statusText.innerText = "Search complete";
});
Lottie performance optimization
When Lottie is incorporated into a small UI part as in the demo above, there may not appear to be much of a problem. However, when Lottie is incorporated into a website as a visual effect, performance cannot be ignored.
As mentioned at the beginning of the article, Lottie files are small, often only a few KB, so they are excellent in terms of page-load data size. However, animation playback and rendering are expensive, so the website can feel heavy at runtime.
When the CPU or GPU is under heavy load, flickering and frame-rate delays can occur. The exact behavior differs by browser. In Chrome, the frame rate may be maintained while parts of the animation fail to appear, making the screen look broken. In Safari, the frame rate may drop significantly and the animation may stutter. On mobile devices, the browser can even crash.
To avoid damaging the user experience, optimization is recommended.
More specifically, if rendering becomes heavy, consider the following:
- Destroy Lottie animations that are not visible on screen
- Use Web Workers to run processing on a background thread
- Use WebGPU to reduce rendering load
Let’s look at these points in more detail.
Using クリエイティブ表現のレベルアップに使える最新ブラウザーの開発者機能(パフォーマンス編) as a reference, enable “Frame Rendering Stats” and “Paint flashing” in the Rendering panel. It is also useful to enable checks such as “CPU usage” in Performance monitor, because they show a variety of information.
Test 1: optimizing Lottie animation management
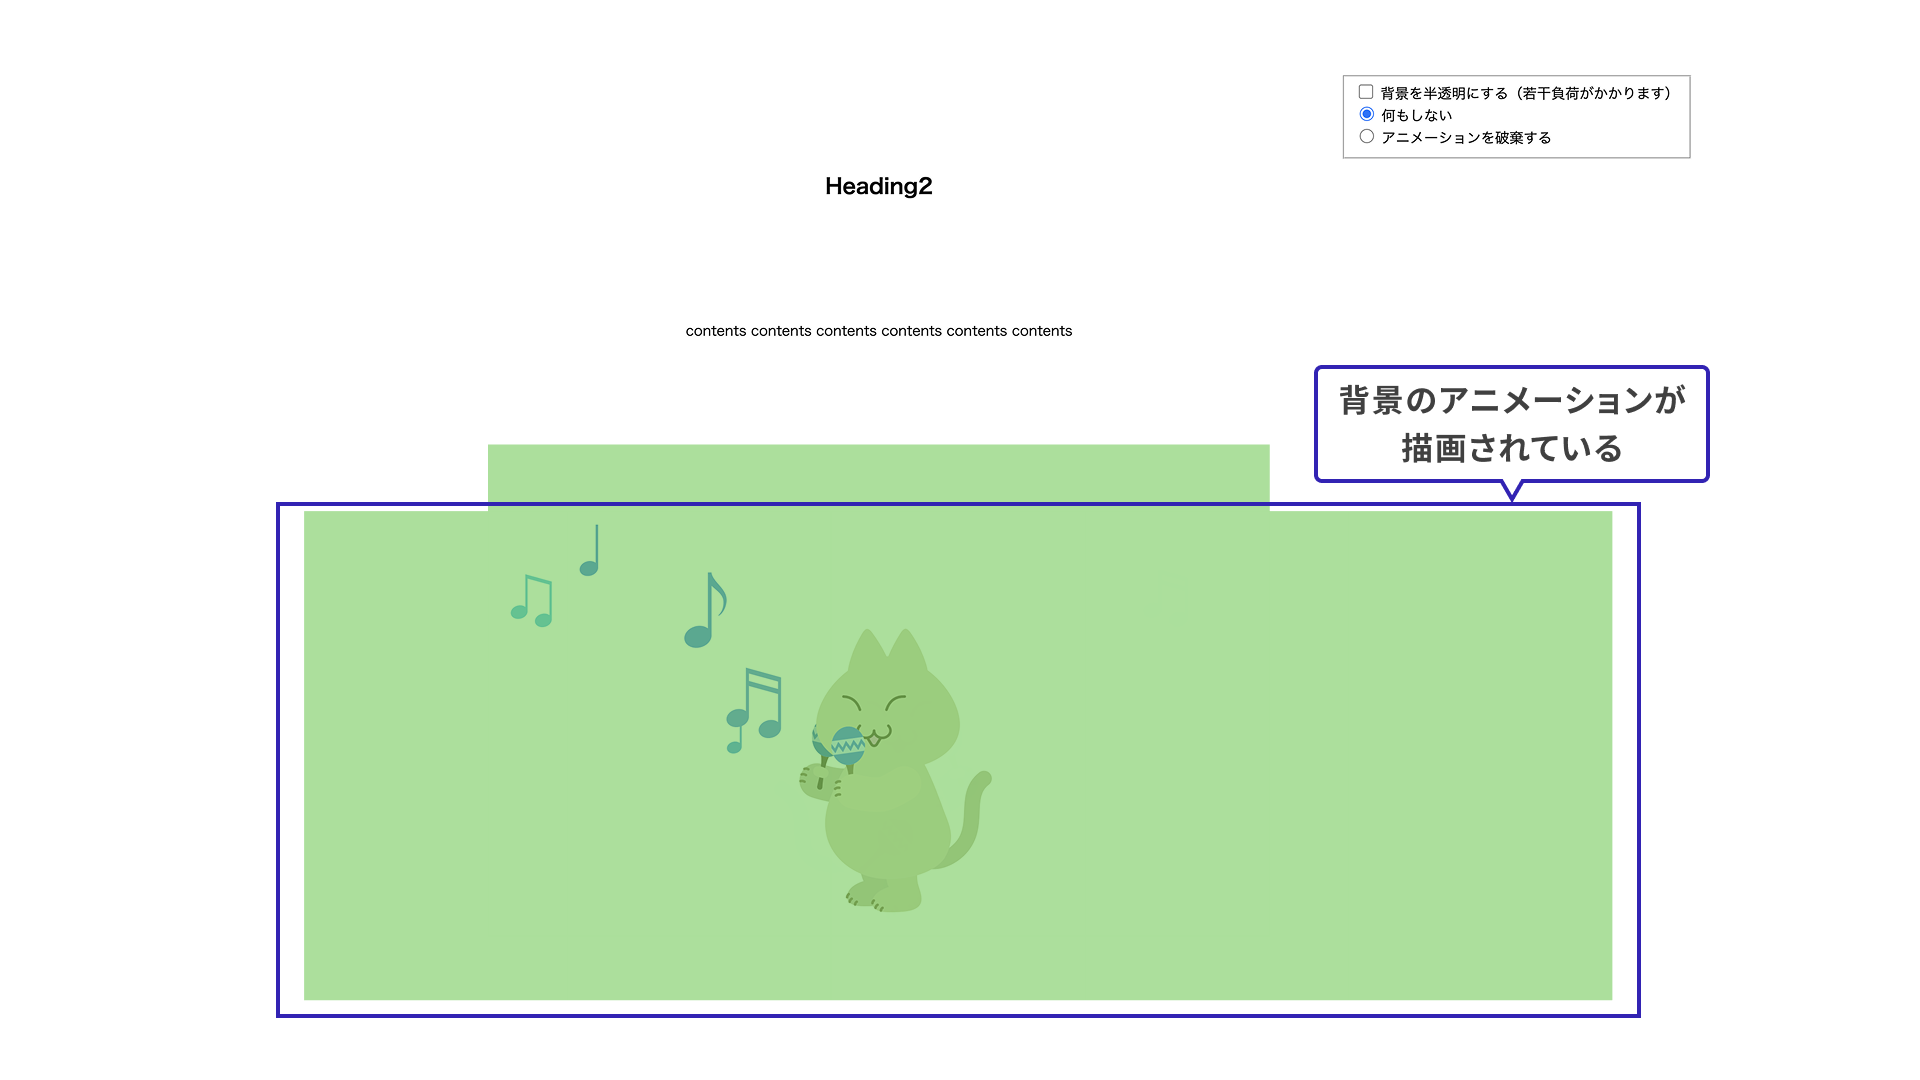
For the first test, a demo was prepared with a main visual area fixed using position: sticky;. As you scroll, the next section moves up and covers the main visual. The results were as follows.
| No optimization | Animation destroyed | |
|---|---|---|
| GPU memory | About 16.2 MB | About 16.2 MB |
| CPU usage | About 60% to 99% | About 27.5% to 90% |
Test environment: Chrome 148.0.7778.216 / macOS 26.5.1 / MacBook Air M1, 2020 / browser size 1920 x 1080 px (external monitor)
* Because memory usage changes depending on the animation playback frame, treat these values as rough estimates.
Baseline: no playback optimization
When scrolling, the Lottie animation in the main visual area is hidden behind the body section and is no longer visible. Even so, playback is not stopped, so CPU is being used unnecessarily. The green rectangle enabled by Paint flashing shows that the animation in the background is still being painted.
When the animation is destroyed
When the main visual Lottie becomes hidden during scrolling, the animation is destroyed with the destroy() method. CPU usage decreases, confirming that the load has been reduced.
The official documentation for destroy explains that the destroy() method destroys the renderer instance and removes all registered event listeners.
The Memory Management section of the official documentation also introduces a way to destroy multiple animations.
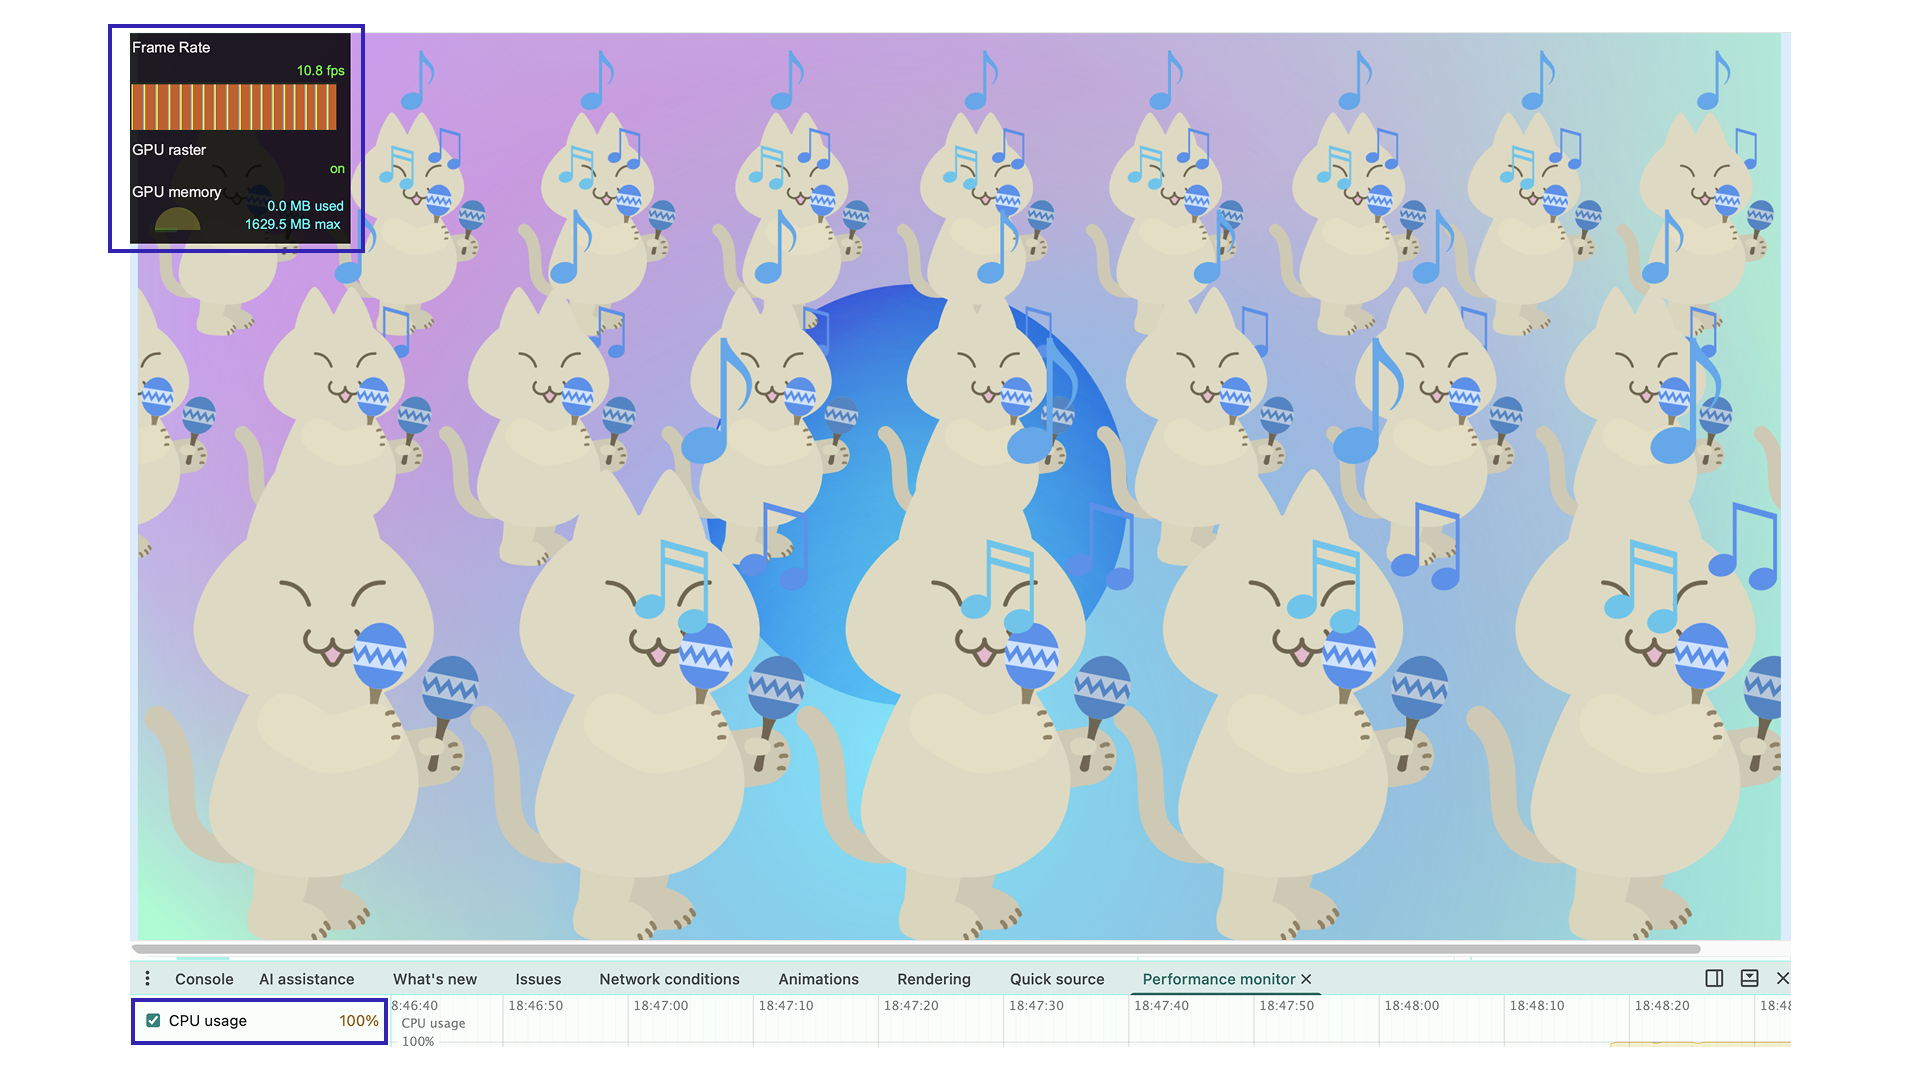
Test 2: complex Lottie data
What happens when the Lottie data itself is complex? For testing, objects were duplicated roughly in After Effects, producing Lottie data with around 800 shape layers in total. Because the file is in .lottie format, it is only 18 KB.
import { DotLottie } from "@lottiefiles/dotlottie-web";
import animation from "@/assets/complex-anim.lottie";

// Omitted

const canvas = document.createElement("canvas");
const anim = new DotLottie({
  canvas: canvas,
  src: animation,
  autoplay: true,
  loop: true,
  renderConfig: {
    devicePixelRatio: window.devicePixelRatio * 0.75,
  },
});
- Open the demo in a new window This demo puts some rendering load on your device. Use caution when viewing it.
- View the source code
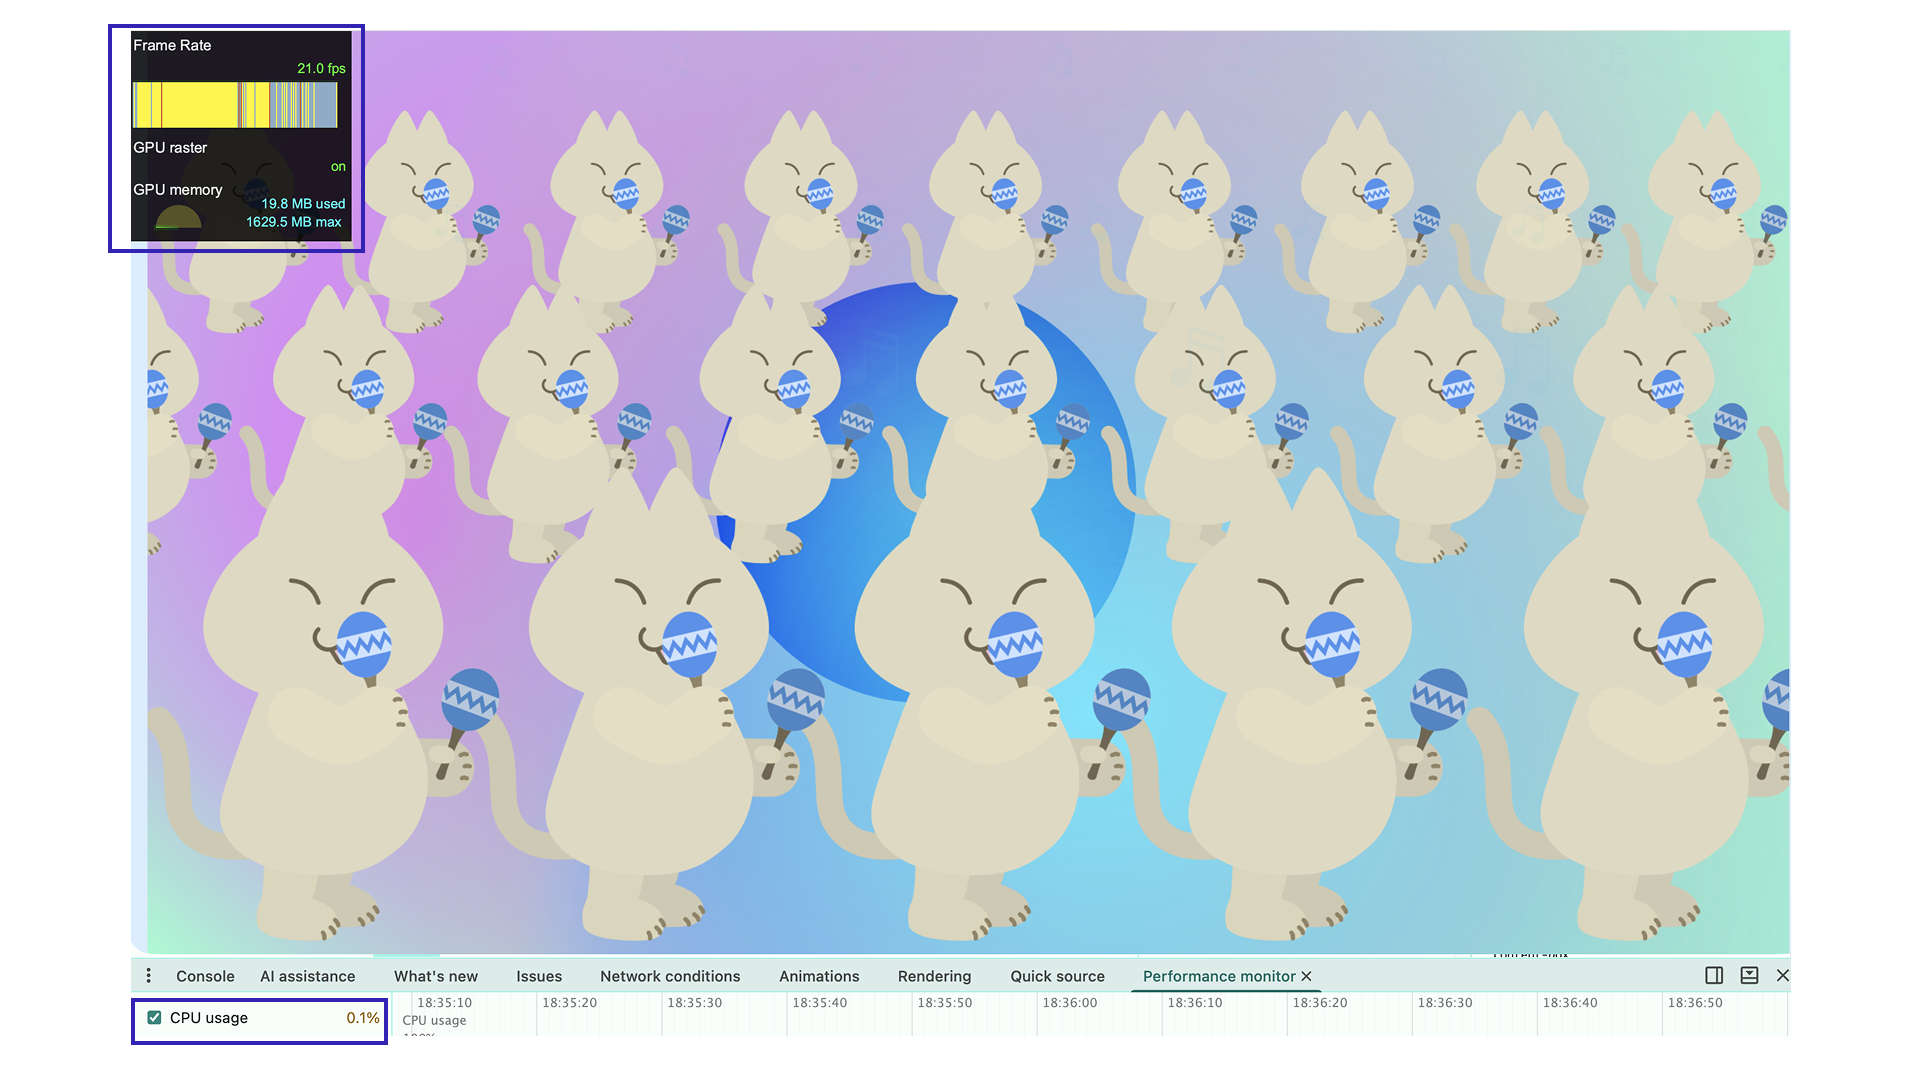
On a larger monitor, the animation appeared choppy. The frame rate was around 10 fps, and CPU usage was almost always near 100%. In this way, complex Lottie data can create a high load simply by playing it.
Use Web Workers
The LottieFiles performance optimization documentation introduces DotLottieWorker, which uses Web Workers.
By separating the rendering of heavy animations from the main thread, performance improvements can be expected. Implementation is easy: replace DotLottie with DotLottieWorker.
import { DotLottieWorker } from "@lottiefiles/dotlottie-web";

// Omitted

const anim = new DotLottieWorker({
  // Omitted
  renderConfig: {
    freezeOnOffscreen: false, // Prevent rendering from stopping offscreen. Without this, it will not render.
  },
});
- Open the demo in a new window This demo puts some rendering load on your device. Use caution when viewing it.
- View the source code
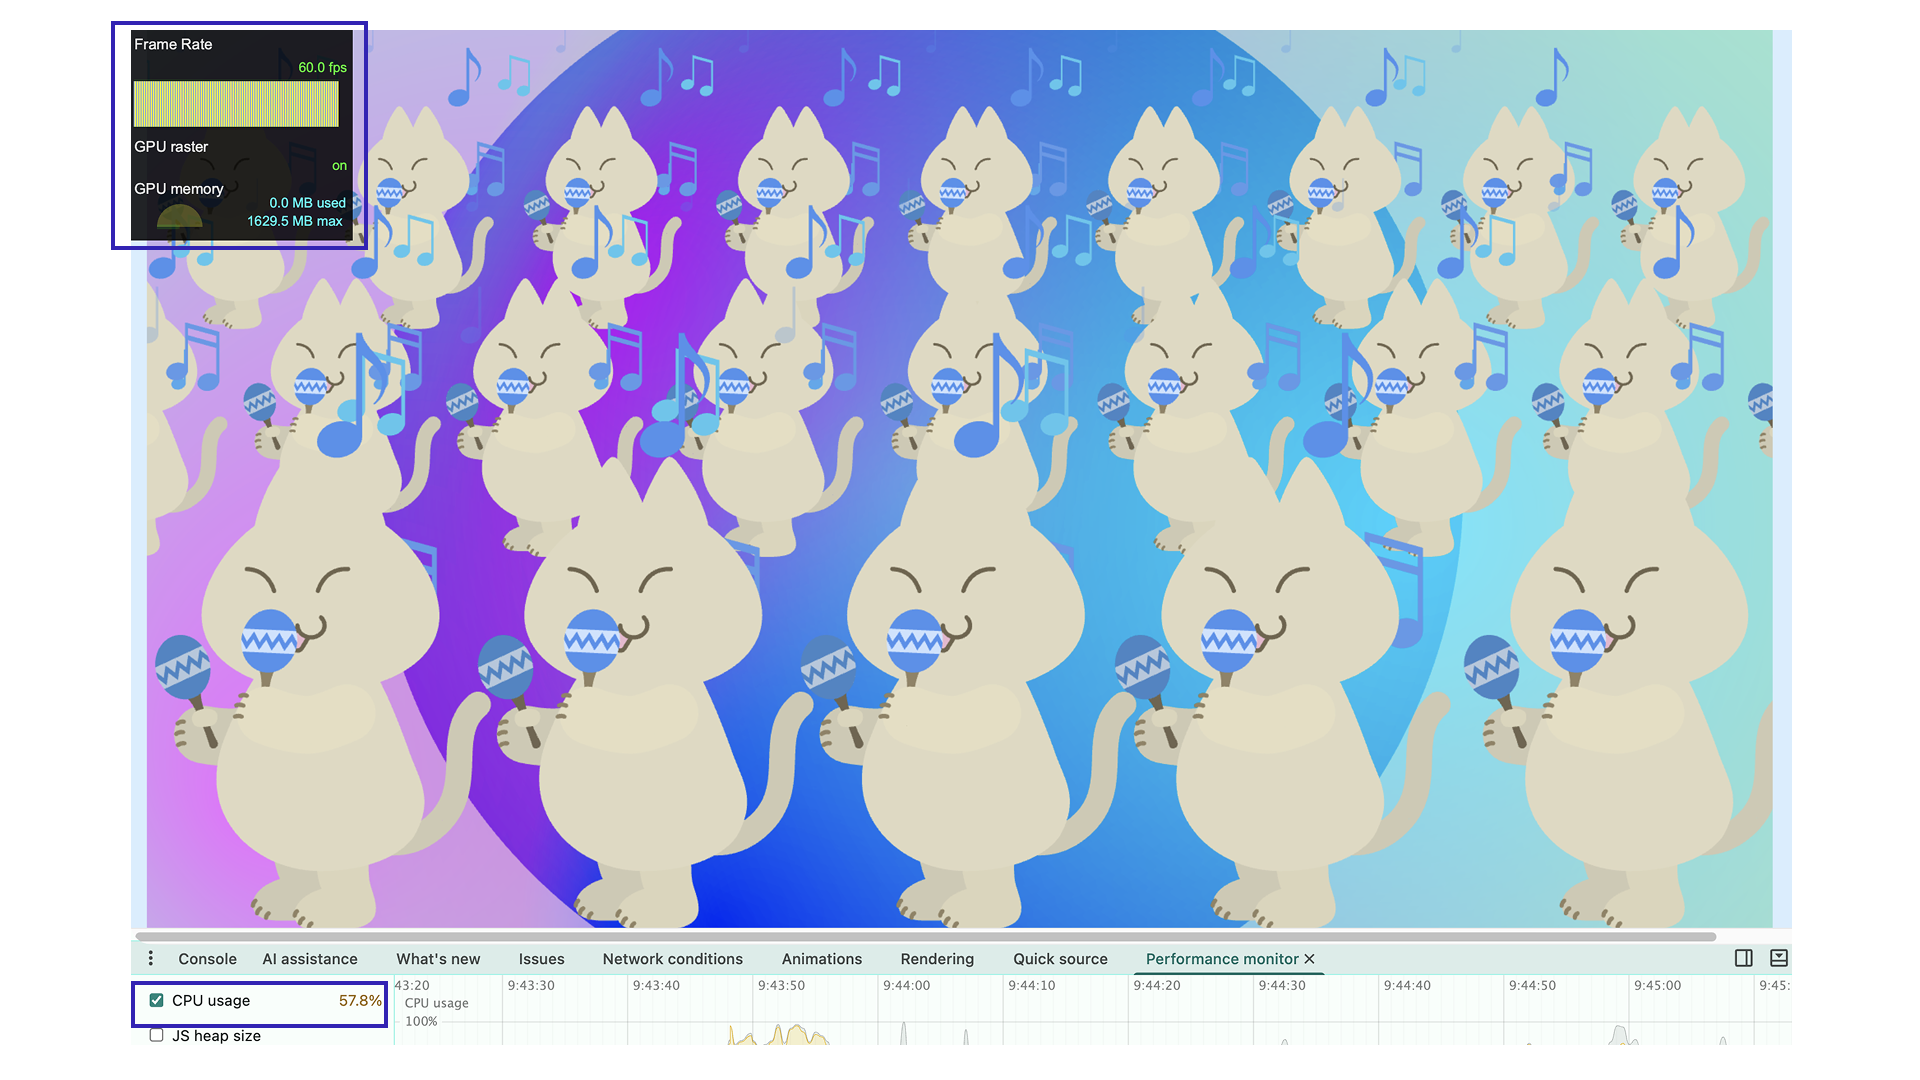
The frame rate improved to around 20 fps, and CPU usage dropped to 0.1%. The animation stutter improved somewhat.
Use WebGL
DotLottie uses canvas 2D for rendering by default, but a WebGL-compatible version is also available. Canvas 2D uses the CPU for drawing, while WebGL uses the GPU and can execute browser rendering faster.
import { DotLottie } from "@lottiefiles/dotlottie-web/webgl";

// Omitted

const anim = new DotLottie({
  // Omitted
});
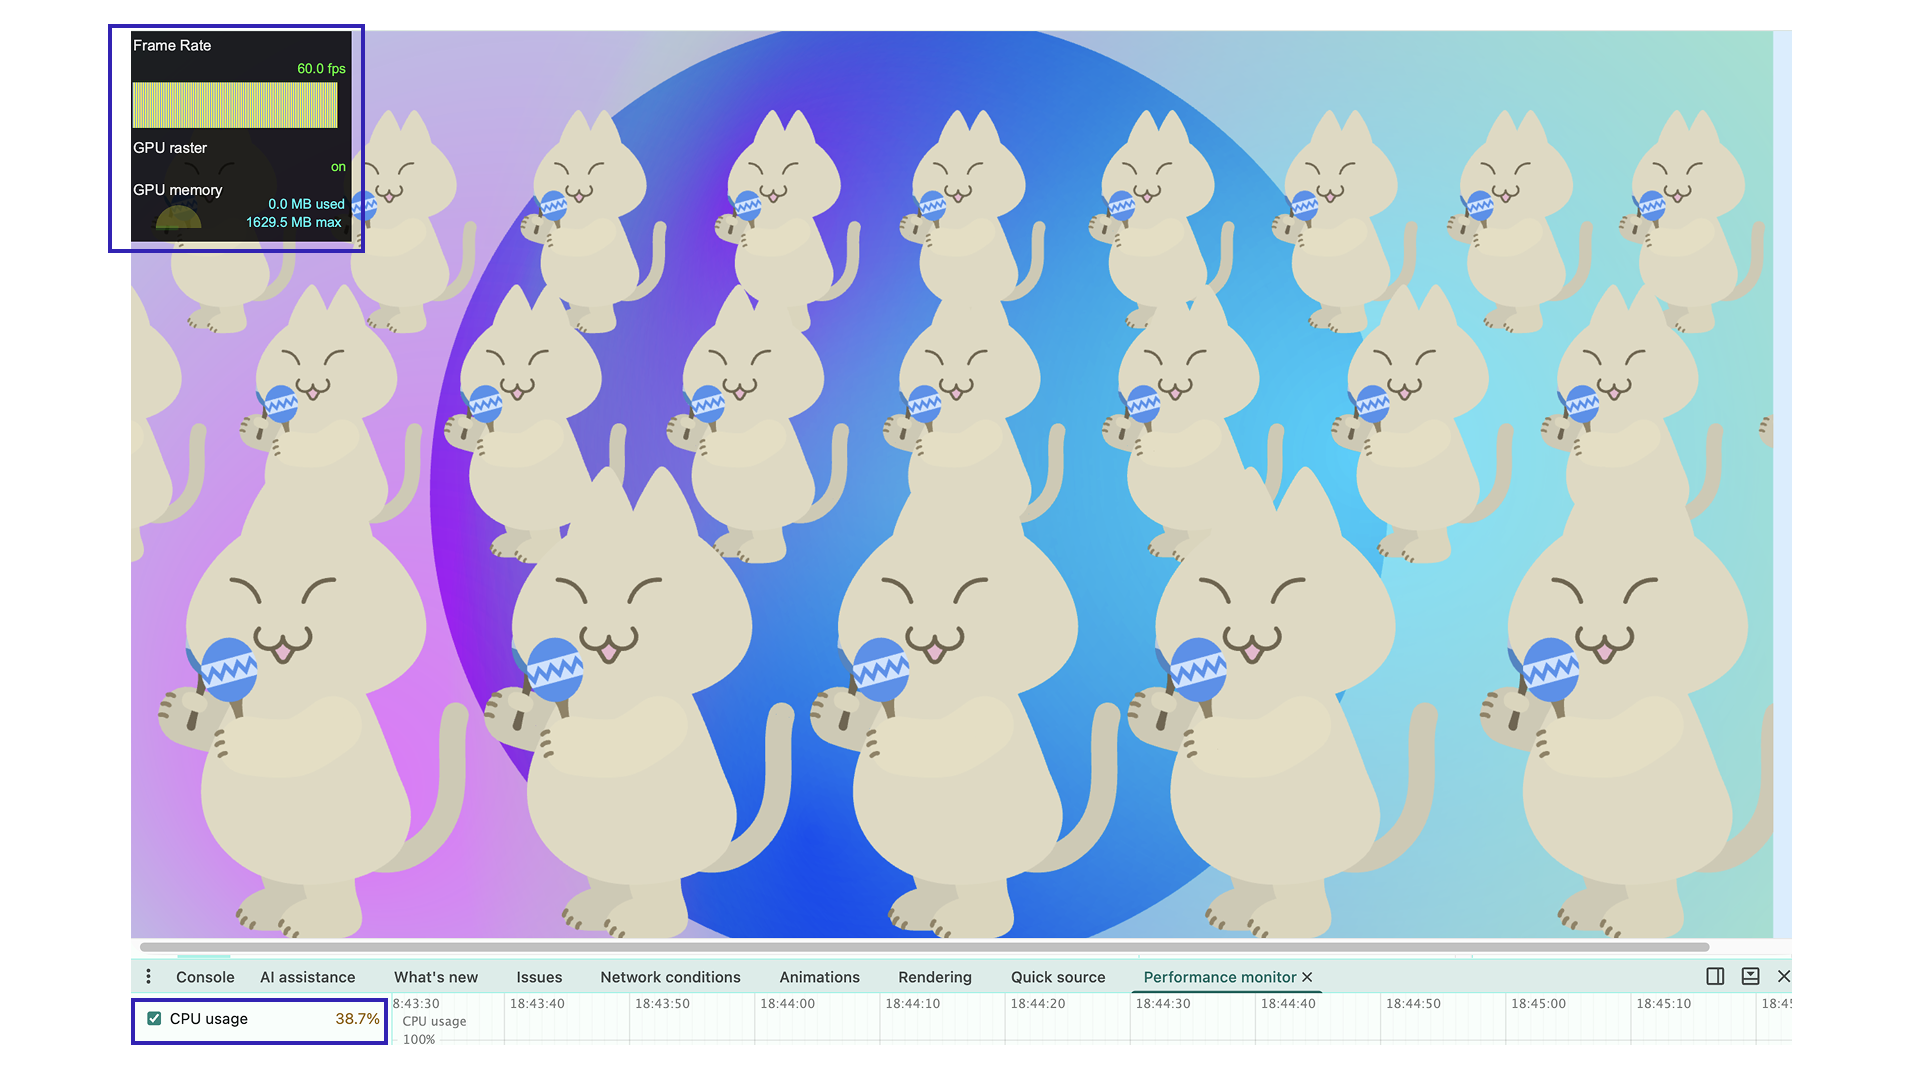
The frame rate improved to 60 fps, and the animation displayed smoothly.
Use WebGPU
WebGPU uses the GPU even more efficiently than WebGL. Consider it when you want to improve performance beyond WebGL. To learn more about WebGPU, see 次世代のWebGPUの可能性 WebGLと比較して理解する描画機能の違い.
import { DotLottie } from "@lottiefiles/dotlottie-web/webgpu";

// Omitted

const anim = new DotLottie({
  // Omitted
});
The frame rate is stable at 60 fps, and the animation is smooth.
Conclusion
This article introduced JavaScript-focused implementation and performance-conscious optimization techniques.
The animation creation articles covered workflows using Figma and After Effects. The implementation articles covered web implementation with Web Player for HTML placement and dotLottie-web for JavaScript placement.
After researching the full process from creating Lottie data to implementing it, it became clear that Lottie is an excellent technology. Design-tool workflows are easy to incorporate, implementation has a low barrier to entry, and it can create rich experiences. At the same time, poor performance can damage the user experience. Implementation-side care is important for making the most of Lottie.
Even when design and implementation can be split between different roles, it is important for both sides to understand the basics. Hopefully, this article helps you create better content.
References
Series
This article was originally published 2 years ago, and was maintained June 2026.