Lottie is a technology and file format for vector image animations.
The articles on creating Lottie animations, Figma and After Effects, covered the basics of Lottie, how to create animations, and how to export files. This article introduces how to implement Lottie animations.
There are several ways to embed Lottie, depending on the platform. This article uses a common web workflow as an example. As the first implementation article, it uses the Web Player tool, which makes Lottie easy to embed.
Implementing the animation
There are two main implementation patterns for the web: an HTML-focused approach and a JavaScript-focused approach.
-
HTML-focused implementation: dotLottie-wc
- A library that wraps dotLottie-web, introduced later, as a web component. It supports simple controls such as playback adjustment.
- Feature: Easy to introduce with mainly HTML.
-
JavaScript implementation: dotLottie-web
- Create and use an instance with
new DotLottie(). - Feature: Gives detailed JavaScript-based control over playback timing, performance, and more.
- Create and use an instance with
Implementation with the Web Player tool
First, here is an embedding method that works by copying and pasting. The easiest way is to copy a snippet from the Web Player tool and paste it into HTML.
Adjust the animation parameters, select the player format, and click Copy Code to copy the code. Paste the snippet into the HTML body tag, and the Lottie animation will play.
For the differences between Lottie file formats, see Creating Lottie animations with Figma.
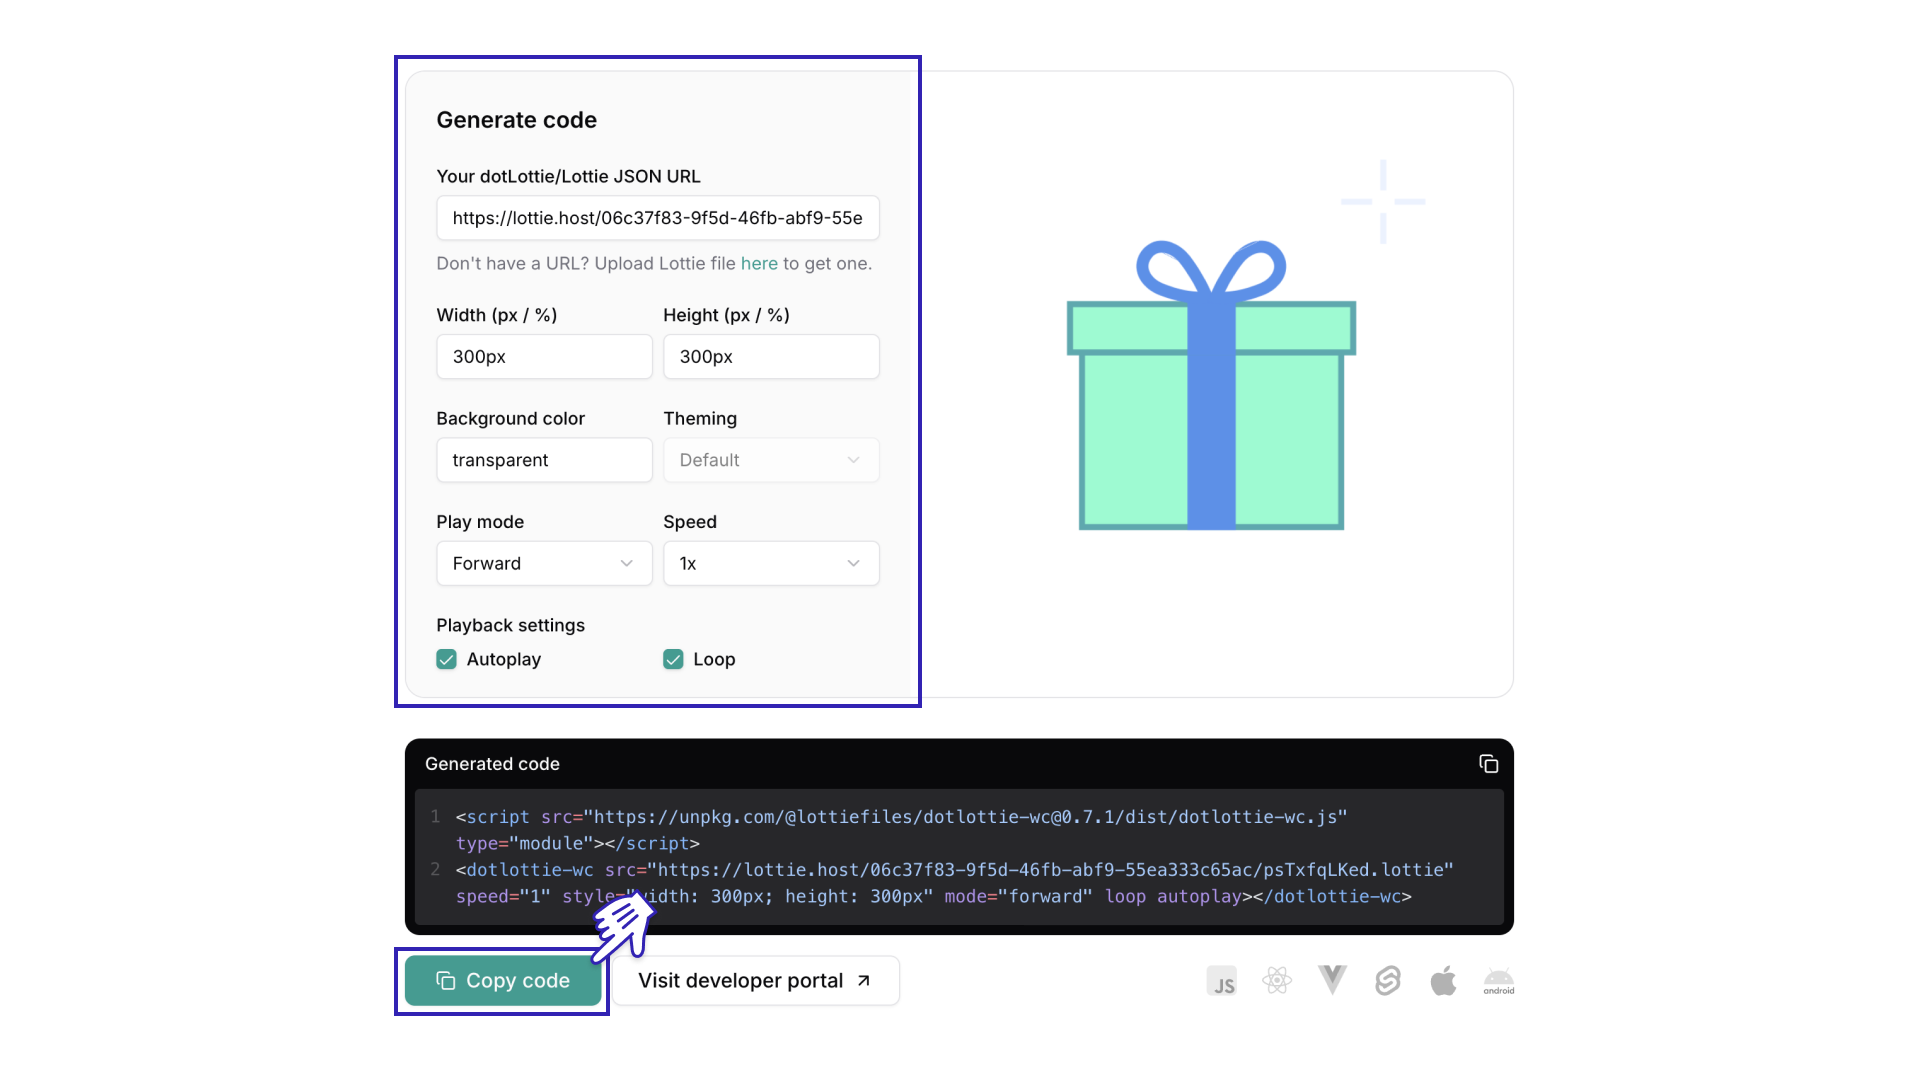
<script src="https://unpkg.com/@lottiefiles/dotlottie-wc@0.7.1/dist/dotlottie-wc.js" type="module"></script>
<dotlottie-wc src="https://lottie.host/06c37f83-9f5d-46fb-abf9-55ea333c65ac/psTxfqLKed.lottie" speed="1" style="width: 300px; height: 300px" mode="forward" loop autoplay></dotlottie-wc>
Code-based implementation
Next, this section is for people who want to understand the details more deeply or fine-tune the animation. It introduces the steps for implementing Lottie from code.
1. Import the library
Import the dotLottie-wc library according to the documentation.
- When loading from a CDN:
<script type="module" src="https://unpkg.com/@lottiefiles/dotlottie-wc@latest/dist/dotlottie-wc.js"></script>
- When using a package manager:
npm install @lottiefiles/dotlottie-wc
2. Write the dotlottie-wc tag and specify the Lottie path in src
<dotlottie-wc
  src="../assets/present-anim.lottie"
></dotlottie-wc>
If you use a Lottie file published on LottieFiles, specify its URL. Upload the file from the Preview Lottie animation page and use the generated URL.
<dotlottie-wc
  src="https://lottie.host/06c37f83-9f5d-46fb-abf9-55ea333c65ac/psTxfqLKed.lottie"
></dotlottie-wc>
3. Add properties for the intended behavior
Now that the setup is ready, adjust the animation playback. For an animation that starts looping automatically after loading and changes the playback speed to 0.5x, add properties as shown below.
<dotlottie-wc
  src="../assets/present-anim.lottie"
  autoplay
  loop
  speed="0.5"
></dotlottie-wc>
Reference: attributes
With only a few lines, a Lottie animation has been embedded. One advantage of implementation is that you can adjust parameters that cannot be configured in the LottieFiles tool. Other available properties are also summarized in the demo, so use it as a reference.
Column: JSON and dotLottie formats
Lottie files come in two formats: .json and .lottie.
dotLottie-wc can use both .json and .lottie files in the same way. However, because .lottie files have advantages like the following, using the .lottie format is recommended.
- Multiple animations can be bundled into a single file
- Files are roughly one-tenth the size of JSON
- The format can be used across platforms, including web, iOS, and Android
- State Machines can be used to create interactive animations
Column: interactive animations are also possible
Lottie has a feature called State Machines. With State Machines, animations can be played in response to actions such as clicks or mouse hover.
Create a .lottie file that includes State Machines in a tool such as Lottie Creator. Then load it with the dotLottie-wc described above to display an interactive animation on the web.
Alternatively, you can use a library called dotLottie JS to write State Machines in code. After writing the code, export the file in .lottie format and load it with dotLottie-wc.
The following is a button that animates when clicked. It can be displayed easily with dotlottie-wc.
The animation distributed on LottieFiles was used under the Lottie Simple License.
<dotlottie-wc
  src="https://lottie.host/8bee191a-c073-478b-b621-16d7190e5ff6/LKz8kewfOD.lottie"
  stateMachineId="StateMachine1"
  style="width: 300px; height: 300px"
></dotlottie-wc>
Conclusion
This article introduced how to implement Lottie animations with dotLottie-wc. It can be added easily by embedding it in HTML.
On the other hand, implementation-side care is important when detailed control or performance needs to be considered. The next implementation article, Adding Lottie animations with JavaScript and optimizing performance, covers animation control. It also introduces a JavaScript-focused implementation method with performance in mind.
References
Series
This article was originally published 2 years ago, and was maintained June 2026.