
The JavaScript library GSAP is useful for creating motion on websites. GSAP offers advanced features and strong runtime performance.
Creating motion by interpolating between a start point and an end point is called “tweening” (from the word between). Many JS libraries provide tweening, but GSAP is especially well regarded and stands out for its extensive feature set. Our animation-library comparison also found that it performs better than similar libraries.
I have used GSAP for 18 years, dating back to the old TweenMax era. This series covers everything from the minimum essentials to practical production techniques.
Official GSAP website
This introduction to GSAP is divided into four parts. Part 1 covers installation, basic tweens, transforms, easing, and staggered motion.
What you can do with GSAP
Scroll-linked animation
Text animation
Three.js integration
A Three.js + GSAP integration demo.
Where GSAP shines
When web standards like CSS Transitions are also an option, what advantages does GSAP offer? Here’s how I think about it.
- Compared with CSS Transitions/Animations and the Web Animations API, GSAP gives you far more control.
- GSAP is useful for managing sequences of motion.
- GSAP can be used not only with HTML DOM elements, but also in WebGPU and Canvas implementations. (※)
※ In WebGPU/Canvas, you use plain JavaScript objects, so CSS Transitions and similar techniques cannot be used.
Conversely, if a website can be built with CSS Transitions alone, there is no need to use GSAP. Some UI libraries and design systems already include transitions and motion:
When using one of these, there is no need to add GSAP solely for basic UI effects.
GSAP is useful when you want precise control over animation direction or interactions that feel satisfying. It also helps you create motion that breaks out of fixed patterns.
Installation
Getting started with GSAP is easy. I’ll show two approaches: using a script tag and using a package manager.
Using a script tag
If you want to use it quickly via a CDN, this is the simplest approach. Load it with a script tag from the CDN.
<script src="https://cdn.jsdelivr.net/npm/gsap@3.15.0/dist/gsap.min.js"></script>
Once loaded, the global window object gets a gsap object, so you can use gsap anywhere in your JavaScript. Via CDN, the file is 28 KB when compressed with gzip, so the footprint is compact.
Importing as ESM from a CDN
If you want to load it as ES Modules from a CDN, write it like this (see ES Modules入門 - JavaScriptのモジュールを使う方法).
<script type="importmap">
  {
    "imports": {
      "gsap": "https://cdn.jsdelivr.net/npm/gsap@3.15.0/index.js"
    }
  }
</script>

<script type="module">
import { gsap } from "gsap";

// ...write your implementation here
</script>
Installing with NPM
To use it in a Node.js development environment, install the gsap package with the npm install command.
npm install gsap
The gsap package also includes TypeScript definition files, so you do not need to install @types. If you use ES Modules, write the code like this.
import {gsap} from "gsap";

gsap.to(someElement, { x:100 }); // placeholder code
The official page GreenSock | Docs | Installation provides a detailed explanation with an install helper and videos.
Basic usage
The minimum code you need looks like this.
// Pass the target as the first argument and the properties/values to change as the second argument
gsap.to(".rect", { x: 200, duration: 2 });
Specify the target selector or object (arrays are also allowed) as the first argument. In the second argument, pass an object containing the properties you want to change and their values. Use duration to specify time in seconds.
For example, if you want to change the background color over 1 second, write it like this.
// Change to blue over 1 second
gsap.to(".target", { backgroundColor: "#0000FF", duration: 1 });
As in CSS, values can be specified as strings.
Configuration values
You can customize tween behavior by including configuration values in the second argument. The following code includes delay for delayed start and repeat for repeating.
// Start playback after a 2-second delay
gsap.to(".target", { color: "#0000FF", duration: 1, delay: 2 });

// Repeat twice
gsap.to(".target", { color: "#0000FF", duration: 1, repeat: 2 });

// Include a delay between repeats
gsap.to(".target", {
  color: "#0000FF",
  duration: 1,
  repeat: 2,
  repeatDelay: 1,
});
The most common properties are summarized in the table below. If you remember the properties marked with “★★” in the Usage column, that’s enough to get started. The representative properties are covered throughout this series.
| Property | Description | Unit | Default value | Usage |
|---|---|---|---|---|
duration |
Duration | Number (seconds) | 0.5 |
★★ |
ease |
Easing | String or function | power1.out |
★★ |
delay |
Delay time | Number (seconds) | 0 |
★ |
repeat |
Number of repeats | Number | 0 |
★ |
repeatDelay |
Delay before repeating | Number (seconds) | 0 |
- |
yoyo |
Whether repeats should reverse direction | Boolean | false |
- |
paused |
Whether to start in a paused state | Boolean | false |
- |
overwrite |
Whether to overwrite existing tweens | Boolean or "auto" |
false |
- |
Controlling repeats
If you want motion to repeat, use the repeat property. If you set a positive integer, it will repeat that many times.
To repeat infinitely, specify repeat: -1. If you want a waiting period between repetitions, set repeatDelay.
gsap.to(".target", {
  x: 200,
  duration: 2,
  repeat: -1, // Repeat infinitely
  repeatDelay: 0.5, // 0.5 second pause between repeats
});
If you set yoyo, the tween repeats by going there and back, like a toy yo-yo.
gsap.to(".target", {
  x: 200,
  duration: 2,
  repeat: -1, // Repeat infinitely
  repeatDelay: 0.5, // 0.5 second pause between repeats
  yoyo: true, // Reverse direction
});
What can be tweened
The first argument to gsap.to() can accept not only selectors but various kinds of objects. Selectors behave almost the same as document.querySelectorAll(). If you pass a CSS class selector, all matching elements will tween.
You can also pass an HTMLElement instance, an array, or any arbitrary object.
// Tween all elements that match the selector.
gsap.to(".item", { x: 100, duration: 1 });

// If you pass an array, all items in the array can be animated together.
gsap.to(["#item1", "#item2"], { x: 100, duration: 1 });

// If you pass an HTMLElement directly, that element will be animated.
const element = document.createElement("div");
element.textContent = "Hello";
document.body.append(element);
gsap.to(element, { x: 100, duration: 1 });

// You can also pass an arbitrary object.
const param = { value: 0 };
gsap.to(param, { value: 100, duration: 1 });
Specifying transforms
With GSAP, you can write CSS transform values intuitively. Use x for horizontal movement. It is shorthand for transform: translateX(...). Similarly, y is shorthand for transform: translateY(...).
gsap.to(".target", {
  x: 100, // Horizontal
  y: 100, // Vertical
  duration: 1,
});
In CSS, rotation is written as transform: rotate(180deg), but in GSAP you can specify the rotate property directly. If you omit the unit, the value is treated as degrees. If you want to use radians, specify a string with the rad unit.
// One full rotation (degrees)
gsap.to(".target", { rotate: 360, duration: 1 });

// One full rotation (radians)
gsap.to(".target", { rotate: `${Math.PI * 2}rad`, duration: 1 });
Other transform-related properties can be written as follows.
| GSAP | CSS | Description |
|---|---|---|
x: 10 |
transform: translateX(10px) |
Horizontal translation (px) |
y: 10 |
transform: translateY(10px) |
Vertical translation (px) |
rotate: 360 |
transform: rotate(360deg) |
Rotation angle |
scale: 2 |
transform: scale(2, 2) |
Scale (1.0 is original size) |
scaleX: 2 |
transform: scaleX(2) |
Scale only horizontally |
scaleY: 2 |
transform: scaleY(2) |
Scale only vertically |
xPercent: -50 |
transform: translateX(-50%) |
Horizontal translation (relative to the element’s width) |
yPercent: -50 |
transform: translateY(-50%) |
Vertical translation (relative to the element’s height) |
Column: Why transforms are generally preferred over left/top
When moving an element horizontally or vertically, it is generally better to use x and y rather than left and top. CSS transforms have less impact on layout calculation and render fractional values appropriately for smooth motion.
Specifying easing
Use the ease property to specify easing. Easing can be specified either as a string or as a function.
gsap.to(".target", {x :100, duration: 1, ease : "power4.out"});
If you specify it as a function, you need to import the easing function in the import statement when using ES Modules.
import {gsap, Power4} from "gsap";
gsap.to(".target", {x :100, duration: 1, ease: Power4.out});
The strength of easing is defined in levels such as "power1.out", "power2.out", "power3.out", and "power4.out". If the differences among quad, cubic, quart, and quint are unfamiliar, use the power1 through power4 levels instead.
| Easing strength | Alias |
|---|---|
linear |
none |
sine |
- |
quad |
power1 |
cubic |
power2 |
quart |
power3 |
quint |
power4, strong |
expo |
- |
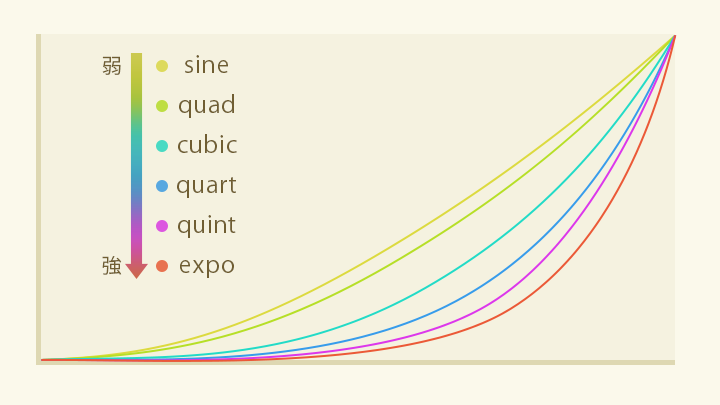
The character of the curve becomes stronger in the order Sine, Quad, Cubic, Quart, Quint, and Expo. For more details on the differences between easings, see Choosing ease in CSS.
You can choose from the following three patterns for acceleration and deceleration.
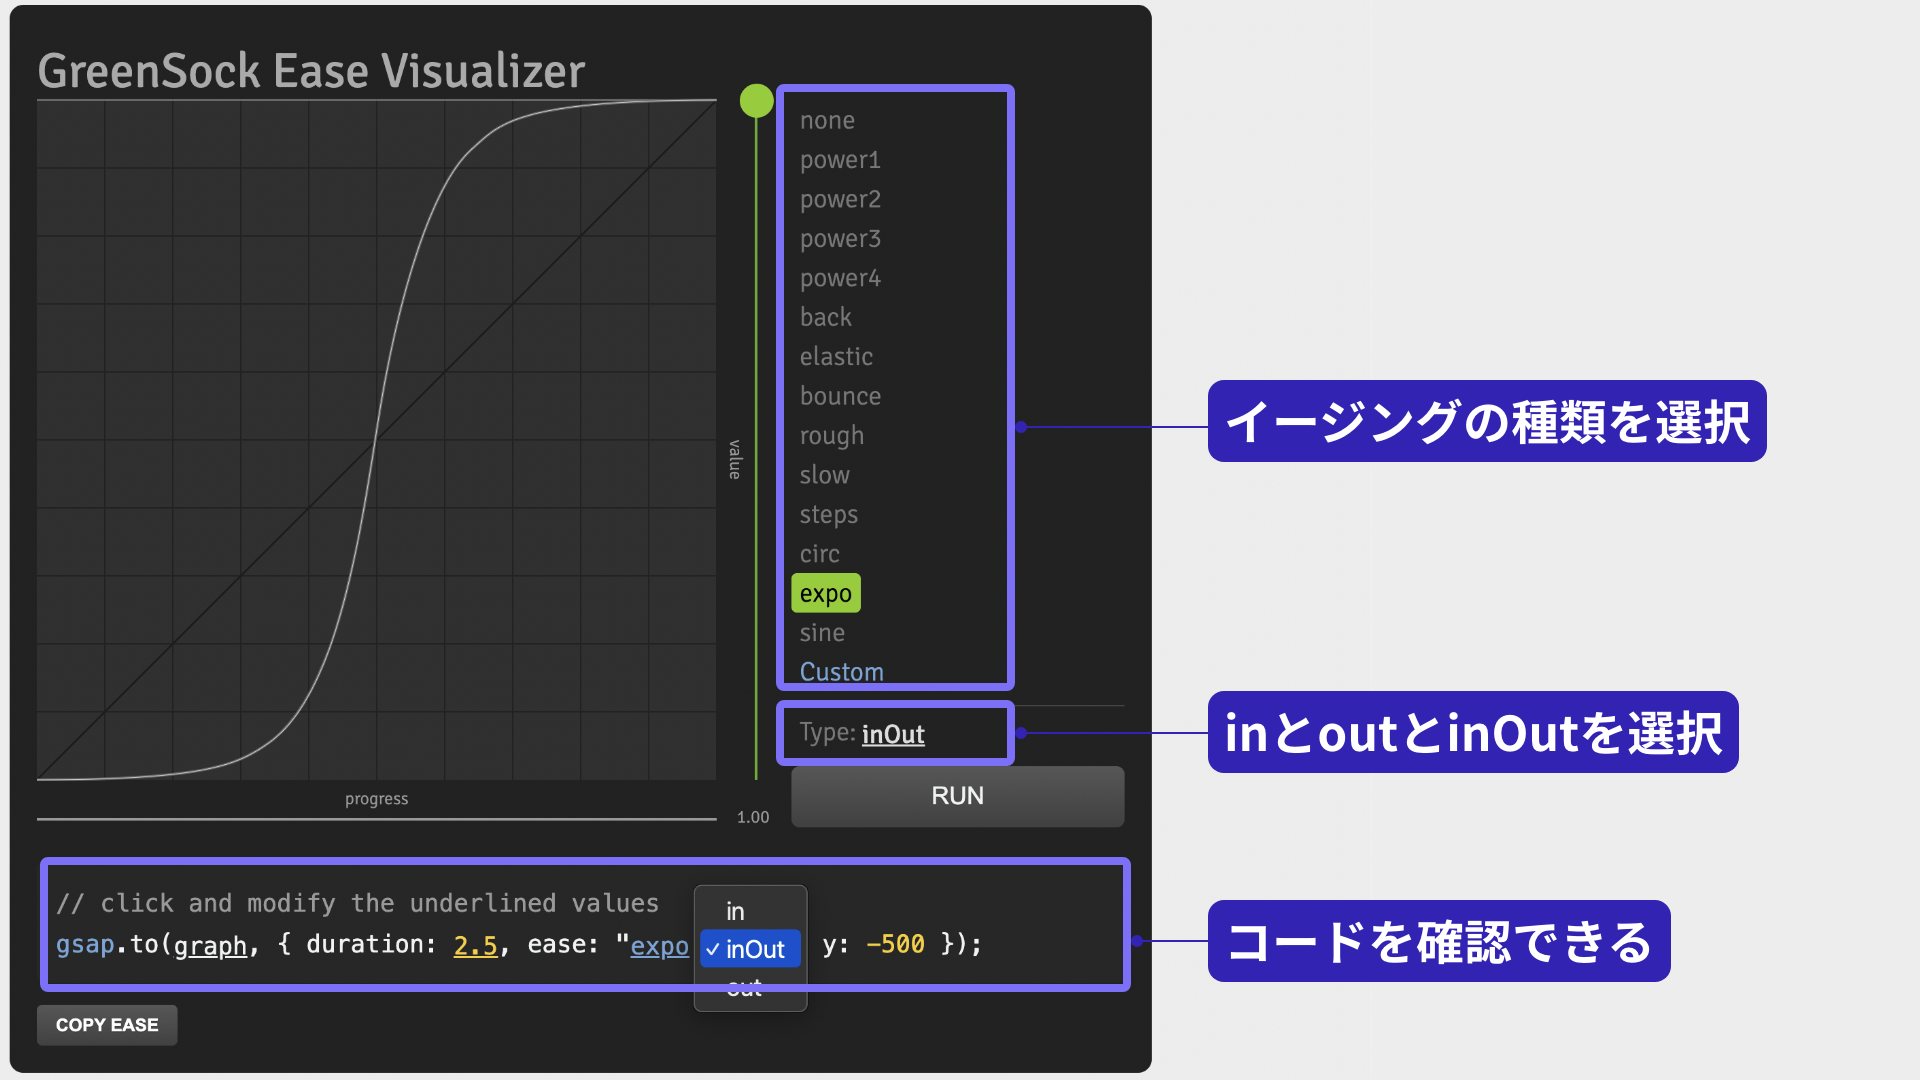
in: starts at the slowest speed, then acceleratesout: starts at the fastest speed, then deceleratesinOut: starts slowly, accelerates, then decelerates at the end
The official page GreenSock | Docs | Eases includes a tool for testing the strength of easing, so it’s worth trying.
Customizing easing
You can customize the intensity of back and elastic. Use parentheses inside the string (or use the function form).
// Overshoots and comes back
gsap.to(".rect", { duration: 2, ease: "back.out(4)", x: "75vw" });

// Springy motion
gsap.to(".rect", {
  duration: 2,
  ease: "elastic.out(1.2, 0.2)",
  x: "75vw",
});
Recommended easing
Personally, I recommend "power4.out". Here are a few common beginner patterns that lead me to say that.
- People are afraid of strong easing and choose weak easing instead, resulting in flat-looking motion.
- One place uses
power1.outwhile another usespower4.out, making the overall feel inconsistent. - People don’t really understand the difference between
expoandcirc, choose something at random, and end up with inconsistent motion.
Using stronger easing gives motion clearer contrast and reduces decision time during production. I still adjust the easing when needed, based on the object’s size, travel distance, and duration.
Different ways to call tweens
So far, I’ve mainly explained gsap.to(). to() specifies the state after the tween ends, but GSAP has several other methods as well.
from()
gsap.from(".target", { x: 100, duration: 1 });
The gsap.from() method animates from the specified start state to the current state. Static HTML is often coded to match the finished design. gsap.from() is useful for defining how far to offset that finished state for an entrance effect.
fromTo()
gsap.fromTo(".target", { x: 100 }, { x: 200, duration: 1 });
The gsap.fromTo() method lets you specify both the start and end states. It requires more arguments, but explicitly setting both ends makes behavior more stable. It is often used with the timelines covered in Part 2 and ScrollTrigger covered in Part 3.
set()
gsap.set(".target", { x:100 });
The gsap.set() method sets values instantly. Use it when you do not need tweening and want to apply CSS or property values immediately.
Staggered motion
With the stagger property, you can add delays across multiple targets so they appear one after another. “Stagger” means to arrange with offsets.
// Reveal with stagger
gsap.from(".rect", {
  y: 10,
  autoAlpha: 0,
  duration: 1,
  ease: "power4.out",
  stagger: 0.02, // Appear every 0.02 seconds
});
Using stagger together with position and opacity is useful for directing the viewer’s eye, as in the following example.
It’s also useful when moving a large number of objects. If you specify the stagger property as an object, you can configure it in more detail.
gsap.to(".rect", {
  y: "100vh",
  duration: 2,
  ease: "bounce.out",
  stagger: {
    each: 0.01, // Interval between items (seconds)
    from: "random" // Start in random order
  },
});
Grid-based staggering
If you specify stagger: { grid: "auto" }, GSAP can determine the starting point based on the elements’ layout positions.
// Apply in a grid pattern
gsap.from(".rect", {
  scale: 0,
  duration: 1,
  ease: "power4.out",
  stagger: {
    each: 0.05,
    from: "center", // From the center
    grid: "auto", // Start based on a grid
    ease: "power4.out", // Easing applied across the offsets
  },
});
Conclusion
You may be surprised by how easy GSAP is to use! In particular, staggered timing lets you create engaging motion with very little code.
Part 2 covers timelines, an essential tool for building complex motion.