In the previous article, “HTMLの標準機能で作るフォームバリデーション”, we explained how to implement form validation using HTML features. As discussed there, HTML alone can be used to build highly capable forms. By combining HTML with JavaScript, however, you can build even more advanced forms. You can also expect an improved developer experience.
This article explains how to build practical forms using three libraries:
- The UI library React
- The form library React Hook Form
- The schema validation library Zod, which works well with type systems
We will also use TypeScript, a statically typed language, together with these libraries to build robust forms.
By reading this article, you will learn how to:
- Create forms with a good user experience (UX) on the form screen and a good developer experience (DX) during implementation
- Manage form values programmatically, making it easier to support complex requirements and find bugs
- Define schemas and validate input values
- Implement complex validation logic
This article introduces form implementation techniques that have been developed in the front-end ecosystem. The content is slightly more advanced than the previous article, but it should help improve your skills.
Note: The sample code in this article uses TypeScript 6, React 19, and Zod 4.
Forms with React
UI frameworks and libraries are widely used in front-end development. There are many options, including React, Vue.js, and Svelte. This article uses React, one of the most widely used UI libraries.
This article does not explain React itself. See the official documentation as needed. Here is sample code for implementing a form with React.
Example: validation on the onBlur event
export const ReactSimpleFormSample = () => {
  const [value, setValue] = useState("");
  const [error, setError] = useState("");

  // When text is entered
  const onChange = (e: ChangeEvent<HTMLInputElement>) => {
    setValue(e.target.value);
  };
  // Event fired when focus leaves the field
  const onBlur = (e: ChangeEvent<HTMLInputElement>) => {
    // Receive the validation result
    const result = validate(e.target.value);
    setError(result);
  };
  // On submit
  const onSubmit = (e: FormEvent<HTMLFormElement>) => {
    e.preventDefault();
    // Receive the validation result
    const result = validate(value);
    // Show the error message if validation fails
    if (result !== "") {
      setError(result);
      return;
    }
    // Form submission processing
    // This is temporary processing. Customize it for your use case.
    window.alert(value);
  };

  return (
    <form onSubmit={onSubmit}>
      <input
        type="text"
        name="nickname"
        value={value}
        onChange={onChange}
        onBlur={onBlur}
      />
      {error !== "" && <p>{error}</p>}
      <button type="submit">submit</button>
    </form>
  );
};
Validation function
// Validation function
const validate = (value: string) => {
  if (value.length === 0) {
    return "Please enter text";
  }
  return "";
};
The validation function runs on the onBlur event. If the value does not meet the condition, the function returns an error message. In this example, validation fails when no text has been entered. When the error is received, the error message is displayed in the form.
Here is the flow of the process.
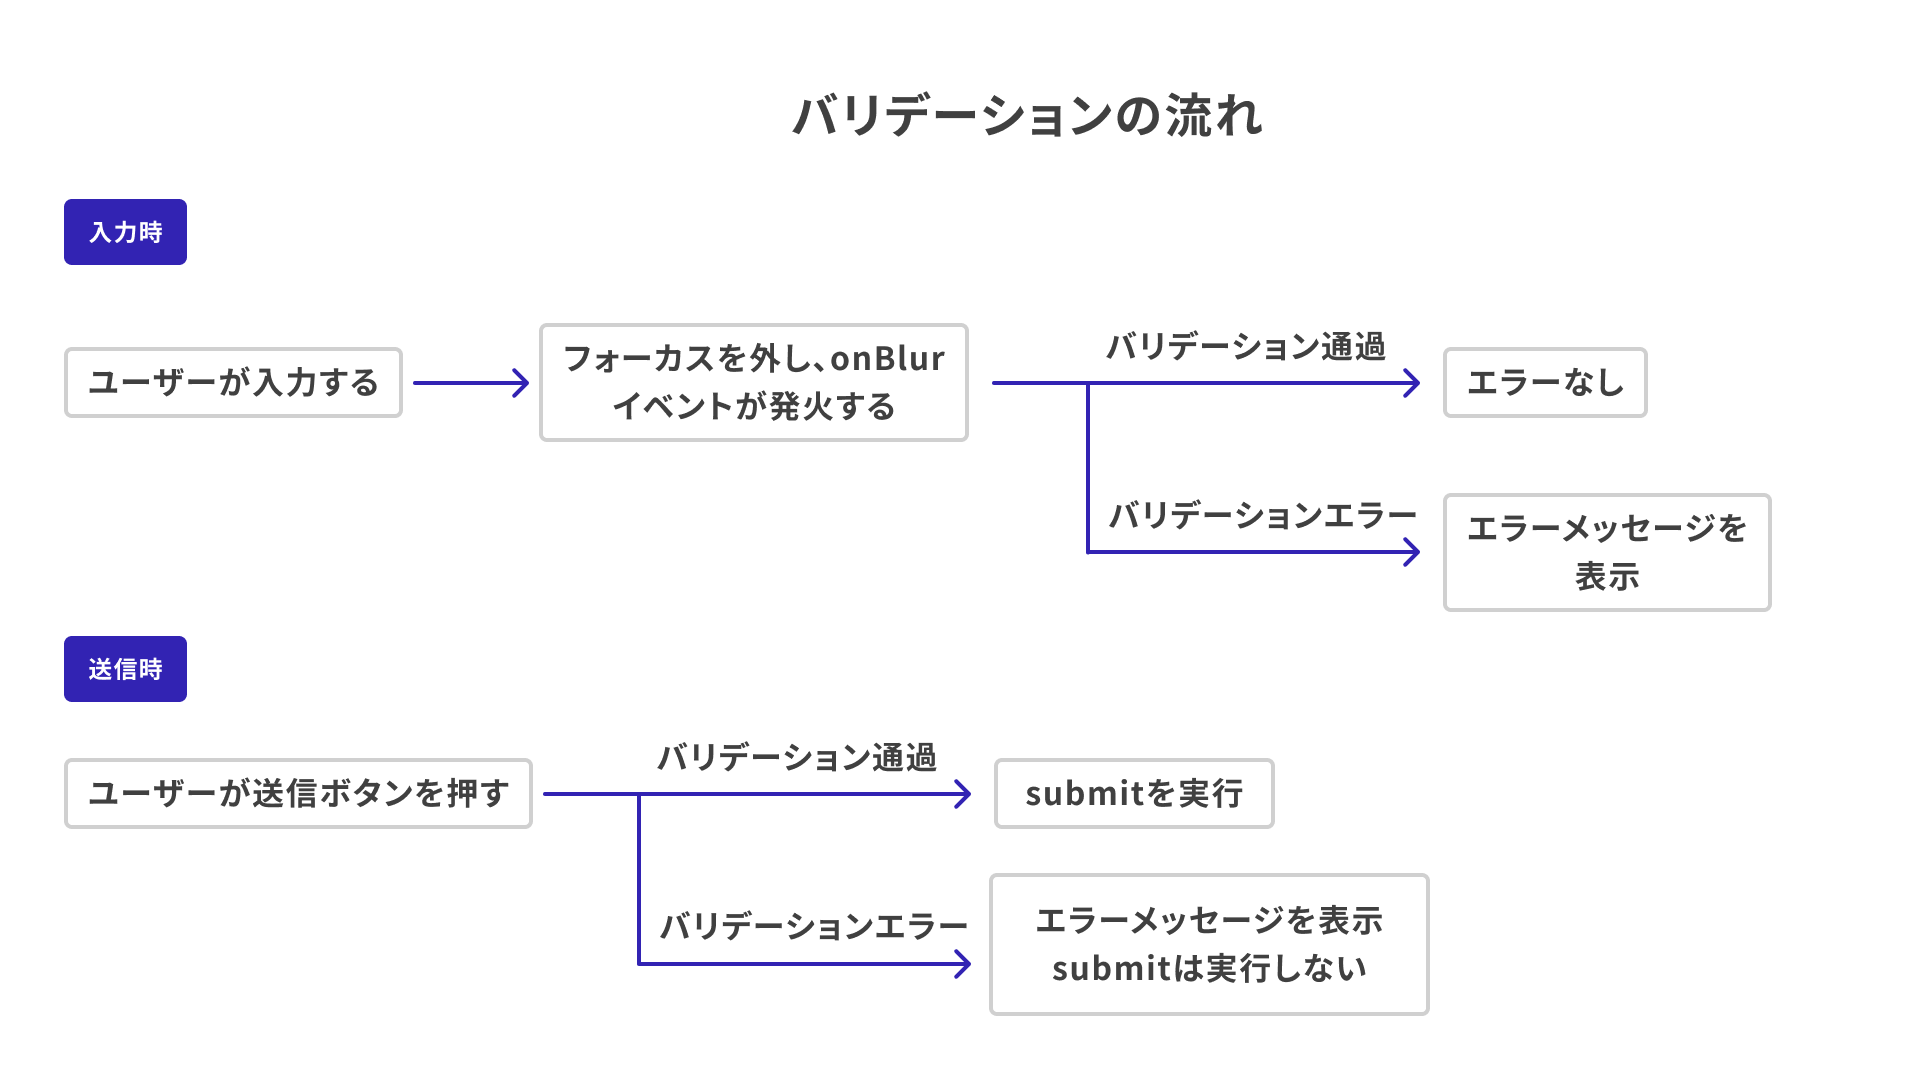
One major advantage of using JavaScript is that you can freely choose what to validate and when validation runs. For example, if validation is moved from the onBlur event to the onChange event, validation runs on every user input event.
Creating forms with React Hook Form
Many libraries have been created in the React community to make form implementation more efficient. This article introduces one of the most widely used options, React Hook Form.
React Hook Form top page

When you open the React Hook Form top page, a 30-second introductory video is displayed. That video, along with the video under “Get Started > React Web Video Tutorial,” is useful for understanding the library’s features. This article introduces representative usage examples.
How to use React Hook Form
Let’s implement a simple form with React Hook Form. This example builds a form for entering a name and age.
// Form type definition
type FormData = {
  nickname: string;
  age: number;
};

export const ReactHookFormSample = () => {
  const {
    register,
    formState: { errors },
    handleSubmit,
  } = useForm<FormData>({ mode: "onTouched" });

  const onSubmit = handleSubmit((data) => {
    // Form submission processing
  });
  return (
    <form onSubmit={onSubmit}>
      {/* Name input */}
      <div>
        <label>
          Name
          <input
            type="text"
            {...register("nickname", { required: "Please enter text" })}
          />
        </label>
        {/* Show the message if there is a validation error */}
        {errors.nickname && (<p>{errors.nickname.message}</p>)}
      </div>
      {/* Age input */}
      <div>
        <label>
          Age
          <input
            className="input"
            type="number"
            {...register("age", {
              required: "Please enter your age",
              min: {
                value: 12,
                message: "Please enter an age of 12 or older",
              },
              valueAsNumber: true,
            })}
          />
        </label>
      </div>
      <div>
        <button type="submit">submit</button>
      </div>
    </form>
  );
};
The most important function in React Hook Form is the useForm() hook. It returns many values that you can use as needed. This article introduces the most common ones.
The register() function is an important function for handling form input values inside useForm(). In the following implementation, a form control with the name attribute "nickname" is registered with React Hook Form.
The second argument of register() can also receive options such as validation rules. Attributes that also exist in HTML, such as min and pattern, can be specified as validation rules, and error messages can be configured as well.
The register() function returns props for the input element as an object. You can expand that object with the spread operator and pass it as props.
<input
  {...register("nickname", { required: "Please enter text" })}
/>
The official documentation also provides a helpful explanation video.
Form values connected by the register() function are used in the return value of the useForm() hook. For example, the errors field of the formState object lets you access properties for form controls that currently have validation errors.
Using the sample code as an example, if the "nickname" field with the required rule is left empty, you can access information about “which error occurred” and the “error message.”
errors.nickname.type:"required"errors.nickname.message:"Please enter text"
You can use this information to display the appropriate validation error message.
The handleSubmit() function is a wrapper for the onSubmit event that makes form values easier to handle. It receives the form input values as its argument and does not run when the form has validation errors.
React Hook Form is a library that lets you write forms simply while making input values easier to handle.
Validation timing
The object passed to the useForm() hook has a mode field. This field specifies when validation runs. It provides familiar event names such as onSubmit and onBlur. You can also use the onTouched value, which appeared in the earlier example.
For a form with onTouched specified, validation runs on the first blur event (onBlur). After that, validation fires on every change event (onChange). This is one of the properties that can improve the user experience, so it is worth remembering.
Integration with types
Next, let’s look at how React Hook Form integrates with TypeScript. In the example, the form input values are defined with a type called FormData, which is passed as a generic type to the useForm() function. Defining the type here provides several benefits.
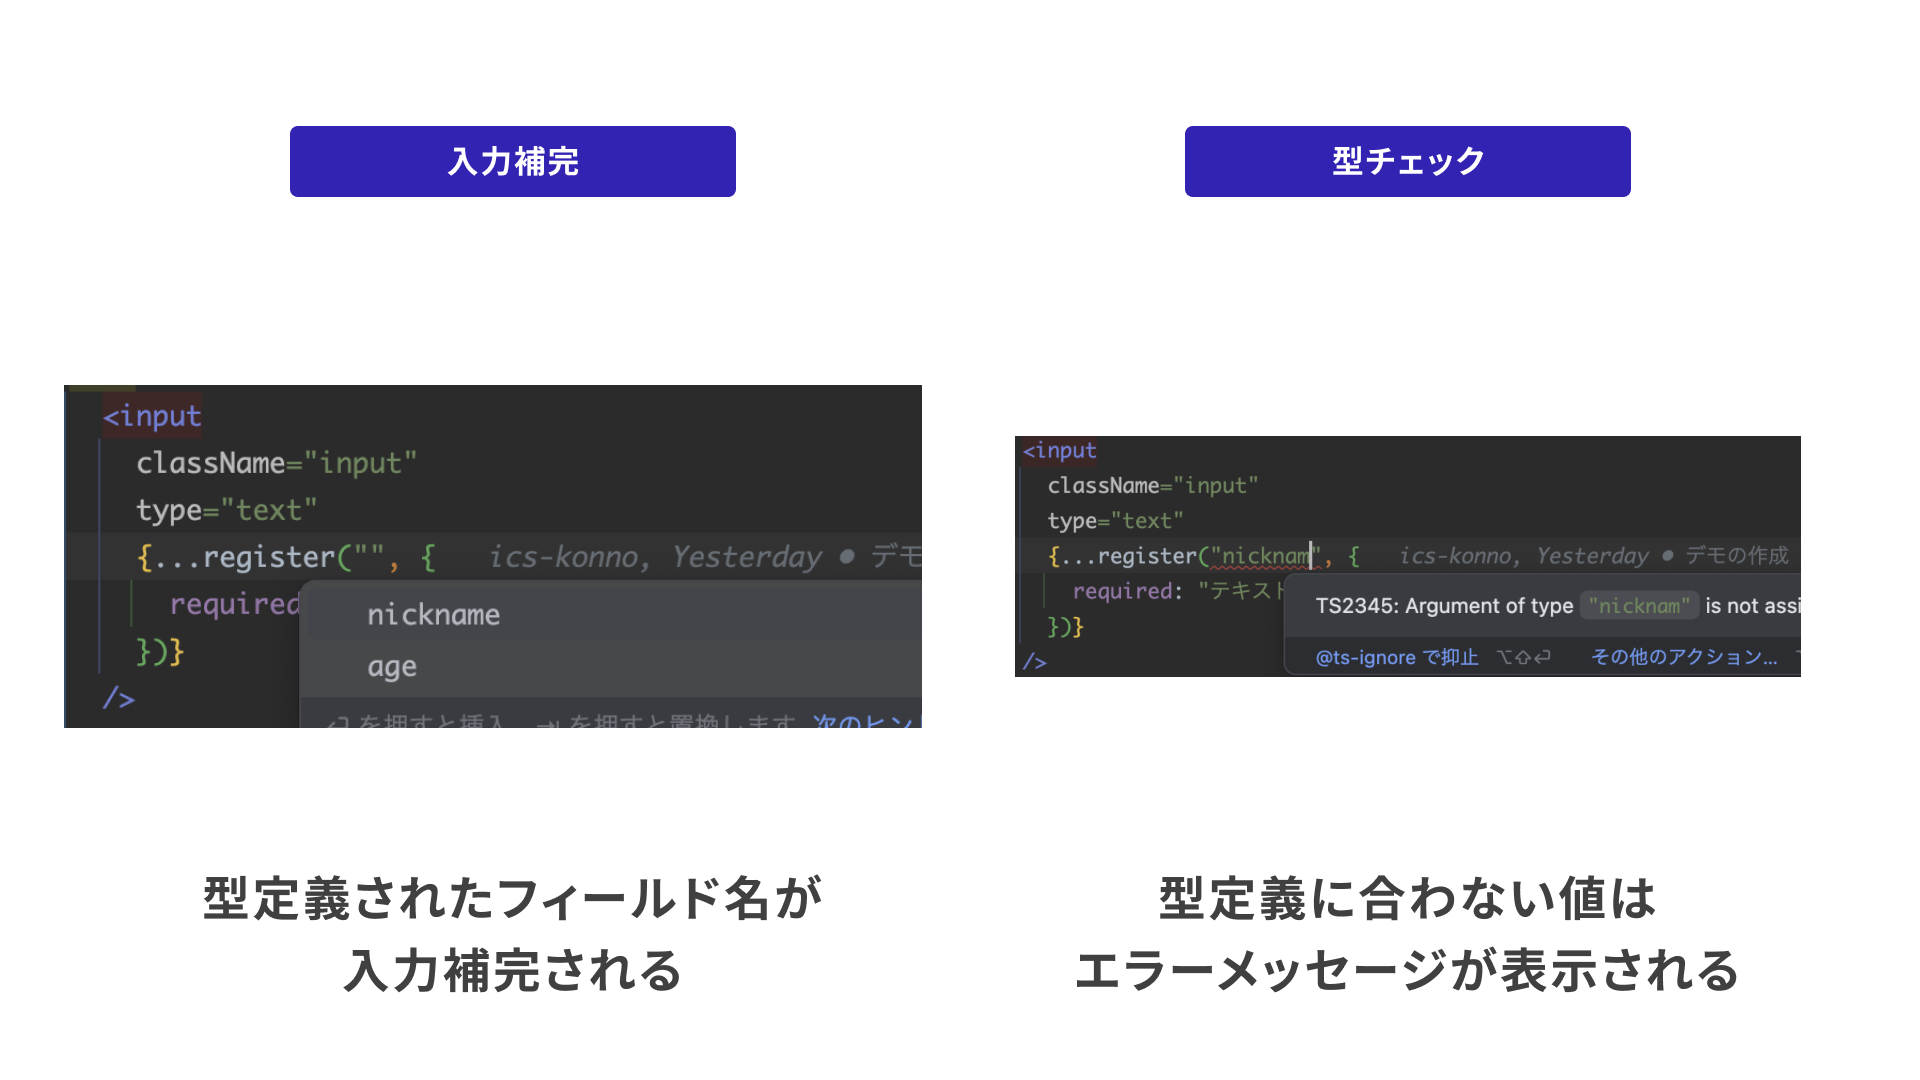
First, the names passed to the register() function are type-checked. If you pass a name that is not defined in the type, TypeScript reports an error, which helps prevent typos.
Type completion also works for the errors object and the argument of handleSubmit(), improving development efficiency and the developer experience.
Many developers think TypeScript is difficult, but it provides many advantages, including fewer bugs and more efficient development.
Schema validation
So far, validation has been written using JavaScript functions. Functions let you implement flexible validation with complex branching logic, but they can also reduce readability and make changes harder. When you want to define validation rules in a format similar to a single object, a schema is useful.
The following is an example schema using Zod, a schema validation library for TypeScript.
const schema = z.object({
  /** Name */
  name: z.string().min(1, { error: "Please enter your name" }),
  /** Age */
  age: z
    .pipe(
      z.number({ error: "Please enter your age using digits" }),
      z.int({ error: "Please enter your age as an integer" }),
    )
    .refine((n) => n >= 12, { error: "Please enter an age of 12 or older" }),
  /** Email address */
  email: z
    .union([
      z.email({ error: "Please enter a valid email address" }),
      z.literal(""),
    ])
    .optional(),
});
A schema is defined for each field, then the fields are combined into a single object with the z.object() method. The specific validation definitions for each field are explained later.
To integrate this schema with React Hook Form, pass a resolver to the useForm() hook. Since this example uses Zod, set zodResolver with the schema defined above. Resolvers are also available for schema libraries other than Zod, such as Yup and Joi.
Zod also provides a useful utility type called z.infer, which extracts a type from a schema. This type can be passed as the generic type for useForm().
// Generate a type from the schema
type Inputs = z.infer<typeof schema>;

export const SchemaFormSample = () => {
  const {
    register,
    handleSubmit,
    formState: {errors},
  } = useForm<Inputs>({
    mode: "onTouched",
    resolver: zodResolver(schema), // Add the resolver
  });
  const onSubmit = handleSubmit((data) => {
    // Form submission processing
  });
  return (
    <form onSubmit={onSubmit}>
      <div>
        <label>
          Name
          <input type="text" {...register("name")} />
        </label>
        {errors.name && <p>{errors.name.message}</p>}
      </div>
      <div>
        <label>
          Age
          <input
            type="number"
            {...register("age", { valueAsNumber: true })}
          />
        </label>
        {errors.age && <p>{errors.age.message}</p>}
      </div>
      <div>
        <label>
          Email address
          <input type="email" {...register("email")} />
        </label>
        {errors.email && (<p>{errors.email.message}</p>)}
      </div>
      <div>
        <button type="submit">submit</button>
      </div>
    </form>
  );
};
With only this setup, you have a form with robust type support and validation. Compared with writing validation functions yourself, schemas are easier to read because they are written in an object-like format, and they work well with the type system.
Various Zod schemas
Let’s look at the specific validation details of the Zod schemas for each field that were not covered above.
Schemas such as z.string(), z.number(), and z.int() validate primitive types. You can then chain schemas for each type. In Zod 4, using the top-level z.int() is recommended for integer validation instead of z.number().int().
Chaining .min(1) requires at least one character, which means it can be used for required-field validation. You can also define a custom validation message with the error field.
/** Name */
z.string().min(1, { error: "Please enter your name" });
For numeric schemas, validation is available for integers, minimum values, and maximum values. When you want to first check that the value is a number and then narrow it to an integer, connect z.number() and z.int() with z.pipe(). Use .refine() to check the minimum value.
In the following example, entering a decimal value such as 12.4 displays the message “Please enter your age as an integer.” Entering an integer below 12 displays the message “Please enter an age of 12 or older.”
/** Age */
z
  .pipe(
    z.number({ error: "Please enter your age using digits" }),
    z.int({ error: "Please enter your age as an integer" }),
  )
  .refine((n) => n >= 12, { error: "Please enter an age of 12 or older" });
In simpler cases where only integers are handled, you can chain directly from z.int(), as in z.int().gte().
z.int({ error: "Please enter your age as an integer" }).gte(12, { error: "Please enter an age of 12 or older" });
Sometimes a value only needs to satisfy one of two schemas. In that case, the z.union() schema is useful. The following example defines a schema for “either an empty string or a string in email address format.” Add .optional() if you also want to allow no input (undefined).
/** Email address */
z.union([
  z.email({ error: "Please enter a valid email address" }),
  z.literal(""),
]).optional();
For strings, Zod provides top-level format validators such as z.email() and z.url(). You can also define your own schemas with method chaining, such as .startsWith(), or with regular expressions.
The benefit of schemas is that the specification becomes clear and easy to understand. Schema validation is a technique that supports development in both individual projects and large-scale team projects.
Complex form validation
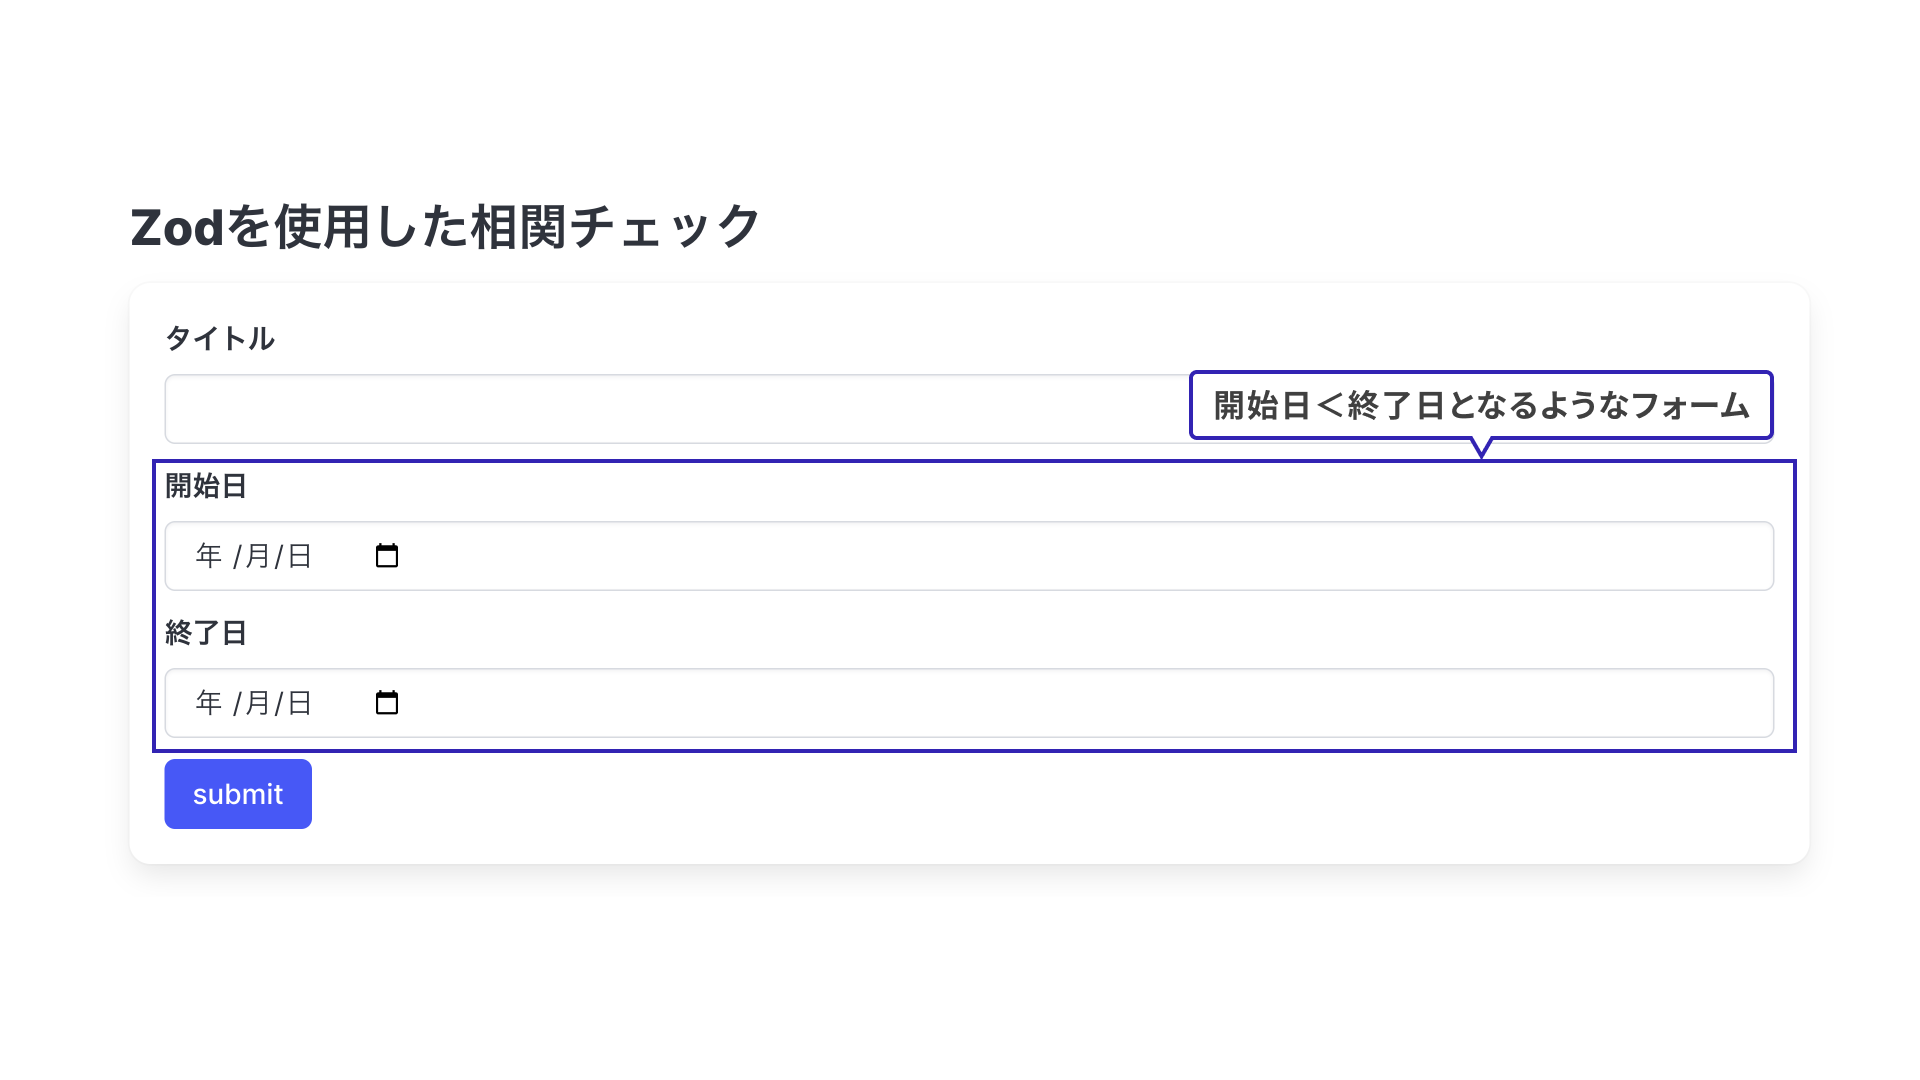
The validation introduced so far has applied to individual input fields. In real applications, however, you may also need validation that spans multiple input fields.
Consider a date input form that compares a start date and an end date, as shown below.
Creating the schema
This form defines the condition that the “start date” must be earlier than the “end date.” Validation that compares multiple input values like this is called cross-field validation. Zod can also create schemas for cross-field validation, so let’s look at an example.
const dateSchema = z
  .object({
    startDate: z.iso.date({ error: "Please enter a date" }),
    endDate: z.iso.date({ error: "Please enter a date" }),
  })
  .refine((arg) => new Date(arg.startDate) < new Date(arg.endDate), {
    error: "Enter an end date later than the start date",
    path: ["endDate"],
  });
Since the input should be in date format, this example uses the z.iso.date() schema. The following .refine() schema performs validation on the entire object schema. The first argument is a validation function, and you can access each field from that function’s argument. In this case, startDate only needs to be smaller than endDate, so the comparison is written there.
The second argument defines the validation error message and “which field the validation applies to.” In other words, if this validation fails, it is treated as a validation error on the endDate field.
Connecting the schema to the form
Next, let’s look at how to combine the cross-field validation schema with React Hook Form. When combining it with form fields other than date inputs, nest it inside the overall schema.
const schema = z.object({
  // Title schema
  title: z.string().min(1, { error: "Please enter a title" }),
  // Date schema
  date: dateSchema,
});

type Inputs = z.infer<typeof schema>;
To access a nested schema, use a child property path such as date.startDate. Type completion also works here.
The cross-field validation is now complete. Here is the actual behavior and code.
export const CorrelationCheckSample = () => {
  const {
    register,
    handleSubmit,
    formState: { errors },
  } = useForm<Inputs>({
    resolver: zodResolver(schema),
    mode: "onTouched",
  });
  const onSubmit: SubmitHandler<Inputs> = (data) => {
    // Form submission processing
  };
  return (
    <form onSubmit={handleSubmit(onSubmit)}>
      <div>
        <label>
          Title
          <input type="text" {...register("title")} />
        </label>
        {errors.title && (<p>{errors.title.message}</p>)}
      </div>
      <div>
        <label>
          Start date
          <input
            type="date"
            {...register("date.startDate")}
          />
        </label>
        {errors.date?.startDate && (
          <p>{errors.date.startDate.message}</p>
        )}
      </div>
      <div>
        <label>
          End date
          <input
            type="date"
            {...register("date.endDate")}
          />
        </label>
        {errors.date?.endDate && (
          <p>{errors.date.endDate.message}</p>
        )}
      </div>
      <div>
        <button type="submit">submit</button>
      </div>
    </form>
  );
};
More careful input validation
Cross-field validation has now been implemented, but in the following case, the error message does not disappear even if the form has become valid.
- Enter a start date.
- Enter an end date earlier than the start date, causing an error message to appear.
- Change the start date to a date earlier than the end date.
This happens because the validation target is set to endDate, so validation does not run when the start date changes. To run validation when startDate is entered as well, use the trigger() function returned by the useForm() hook.
The trigger() function runs validation for a specified field. Use it in the input event for the start date field.
export const CorrelationCheckSample = () => {
  const {
    register,
    handleSubmit,
    formState: { errors },
    trigger, // Run validation
    getValues, // Get input values
  } = useForm<Inputs>({
    resolver: zodResolver(schema),
    mode: "onTouched",
  });
  const onSubmit: SubmitHandler<Inputs> = (data) => {
    // Form submission processing
  };
  return (
    // Some code omitted
    <div>
      <label>
        Start date
        <input
          type="date"
          {...register("date.startDate")}
          // Also run the cross-field validation when the start date is entered
          onBlur={() => {
            if (getValues("date.endDate") !== "") {
              trigger("date.endDate");
            }
          }}
        />
      </label>
      {/* End date */}
      {/*...*/}
    </div>
  );
};
On onBlur, if the end date (endDate) has already been entered, validation runs. If validation passes, the error message disappears.
Building a better user experience sometimes requires fine-tuned behavior like this. The ability to make these adjustments is one of JavaScript’s strengths.
Form handling in React 19
React 19 expanded support around form Actions.
A form does not end when the user finishes entering values. The values are sent to the server, and processing is completed after the correct response is returned. Because this is asynchronous, the implementation also needs mechanisms such as UI that indicates submission is in progress and handling for failed submissions. React 19 provides features that make these implementations easier.
- Pending state: Provides state that indicates whether a request is in progress.
- Optimistic updates: Lets you display values “as if the request had succeeded” until the request completes.
- Error handling: Provides fallback display for failed requests and can revert optimistic updates.
- Form Actions: The
actionprop on a form can receive a function, not only a URL.
Implementations that developers previously had to handle themselves can now be handled by library features.
For specific details, see the official React blog article.
Conclusion
This article explained how to implement form validation using React and its ecosystem. React has continued to evolve in recent years. It is no longer only a UI library; it has become something closer to a complete package that also involves server-side concerns. React 19 forms introduce new mechanisms that account for interaction with the server, and common assumptions about form implementation will likely continue to change.
React’s appeal comes not only from React itself, but also from its large community and rich ecosystem. As React evolves, related libraries evolve with it, and increasingly high-quality tools continue to appear.
This article also introduced schema validation as a technology outside React itself. Schema validation is useful not only for forms, but also for data exchange in contexts such as API communication. It is a broadly useful and important technique, so this is a good opportunity to try it.
Across the previous article and this article, we introduced validation with HTML and validation with JavaScript. JavaScript-based validation is attractive because it is easier to test and easier to divide work across roles. For example, one person can build the appearance with CSS while another person builds the form logic, allowing both tasks to proceed in parallel.
However, the right technology depends on the project scale and the strengths of the development team. The simple writing style of HTML is easy for a wide range of engineers to adopt, and HTML validation is also becoming increasingly powerful. Choosing the appropriate technology for the situation is important.
Keep up with current technologies and build better user experiences and developer experiences.