Electron is a technology for creating desktop applications with web technologies. You can develop apps with HTML, CSS, and JavaScript, and build applications for both Windows and macOS from a single codebase. Electron has attracted growing attention in recent years, and well-known companies such as Microsoft and GitHub have adopted it.
Electron applications run on Chromium, the open-source browser project that Chrome is based on, and Node.js. A key feature of Electron is that it can run web content as an application while also adding desktop app features that cannot be implemented in a browser alone.
Electron can be used for smaller apps such as text editors, utility apps, and design tools, as well as client tools for intranets, installations, and digital signage.
This article introduces Electron and explains the steps required to create a desktop application.
Note: This article covers Electron 42.3.0 and Node.js 24.
Introducing Electron and apps that use it
Electron is a framework for creating desktop applications for Windows, macOS, and Linux. With Electron, content built with web technologies such as HTML, CSS, and JavaScript can be turned into a desktop application. Another major advantage is that you can develop applications for multiple operating systems from one codebase.
Examples of apps that use Electron include Visual Studio Code by Microsoft, Slack, Discord, and the Figma desktop app. Since Electron is used by major companies, adopting it tends to feel less risky.
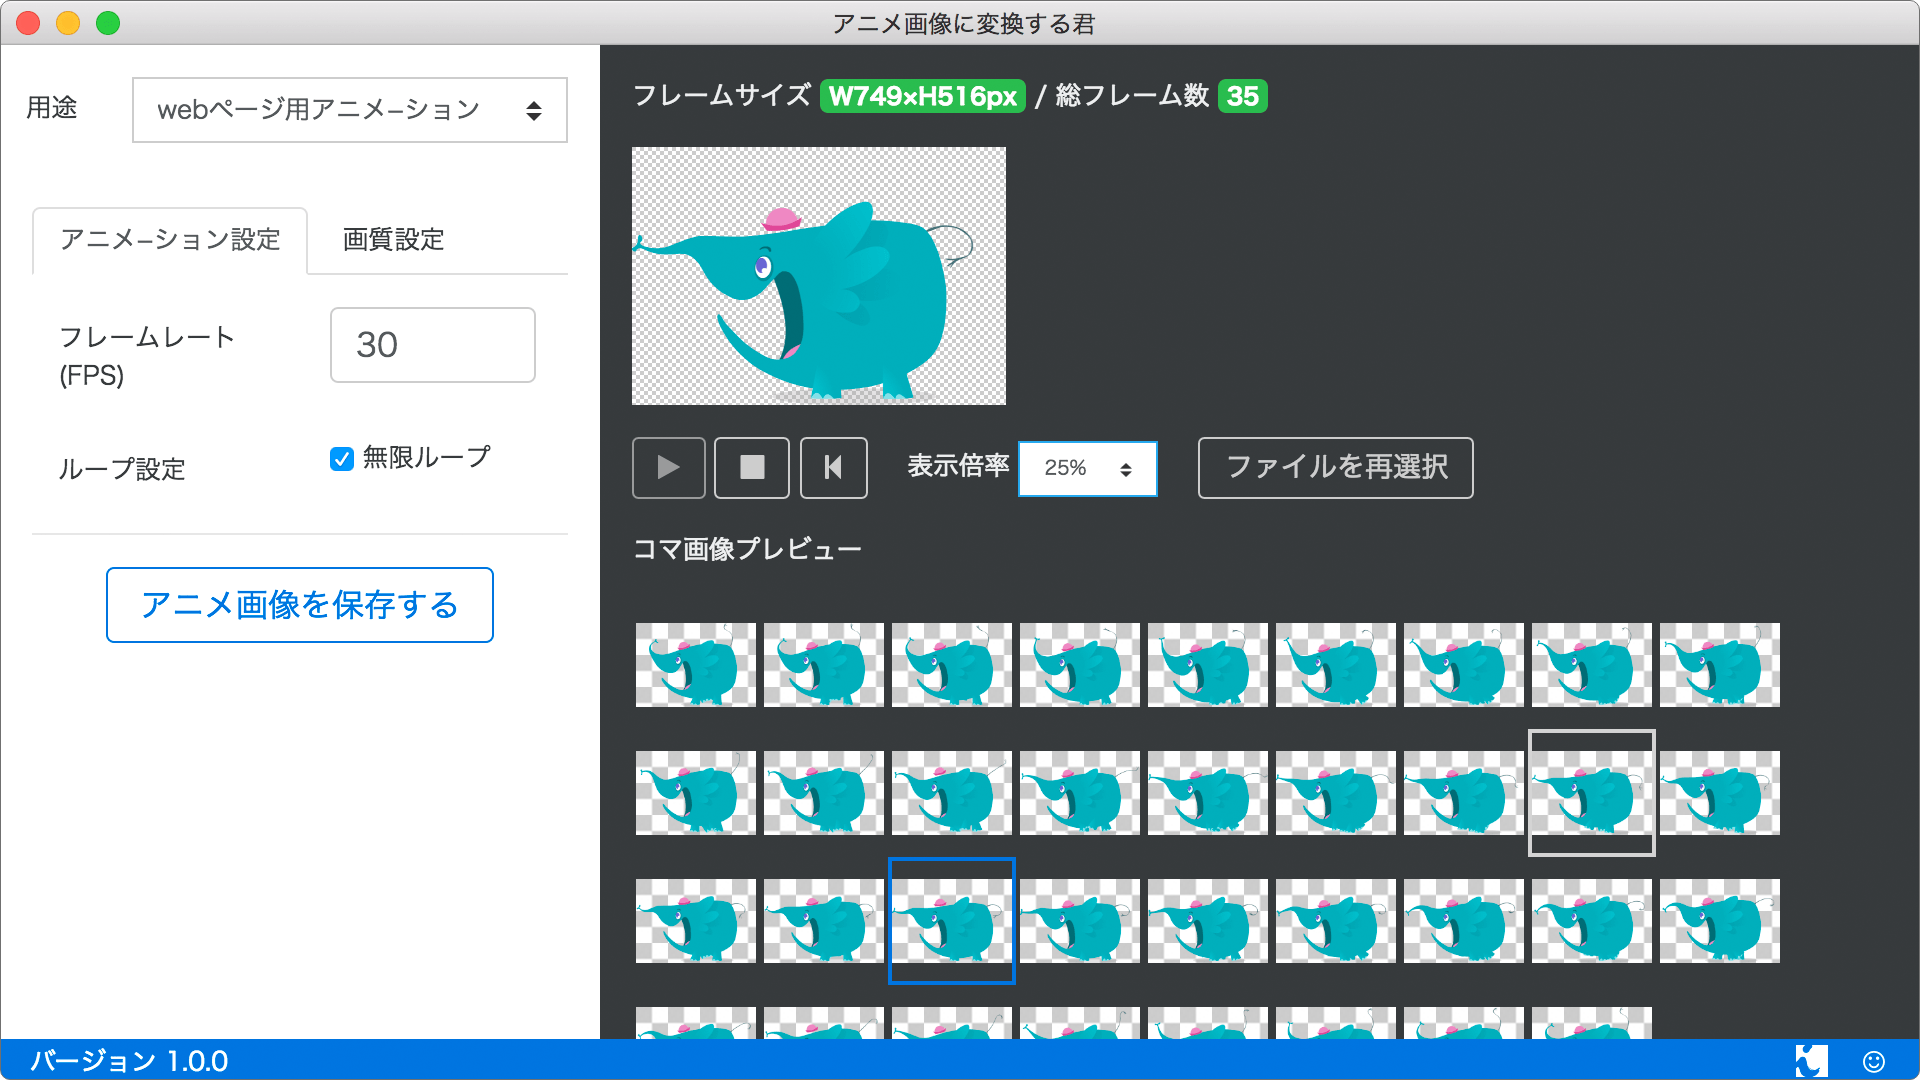
At ICS, we developed アニメ画像に変換する君, a tool for creating LINE animated stickers. The app’s Japanese name roughly means “Image Animation Converter.” It is one of the few examples in Japan of an Electron app published on both the Mac App Store and the Microsoft Store.
An image conversion tool for APNG and WebP images:
For more examples of applications built with Electron, see Awesome Electron.
Now let’s build a desktop application and learn the development workflow.
Create a desktop app with Electron
Let’s create a desktop application with Electron. The only thing you need in advance is a macOS or Windows computer. The steps use the command-line tool that comes with each operating system.
The sample used in this article is also available on GitHub. Refer to it when checking the steps.
1. Install Node.js
To develop with Electron, you need npm, the package manager for Node.js. Start by installing Node.js. Once Node.js is installed, the npm command becomes available.
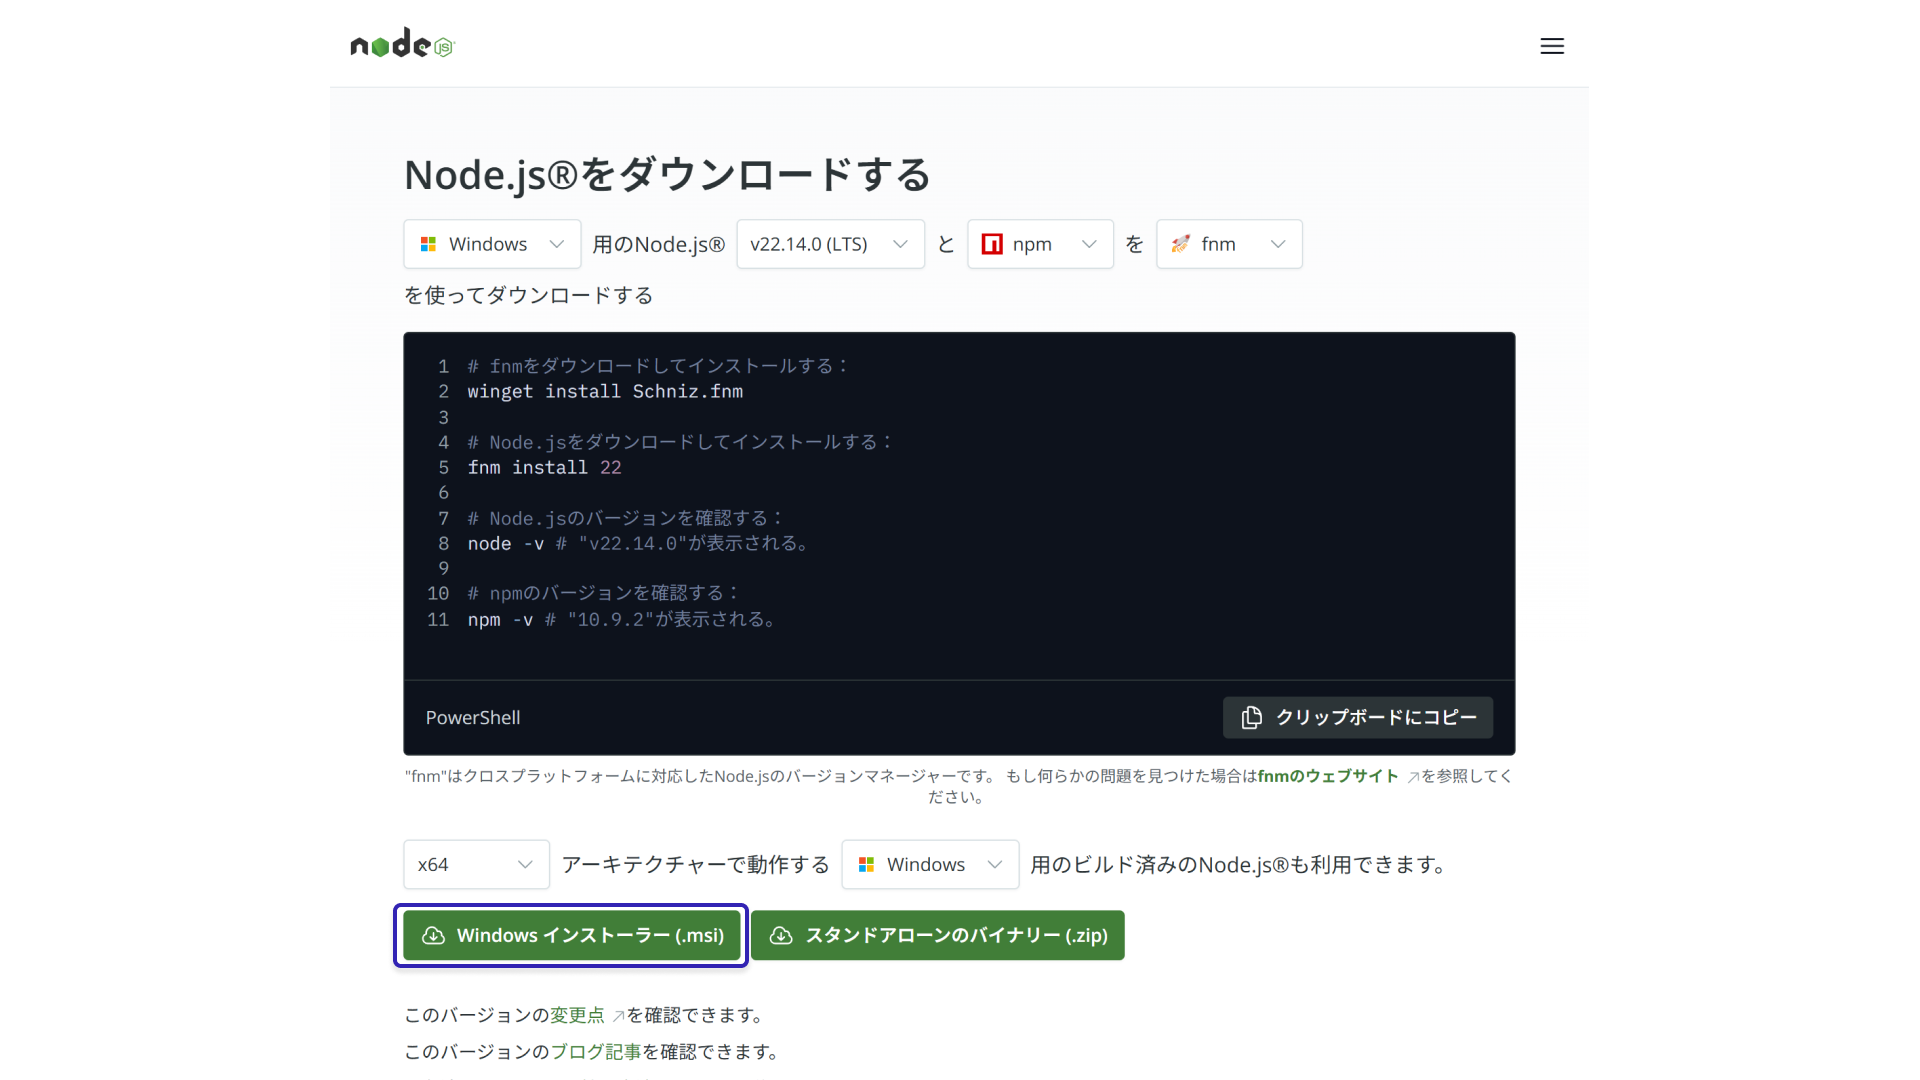
Node.js can be downloaded for free from the official website.
2. Create a project folder
Create any folder. In this article, the folder is called sample-electron. Open the command line, Command Prompt on Windows or Terminal on macOS, and run the following command. Running this command creates a package.json file.
npm init -y
Example output:
{
  "name": "electron-sample",
  "version": "1.0.0",
  "main": "index.js",
  "scripts": {
    "start": "echo \"Error: no test specified\" && exit 1"
  },
  "keywords": [],
  "author": "",
  "license": "ISC",
  "description": ""
}
3. Install Electron
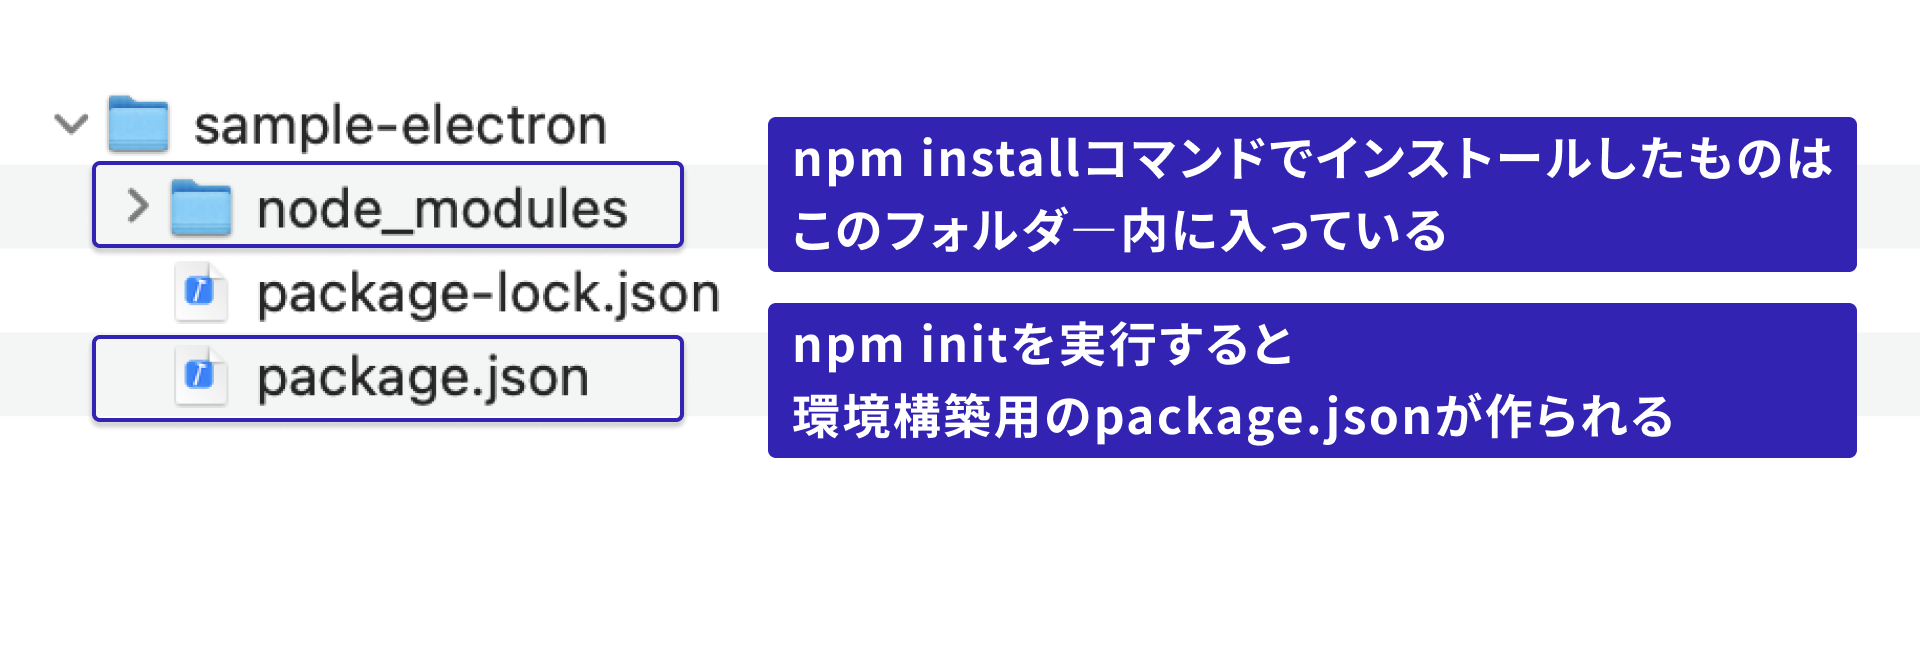
Next, install Electron locally. This also creates the node_modules folder and the package-lock.json file.
npm install -D electron
Some tutorials explain how to install Electron globally with the -g option, but that approach is not recommended. A global installation makes it harder to use different Electron versions for different projects, and it can also cause version mismatches between developers. It is better to set up the environment per project folder.
4. Prepare the files for running the application
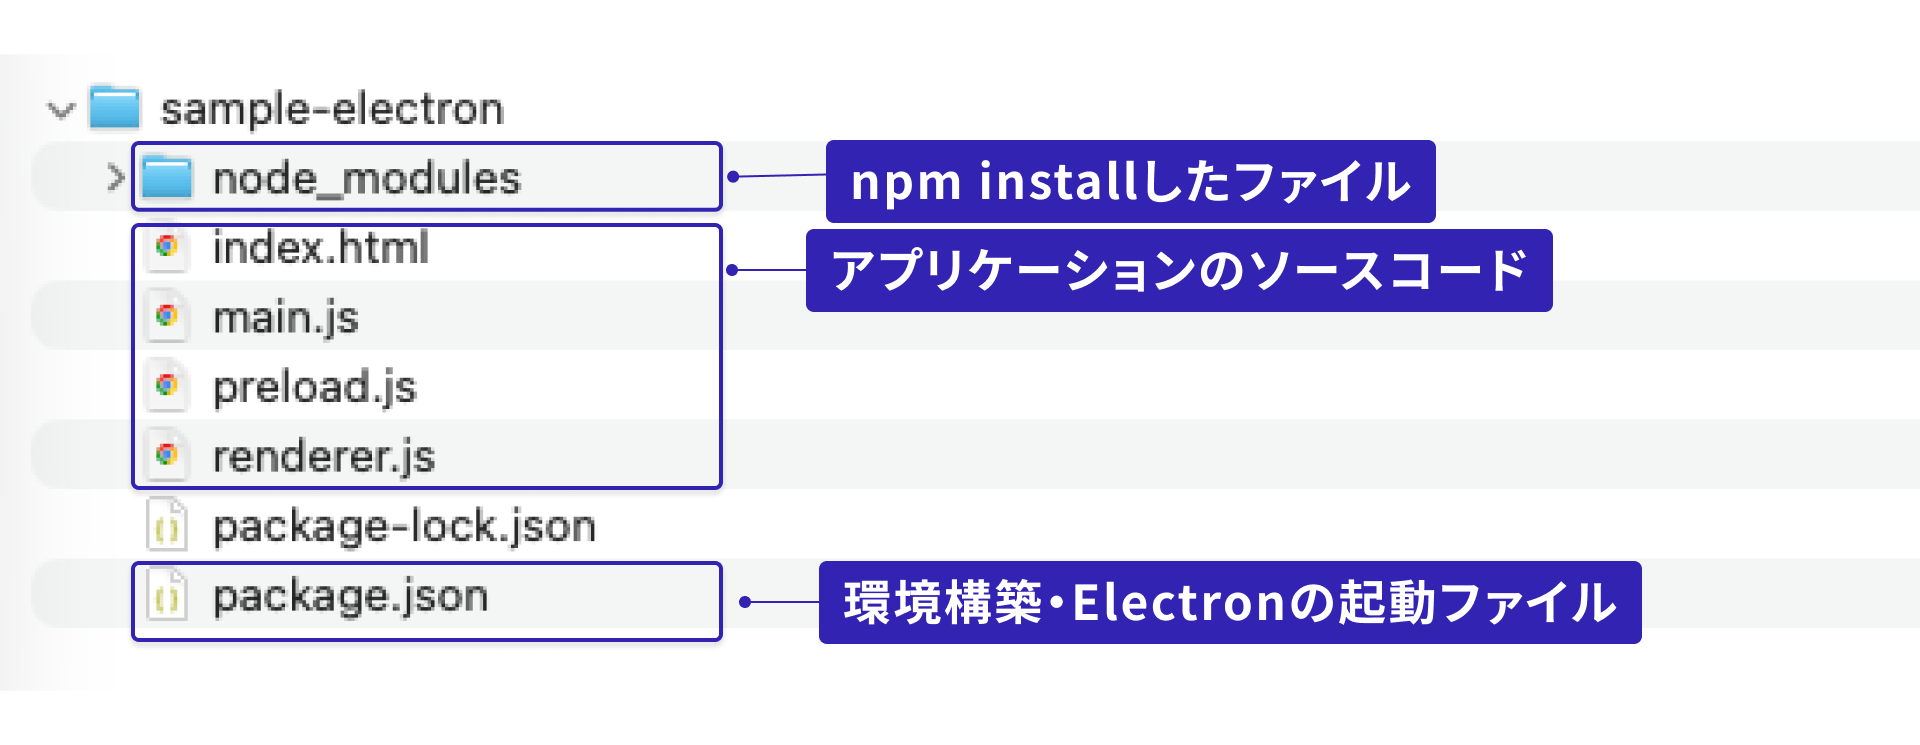
To create the application, edit package.json and prepare four files. The following section explains the role of each file.
package.json is required to run Electron. Rewrite package.json and specify the JavaScript file that will serve as the entry point.
The package.json file:
{
  "name": "electron-sample",
  "version": "1.0.0",
  "main": "main.js", // Replace this with the entry file, "main.js"
  ...
}
JSON files cannot include comments, so do not include the text after // in the actual file.
main.js is the JavaScript entry point, meaning the starting point for application execution. From this file, we will implement the logic that opens the application window.
The main.js file:
// Load the modules required to create the application.
const { app, BrowserWindow } = require("electron/main")
const path = require("node:path")

// Main window.
let mainWindow;

const createWindow = () => {
  // Create the main window.
  mainWindow = new BrowserWindow({
    width: 800,
    height: 600,
    webPreferences: {
      // Securely expose APIs to the renderer process with a preload script.
      preload: path.join(__dirname, "preload.js"),
    },
  });

  // Specify the URL to display in the main window.
  // In this example, index.html is in the same directory as main.js.
  mainWindow.loadFile("index.html");

  // Open DevTools.
  mainWindow.webContents.openDevTools();

  // Handle the main window being closed.
  mainWindow.on("closed", () => {
    mainWindow = null;
  });
};

// Run when initialization is complete.
app.whenReady().then(() => {
  createWindow();

  // Handle the application becoming active.
  // On macOS, this happens when the Dock icon is clicked.
  app.on("activate", () => {
    // Recreate the main window if there are no windows.
    if (BrowserWindow.getAllWindows().length === 0) {
      createWindow();
    }
  });
});

// Run when all windows are closed.
app.on("window-all-closed", () => {
  // Quit the application except on macOS.
  if (process.platform !== "darwin") {
    app.quit();
  }
});
Next, prepare the HTML file that will open as the main window. In main.js, index.html is specified as the main window.
The index.html file:
<!DOCTYPE html>
<html lang="en">
<head>
  <meta charset="UTF-8"/>
  <!-- https://developer.mozilla.org/en-US/docs/Web/HTTP/Guides/CSP -->
  <meta http-equiv="Content-Security-Policy" content="default-src 'self'; script-src 'self'"/>
  <title>My first Electron app</title>
</head>

<body>
  <h1>My first Electron app</h1>
  <p id="info"></p>
</body>
<script src="./renderer.js"></script>
</html>
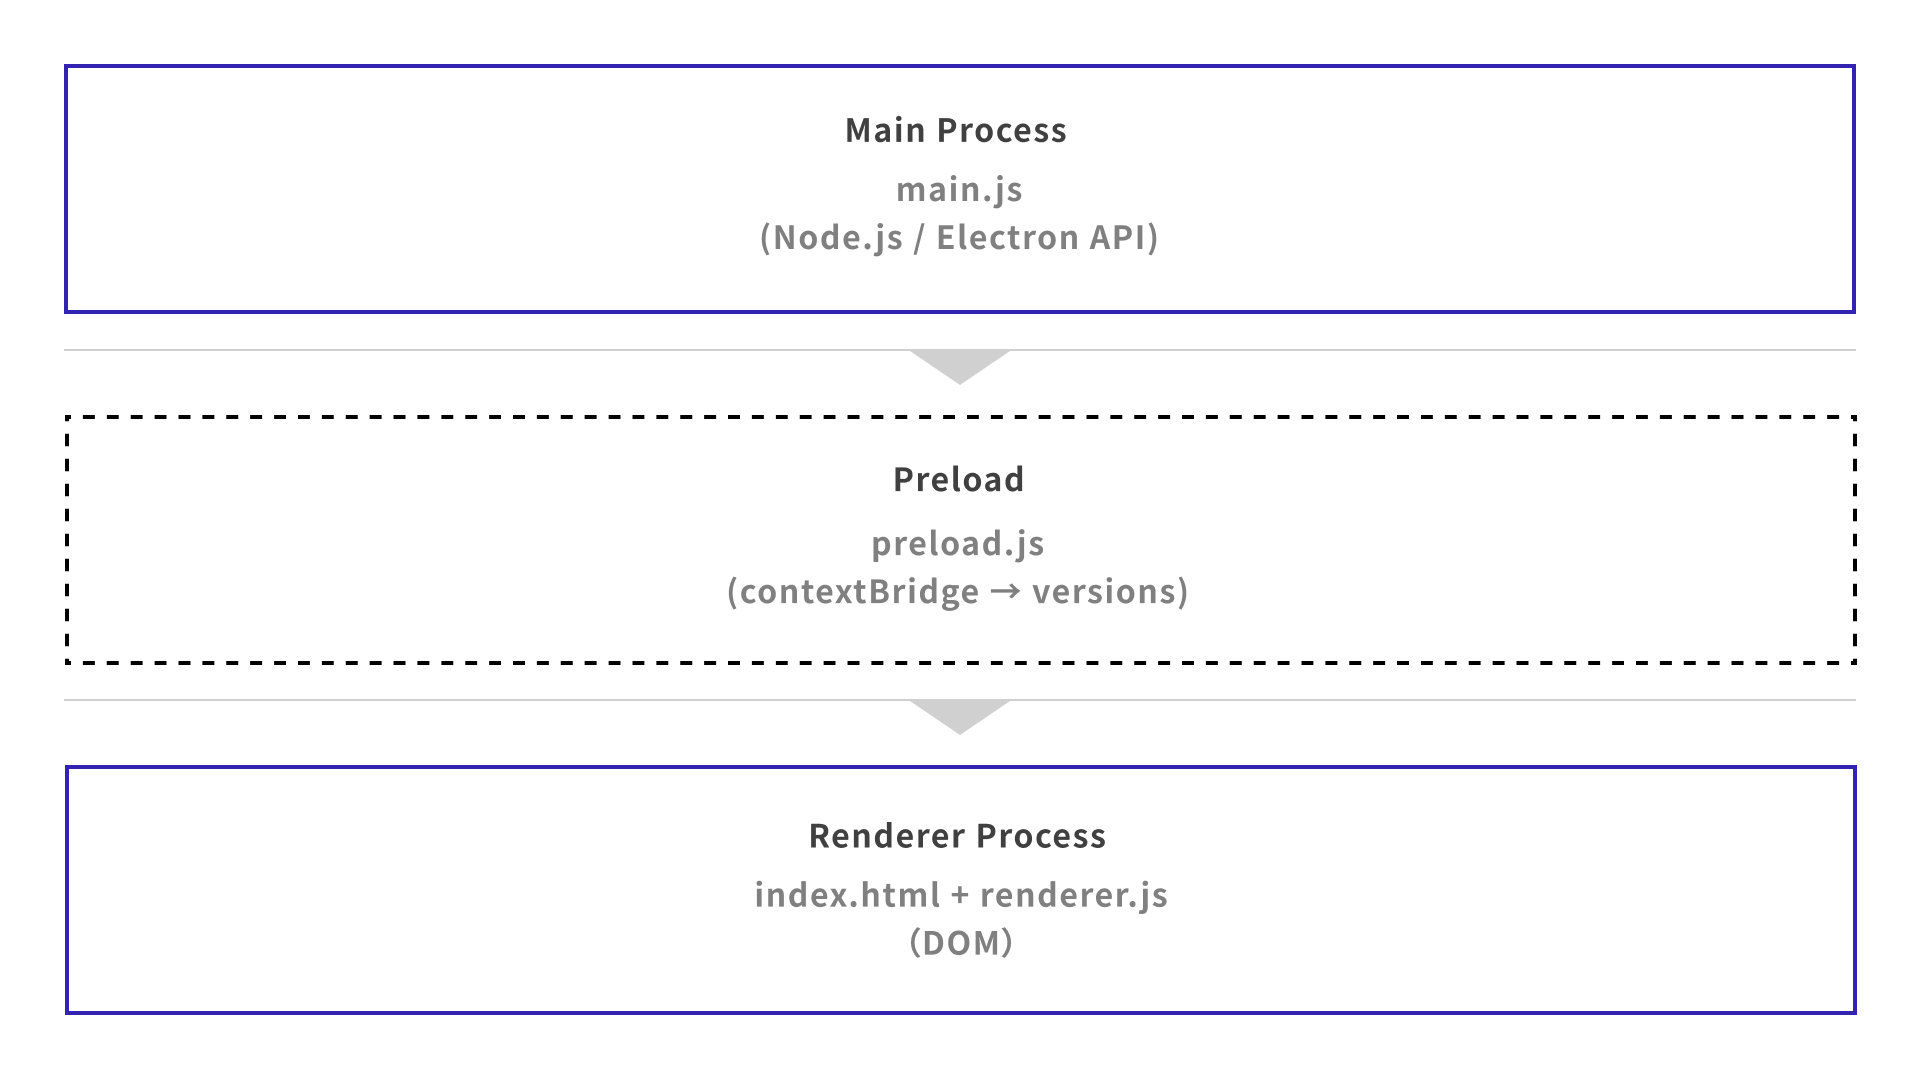
Electron has two process types: the main process and the renderer process. Electron APIs cannot be freely executed from the renderer process, which is responsible for the screen. A preload script and contextBridge are one way to solve this issue.
A preload script runs before the renderer process is loaded. By using the contextBridge API, only selected features can be safely made available to the renderer process.
The preload.js file:
const { contextBridge } = require("electron");

// Expose an API to the renderer process global scope, window.
contextBridge.exposeInMainWorld("versions", {
  node: () => process.versions.node,
  chrome: () => process.versions.chrome,
  electron: () => process.versions.electron,
});
JavaScript for the renderer process is written in renderer.js. This file uses the versions object exposed by the preload script and displays version information on the screen.
The renderer.js file:
const information = document.getElementById("info");
information.innerText = `We are using Node.js (v${versions.node()}), Chromium (v${versions.chrome()}), and Electron (v${versions.electron()}).`;
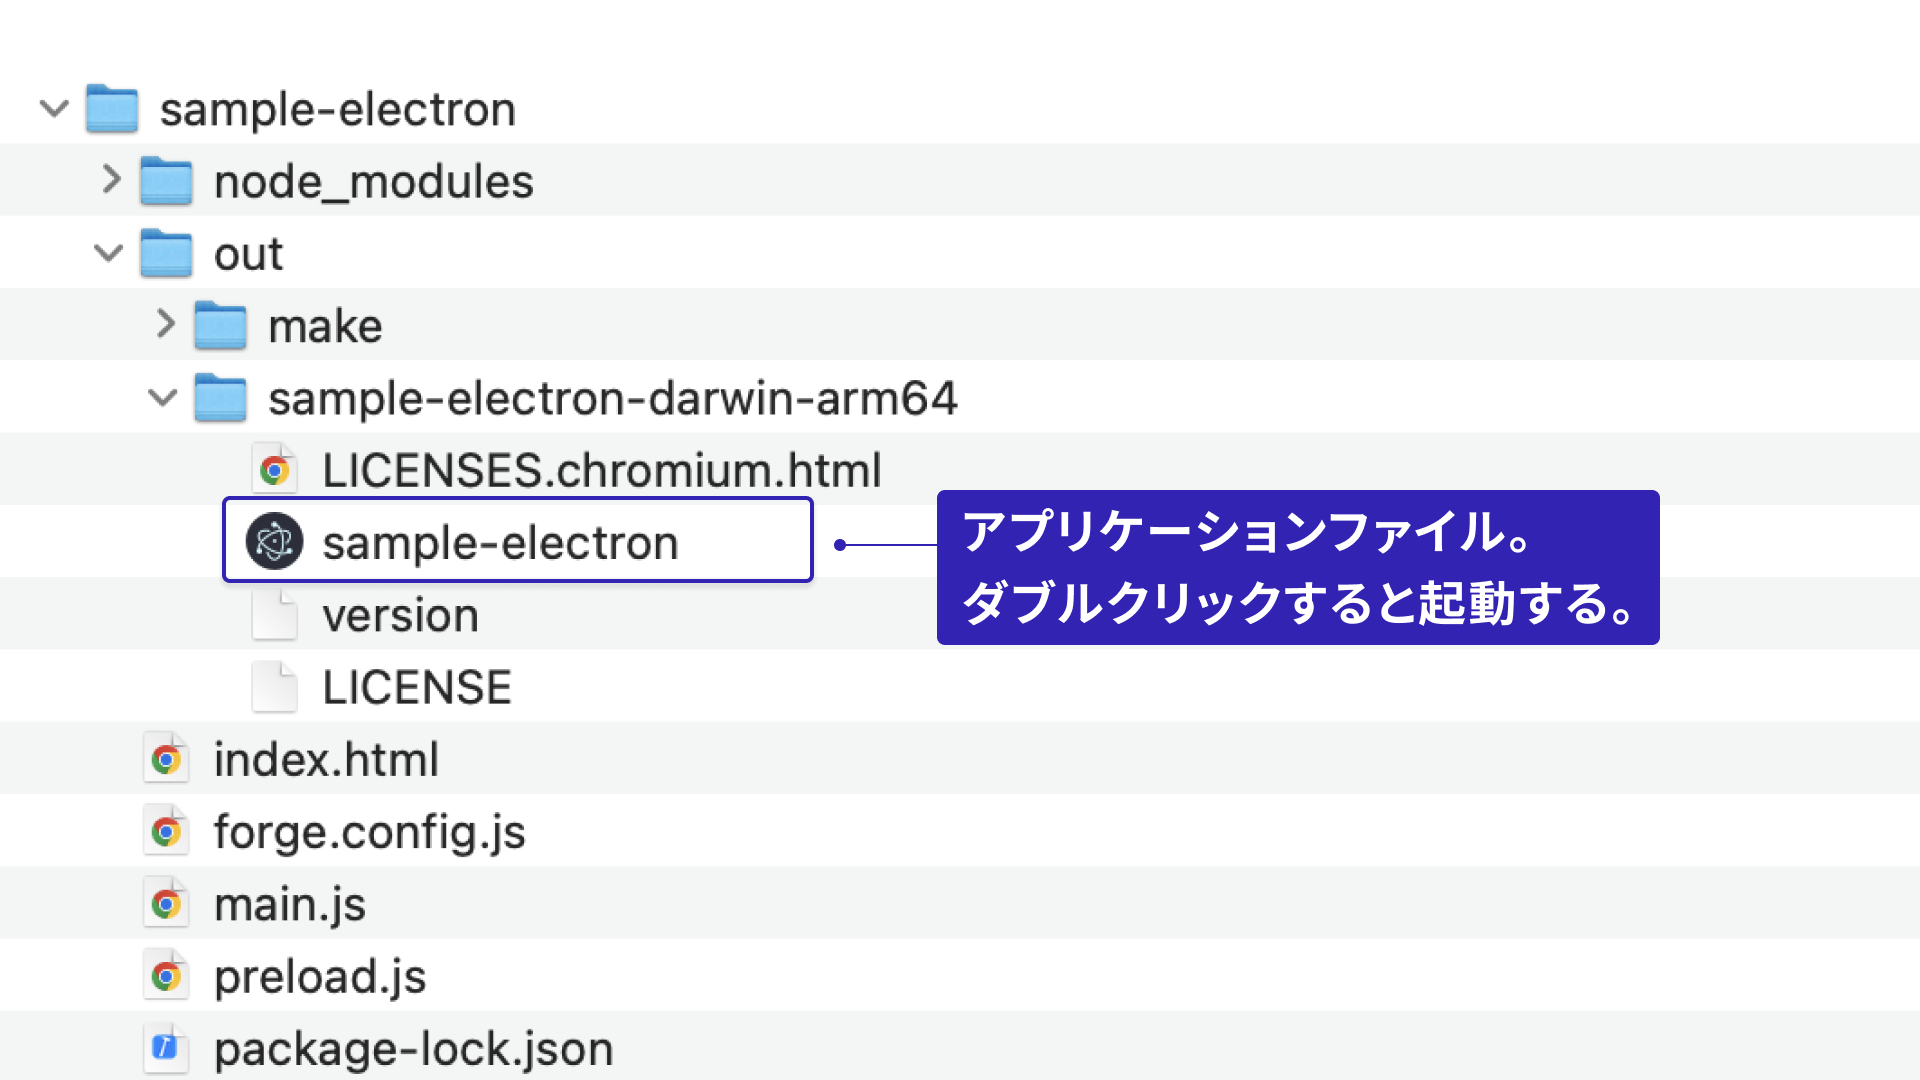
We have created several files, so let’s review the folder structure.
5. Run the application
In the command line, move to the folder that contains the files above. In this article, that folder is sample-electron. Then run the electron command from the command line. When it succeeds, the HTML is displayed as an application.
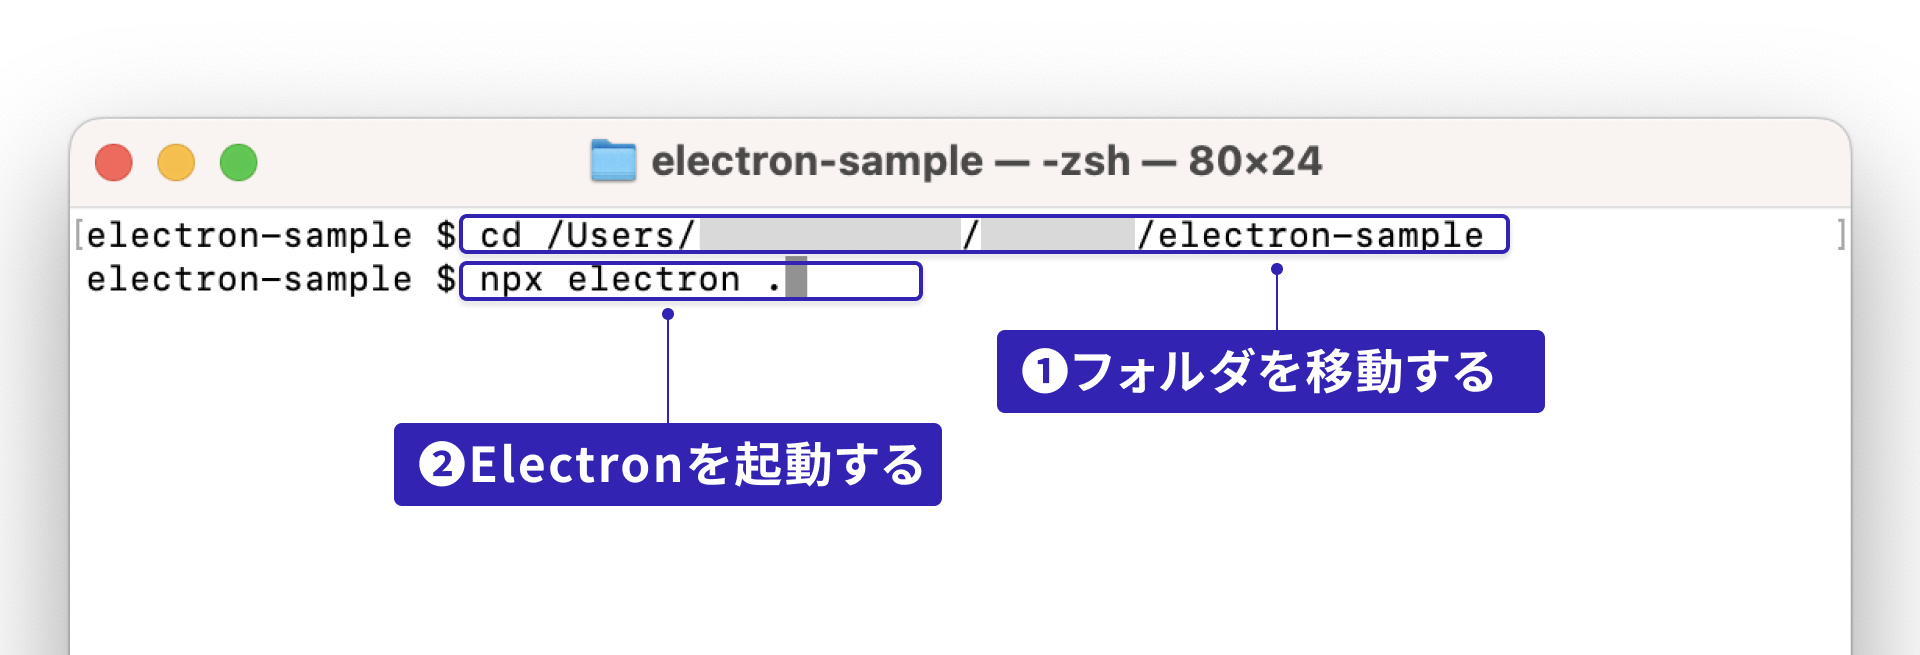
- Enter the command to change folders.
cd path/to/project-folder
- Enter the command to run Electron.
npx electron .

6. Package the application
The steps so far make it possible to run HTML as an application. To distribute it to other people as an app, you need to package it as an .exe file, an .app file, or a similar platform-specific format.
Packaging is easier with Electron Forge.
- Open the command line and run the following command to install the
Electron ForgeCLI tool.
npm install -D @electron-forge/cli
- Import and install the settings and modules related to Electron Forge.
npx electron-forge import
- Run packaging.
npm run make
For other parameters and detailed usage, see the Electron Forge official website.
- When packaging succeeds, an application is created for each platform. For distribution, compress this folder into a ZIP file and provide it to users.
Development tip: put commands in npm scripts
When you run npx electron-forge import, the scripts section in package.json is automatically updated as follows. npm scripts work as shortcuts for commands, so you do not need to enter complex options every time. They also make it easier to see which commands are available.
package.json:
{
  ...omitted...
  "scripts": {
    "start": "electron-forge start",
    "package": "electron-forge package",
    "make": "electron-forge make"
  },
  ...omitted...
}
These scripts can be run with commands such as npm run start. Shorter, easier-to-remember commands improve development efficiency. The Japanese article Node.jsユーザーなら押さえておきたいnpm-scriptsのタスク実行方法まとめ explains npm scripts in more detail.
Extra: debugging
Because Electron is based on Chromium, you can use Chrome DevTools. When the app is run with the electron command, select View > Toggle Developer Tools from the menu to toggle DevTools.
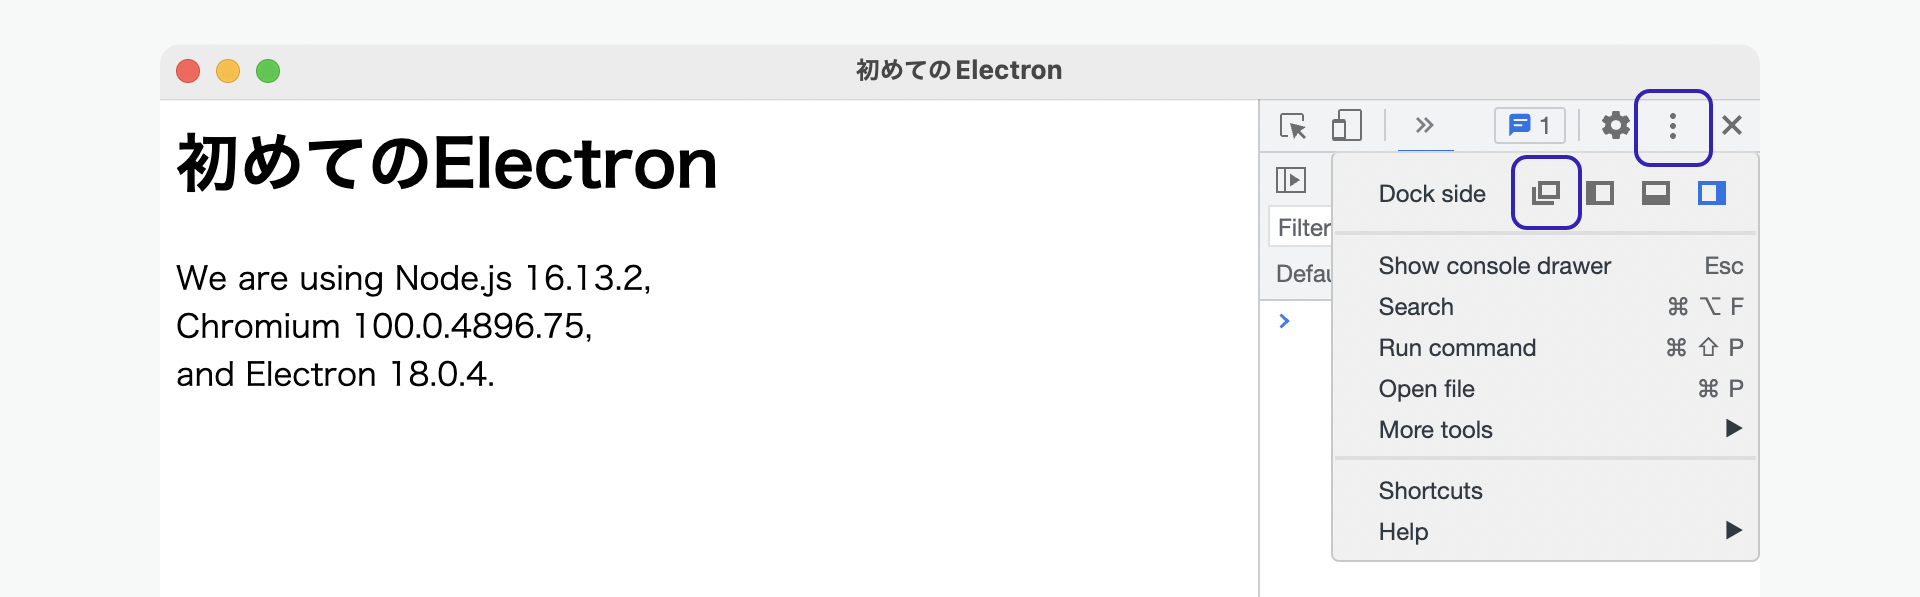
When DevTools is opened for the first time, it appears inside the application window, which can be inconvenient. Hold down the docking icon in the upper right and switch it to a separate window. For detailed usage, see Chrome DevTools.
Conclusion
You may have noticed how quickly the app could be turned into a desktop application. With Electron, desktop apps can be created without a large setup burden. The explanation continues in the next article in the series, Electron入門 - ファイル保存可能なテキストエディターを自作しよう. That article explains communication between the main process and renderer process, as well as how to use features on the Node.js side.
Reference: Electron’s advantages compared with similar technologies
There are various desktop application frameworks other than Electron. The following table provides a simple comparison.
| Name | Supported platforms | Language and technology | Runtime | Cost |
|---|---|---|---|---|
| Electron | Windows / macOS / Linux | Node.js + HTML (*1) | Built in (Chromium) | Free |
| NW.js | Windows / macOS / Linux | Node.js + HTML (*1) | Built in (Chromium) | Free |
| Cordova | Windows / iOS / Android | JavaScript + HTML | Not required (OS-provided browser) | Free |
| Legacy Adobe AIR | Windows / macOS / iOS / Android | JavaScript + HTML (*2) / ActionScript | Can be bundled (Adobe AIR) | Free |
| Qt | Windows / macOS / Linux / iOS / Android | C++ / QML | Not required | Paid plans available |
*1: Chromium’s Blink engine *2: WebKit engine
Several frameworks let you develop desktop apps with HTML and JavaScript. Electron and NW.js are based on Chromium, so you can use current web technologies without worrying about browser differences. For web developers, this makes it possible to reuse assets and knowledge they have already built up.
In this table, Electron and NW.js may look identical. One difference is that Electron uses a JavaScript file as its entry point, so it can run even without preparing an HTML file.