
How do you usually export images in Adobe Photoshop? Recent versions of Photoshop include several export features, but the amount of work varies depending on which one you choose. This article introduces Photoshop’s main image export options and compares which workflow is the most efficient.
For web images, the options now include not only JPEG and PNG, but also AVIF and WebP. If you are exporting a new image for the web, start with AVIF rather than WebP. Of the formats covered here, AVIF is the newest and offers an excellent balance between visual quality and file size.
This article was tested in Photoshop 2026 (version 27.5.0).
Key takeaways
- Newer export workflows such as Export As and Quick Export involve less manual work and improve efficiency
- AVIF is the recommended image format for the web
- Use Save for Web (Legacy) when exporting animated GIFs
Photoshop image export methods
There are five main ways to export images in Photoshop.
Save a Copy
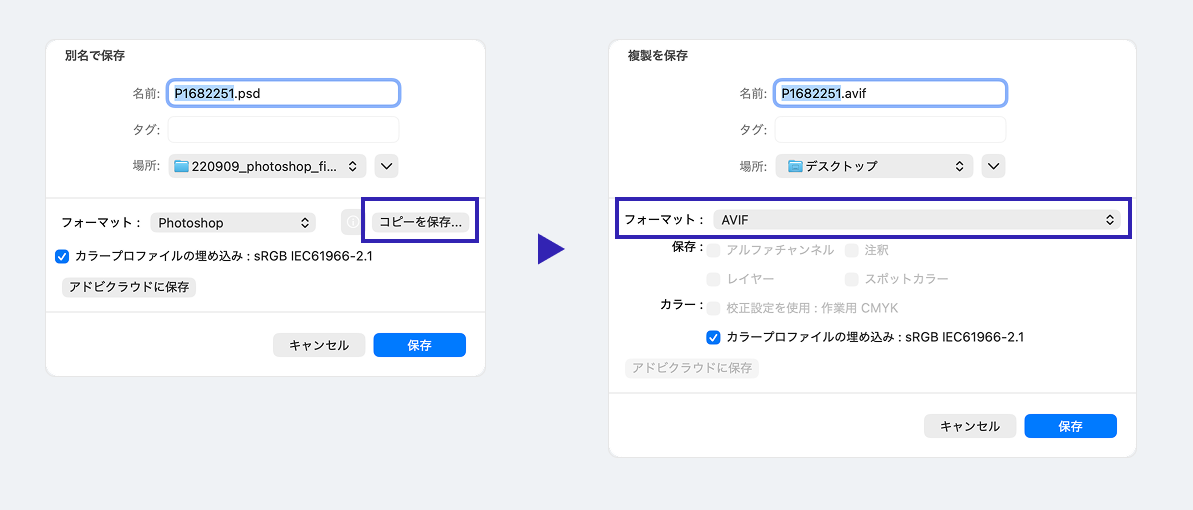
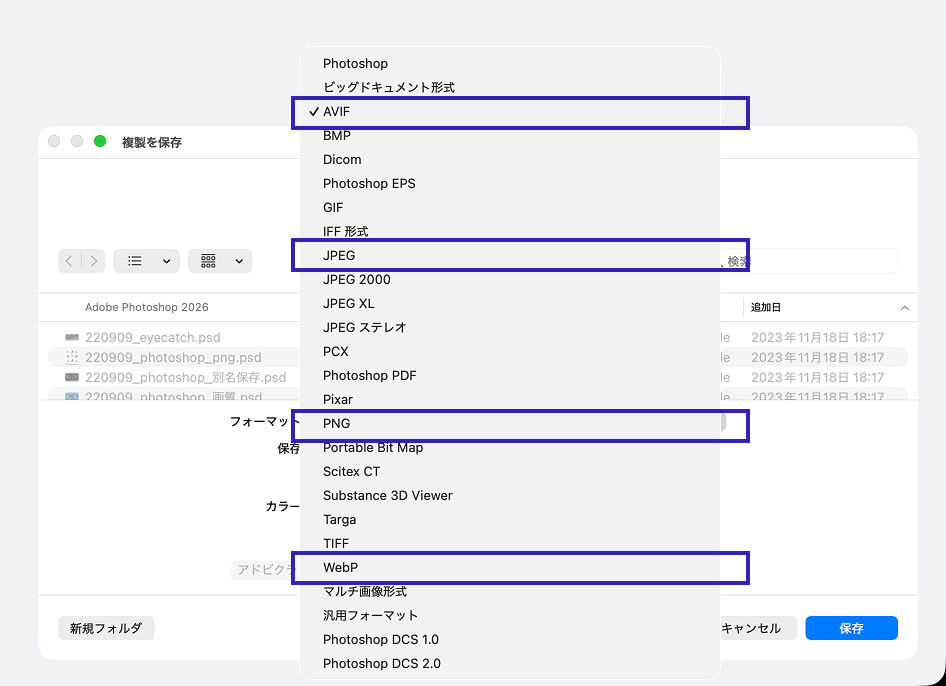
Use File > Save a Copy from the menu bar. Common image formats such as AVIF, WebP, JPEG, and PNG can be selected from the Format dropdown.
The difference between Save and Save a Copy is straightforward. Use Save when you want to preserve editable Photoshop data such as layers. Use Save a Copy when you want to save an image in a delivery format such as AVIF or WebP.
Export As
Open it from File > Export > Export As.
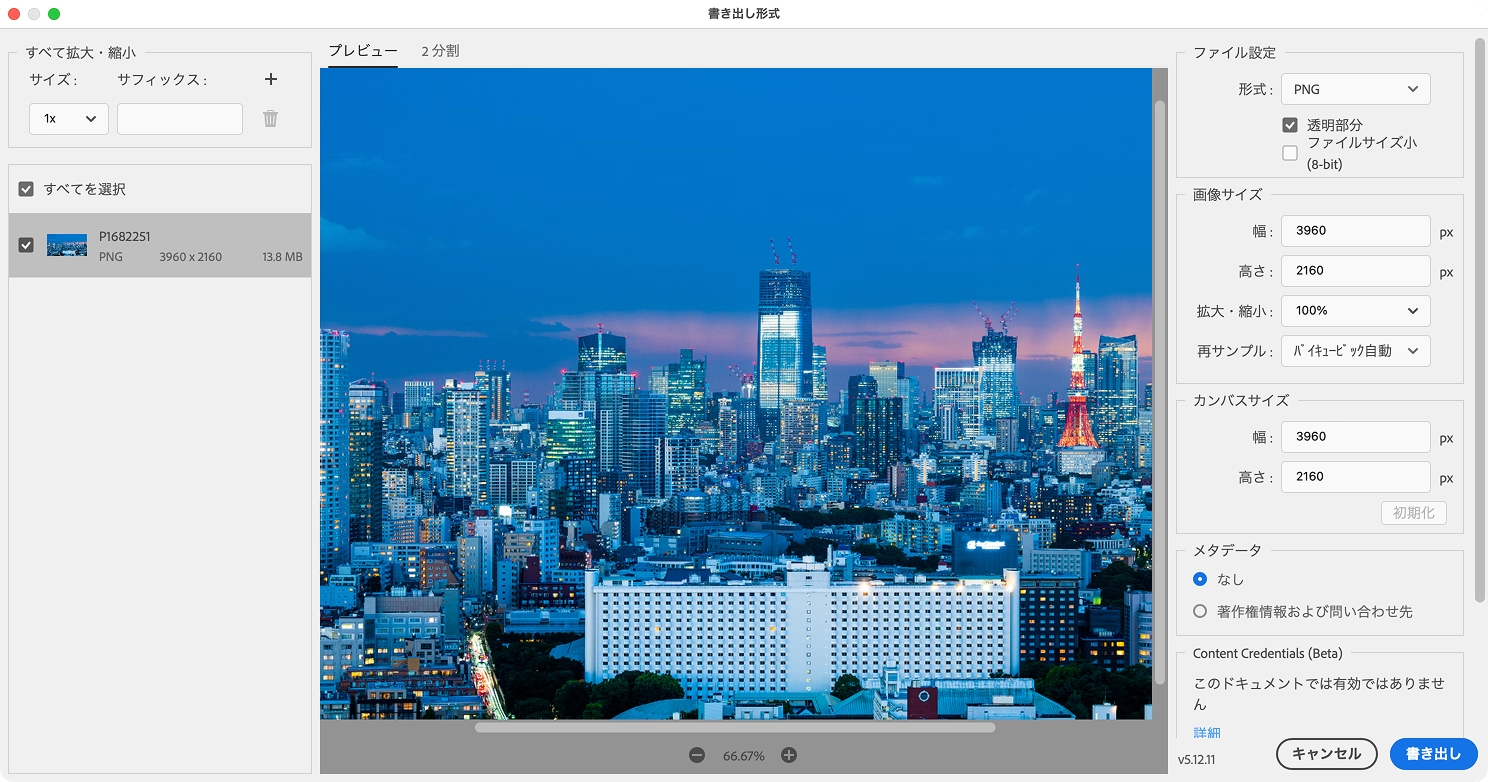
This feature lets you adjust image quality and optimization settings before export. Because you can preview the image size and quality before saving, it is useful for creating JPEG and PNG images for the web.
It also supports exporting individual artboards and layers. That makes it convenient when you are working with multiple artboards or want to export assets layer by layer.
Quick Export
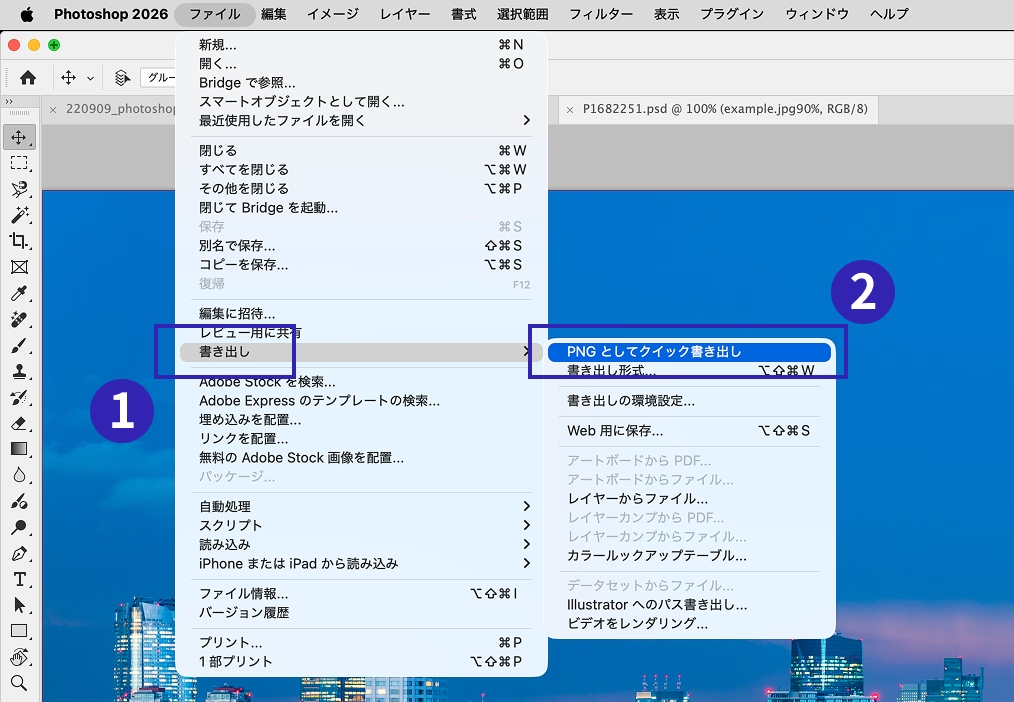
This option exports images using settings you have already saved in advance. Compared with Export As, it shows fewer dialogs before export, so you can output images more quickly.
Open it from File > Export > Quick Export as (image format).
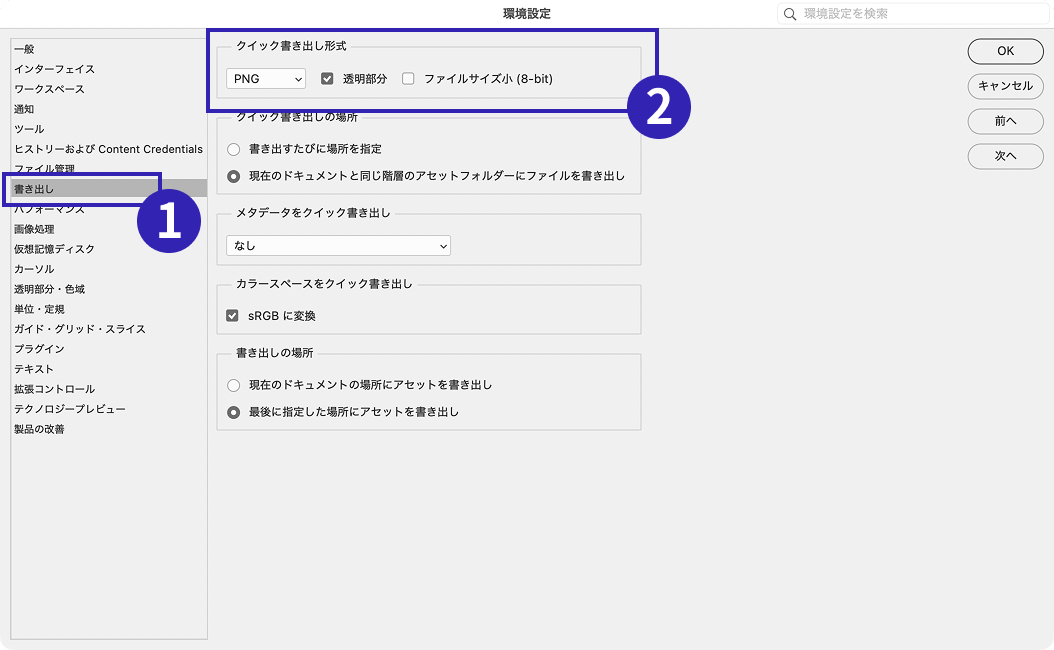
The export format is set under Photoshop > Preferences > Export, in Quick Export Format.
If you repeatedly export images in the same format, Quick Export is convenient. It works well for tasks such as saving images for social media posts with the same settings every time.
Save for Web (Legacy)
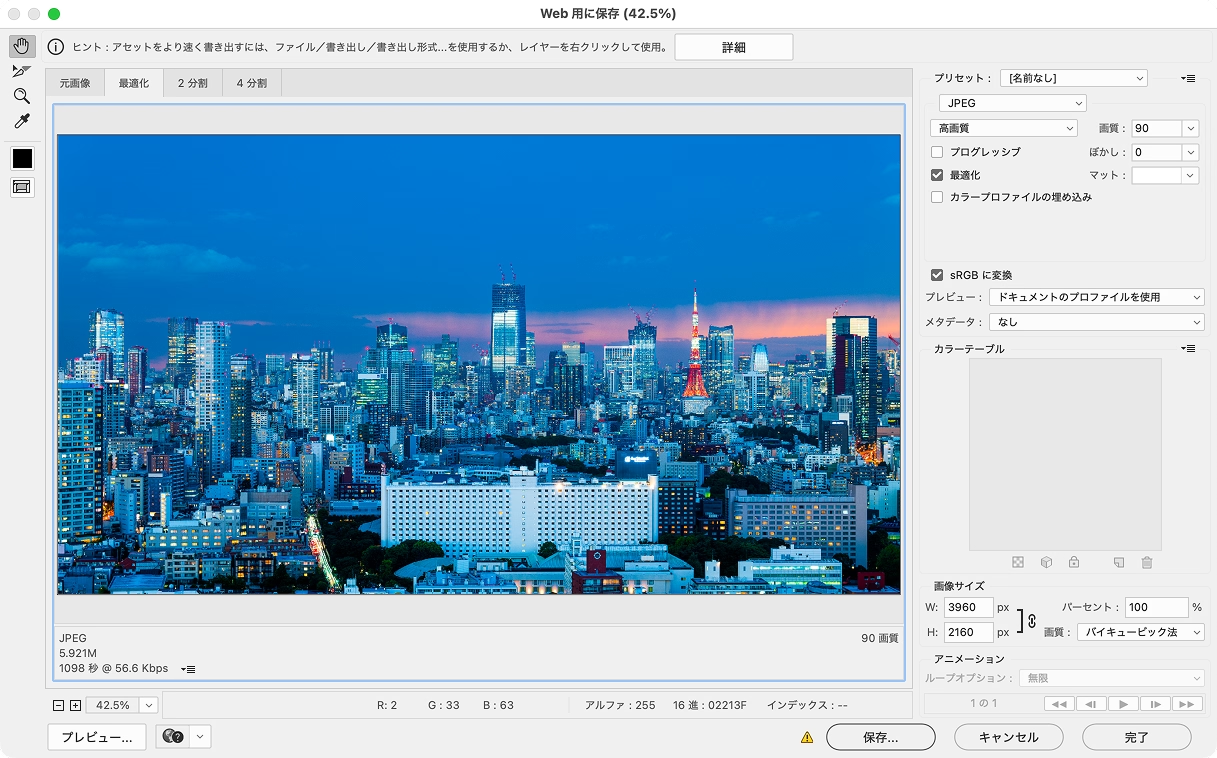
This is Photoshop’s long-standing export method for web images. Open it from File > Export > Save for Web (Legacy).
It provides detailed controls for quality, optimization, and related settings. Its main advantage is that it can export animated GIFs. It can also use the old slice-based export workflow.
Image Assets
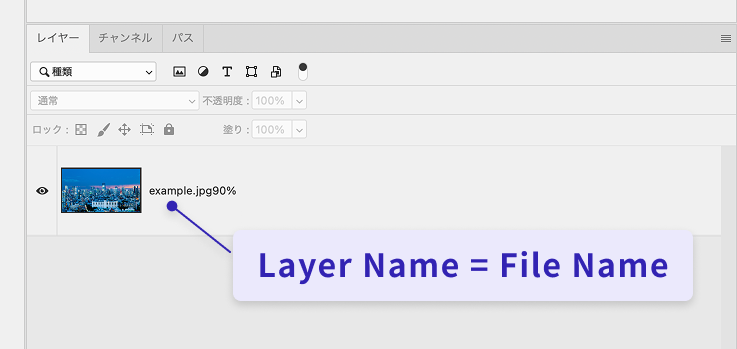
This feature automatically exports images whenever a layer is updated. You can enable it from File > Automate > Generator Plugins > Image Assets. By adding a filename such as .png to a layer name, Photoshop exports the image automatically, which keeps manual work to a minimum.
It also supports detailed settings such as quality adjustment and image size definitions for responsive web design. For more details, see Photoshop CCの『画像アセット』.
Choose AVIF for web images
AVIF is the recommended image format for the web. It is a newer format supported by major browsers. Compared with JPEG and PNG, it often achieves smaller file sizes while keeping image quality high.
AVIF works especially well for images that tend to be large, such as photos, hero images, featured images, and banners. Reducing the weight of images on a page also helps improve loading performance.
After AVIF, WebP is the next format worth considering. WebP is also supported by major browsers and usually produces smaller files than JPEG and PNG. In practice, however, the balance between image quality and file size is harder to control, and the results are often less efficient than expected.
JPEG and PNG are still useful. JPEG remains a practical general-purpose format for photos, while PNG is well suited to transparent images, logos, and UI parts. For new web projects, start with AVIF, then use JPEG or PNG where appropriate.
| Image format | Best use cases | Notes |
|---|---|---|
| AVIF | Photos, featured images, hero images, banner images | A newer format with an excellent balance between image quality and file size |
| WebP | Photos, banner images, transparent images | A slightly older lightweight format |
| JPEG | Photos, images with many gradients | Widely supported and compatible with many tools |
| PNG | Logos, icons, UI parts, transparent images | Easy to use when transparency is needed |
| GIF | Simple animation | Suitable for low-color animated images |
The following choices are best avoided.
- Not recommended: using PNG for photos
- Why: AVIF or JPEG can reduce file size substantially.
- Not recommended: using JPEG for low-color illustrations
- Why: JPEG introduces compression artifacts. PNG provides lossless results, and lossless AVIF may also be a better fit.
- Not recommended: using JPEG for transparent images
- Why: JPEG does not support transparency. Use AVIF or WebP instead.
How to place images on a website
Even when using AVIF or WebP, you can reference the file with a standard img element in HTML.
<img src="images/main-visual.avif" alt="" width="1200" height="800" />
For projects that must support older browsers, you can also use the picture element to provide multiple formats. Today, however, both AVIF and WebP are supported by major browsers, so in most new projects it is reasonable to use AVIF directly in an img element.
<picture>
  <source srcset="images/main-visual.avif" type="image/avif" />
  <source srcset="images/main-visual.webp" type="image/webp" />
  <img src="images/main-visual.jpg" alt="" width="1200" height="800" />
</picture>
Which option takes the least effort?
Of the methods above, which requires the least work? In current versions of Photoshop, images can be exported by artboard or by layer.
Workflows such as Quick Export and the Image Assets feature also reduce the number of dialogs shown before export, making it easier to get images quickly. In particular, Image Assets requires the least effort because images are exported automatically whenever a layer is updated.
| Export method | Full document | Per-layer | Dialogs | Work required when the image is updated |
|---|---|---|---|---|
| Export As | Yes | Yes | 2 | High |
| Quick Export | Yes | Yes | 1 | High |
| Image Assets | Yes | Yes | 0 | None (automatic) |
| Save for Web (Legacy) | Yes | No | 2 | High |
| Save a Copy | Yes | No | 2 | High |
How do photo quality and file size compare?
AVIF was introduced above as the best choice for photos, but how large is the difference in practice?
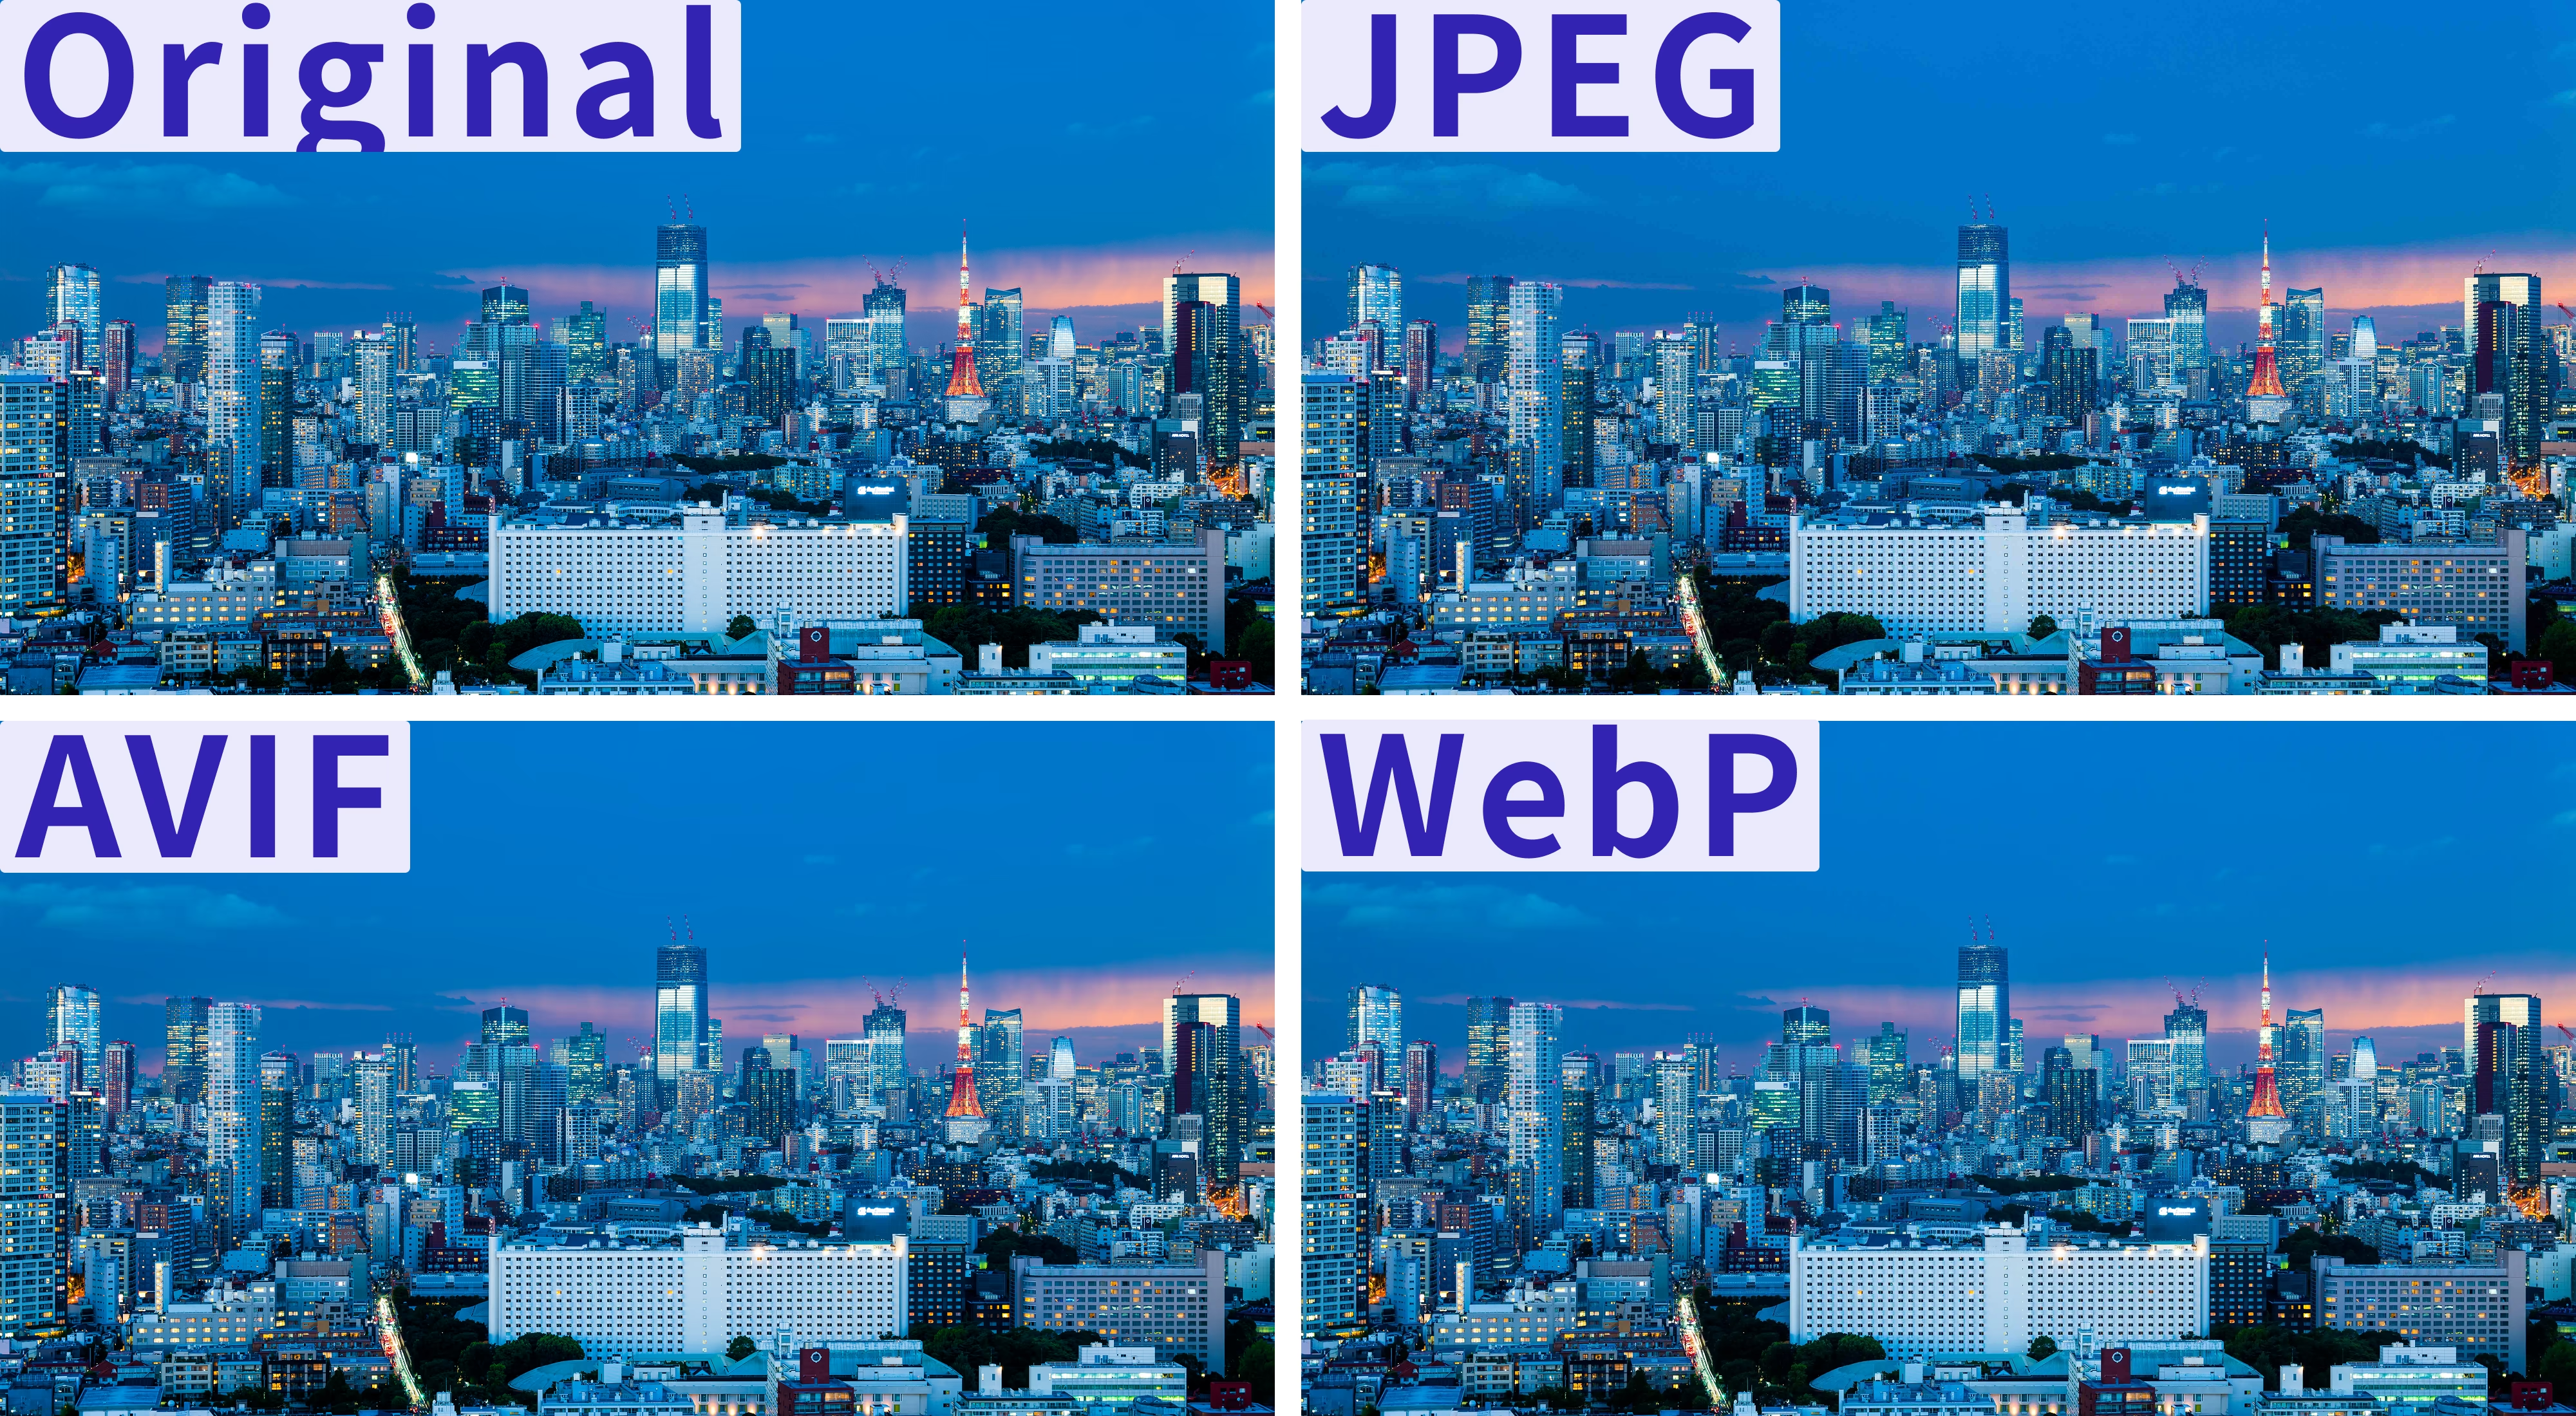
Using a UHD 4K photo (3840 × 2160), the image was exported as AVIF, WebP, and JPEG at roughly the same file size. Compare the image quality below. Click an image to view it full-screen.
Full image
Cropped detail
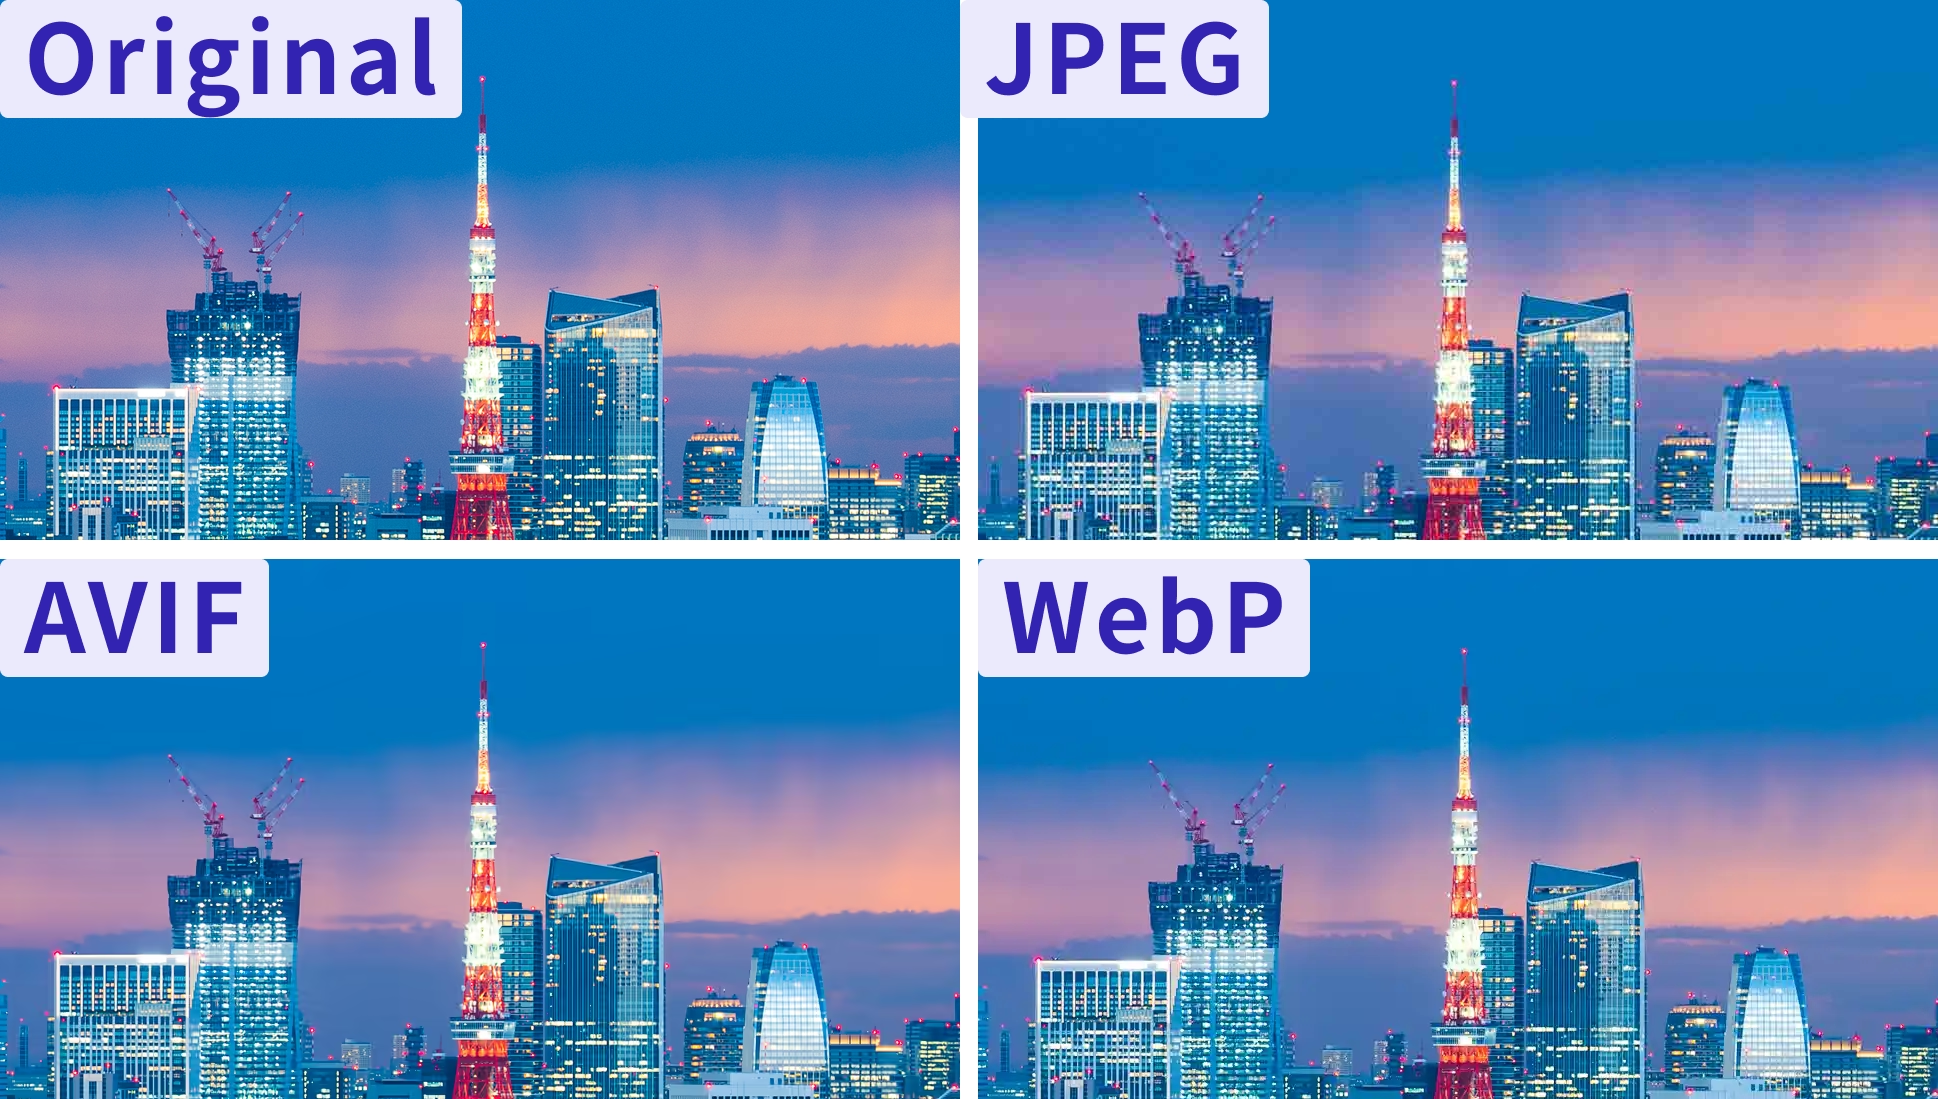
| Image format | File size | Setting |
|---|---|---|
| Original (JPEG) | 9.4 MB | Quality 10 |
| AVIF | 609 KB | Quality 39 |
| WebP | 602 KB | Quality 35 |
| JPEG | 593 KB | Quality 1 |
For photographic images, AVIF produced the highest quality. JPEG breaks down badly in the gradients, with severe banding, and WebP also shows noticeable degradation in the sky. AVIF, by contrast, looks almost identical to the original. AVIF wins by a wide margin.
For cut-out photos with transparent backgrounds
It is also worth considering photos with the background removed and exported with transparency. In that case, AVIF or WebP is recommended, and PNG is not. JPEG is not an option because it cannot handle transparency.
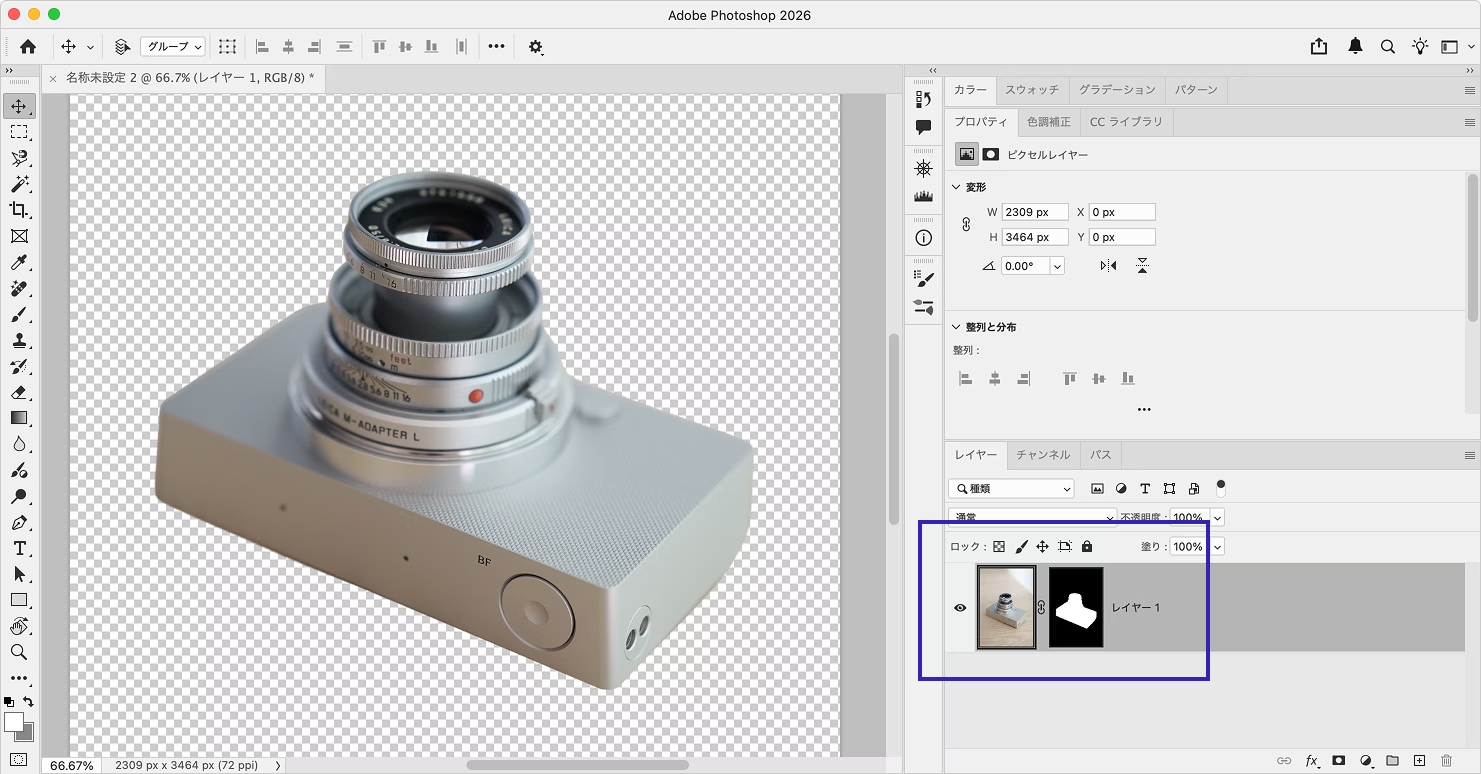
PNG is not well suited to photo-like image data with many colors. By using lossy compression in AVIF or WebP, you can reduce file size to more JPEG-like levels while keeping transparency. The PNG version weighs 3 MB, while AVIF and WebP come out at around 0.5 to 0.8 MB.
The table below shows the file sizes for each format.
| Image format | File size | Compression | Setting |
|---|---|---|---|
| AVIF | 775 KB | Lossy | Maximum quality |
| AVIF | 3.3 MB | Lossless | - |
| WebP | 545 KB | Lossy | Maximum quality |
| WebP | 1.2 MB | Lossless | - |
| PNG | 3 MB | Lossless | - |
WebP produced smaller files, but image quality degraded accordingly, so it was not a better overall result than AVIF.
Export to PNG first, then convert with another tool
If it is difficult to judge the best settings inside Photoshop, another option is to export the image as PNG first and convert it with a separate tool.
Tools such as Google’s image compression tool Squoosh make it easier to tune the balance between image quality and file size.
Conclusion
Hopefully this article helps make image export work more efficient.
For more on using these formats on the web, see 次世代画像形式のWebP、そしてAVIFへ。変わり続ける技術に対応するweb制作の黄金解.
HDR photos have also been attracting more attention recently. For ideas on how to use HDR, see HDR on the web for brighter-than-white highlights and more lifelike photos.
This article was originally published 10 years ago, and was maintained April 2026.