Websites increasingly use 3D content. WebGPU is becoming available in more environments, while libraries such as Three.js continue to mature. As a result, using 3D graphics in production has become a practical option.
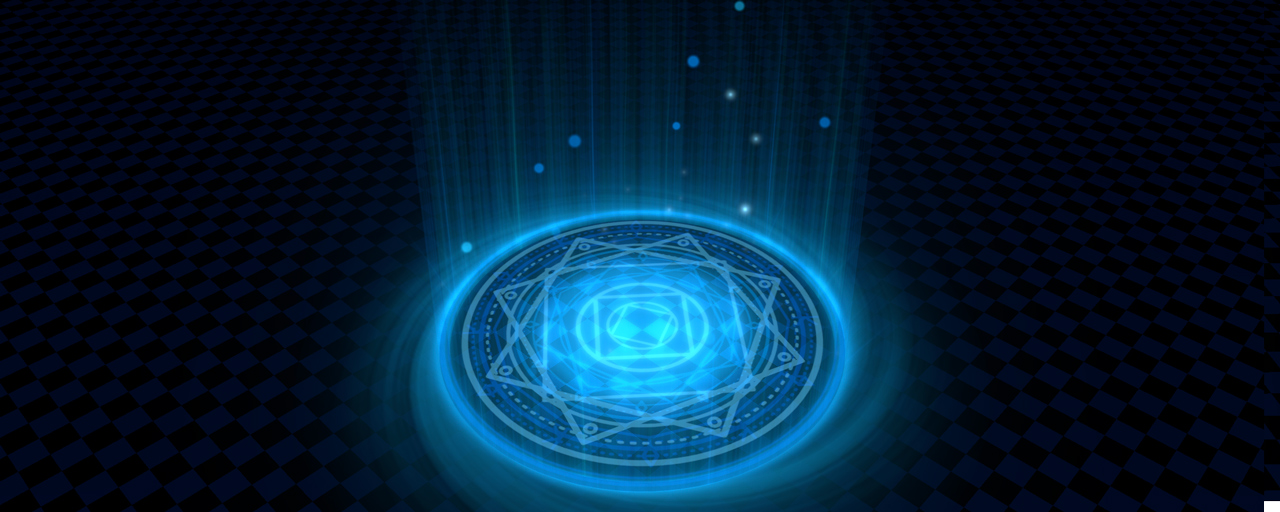
Even so, a 3D scene can feel plain when it is first assembled. Adding effects is an effective way to make the visuals more striking and communicate the state of a character or game more clearly. The following demo resembles a save point or healing point in an RPG.
This demo uses Three.js r185 with WebGPU, GSAP 3, and TypeScript 7.
This article explains three fundamental Three.js techniques by building a save point effect. The same techniques can be applied to many other types of effects.
How the effect is built
The demo is made from the basic parts shown below. Although the finished effect looks complex, each part is simple on its own. A three-layer magic circle and a rhythmic pulse complete the composition.
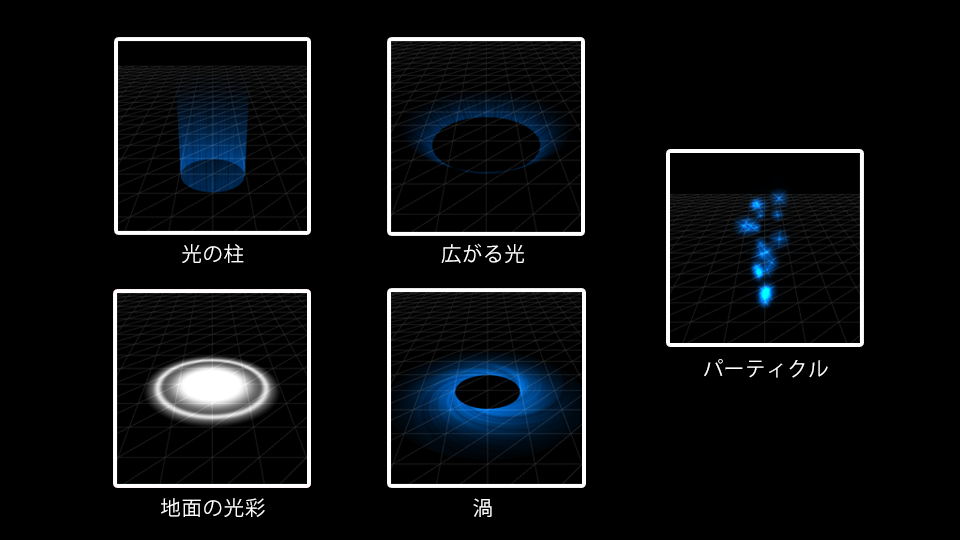
The following three reusable techniques are covered step by step. The remaining parts can be built by extending the same ideas.
- Pillar of light
- Swirl
- Particles
Step 1. Create the pillar of light
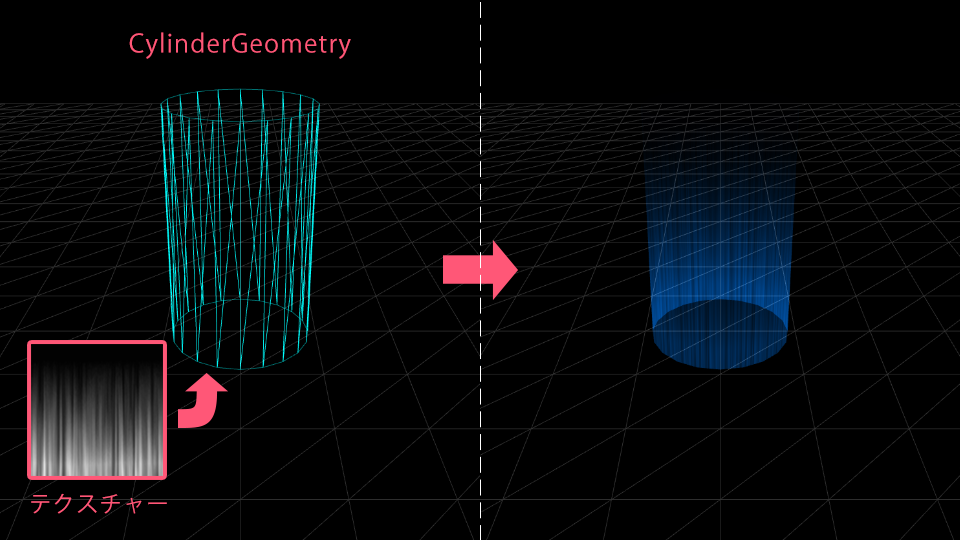
Create a cylinder
The pillar of light has the shape of a tall cylinder. Three.js provides CylinderGeometry, which can be used to create this shape.
// Open-ended cylinder geometry
const geometry = new THREE.CylinderGeometry(
  3, // Top radius
  3, // Bottom radius
  10, // Height
  64, // Circumference segments
  1, // Height segments
  true, // Open ends without caps
);
Set the sixth argument, whether the ends are open, to true. This prevents Three.js from adding caps to the cylinder.
Make the pillar glow
Next, give the cylinder a glowing appearance. MeshBasicMaterial works well for luminous objects because it renders its color without depending on scene lighting.
// Unlit material for the glowing pillar
const material = new THREE.MeshBasicMaterial({
  map: texture, // Black-and-white light pattern
  color: 0x0070e0, // Texture tint
  transparent: true,
  blending: THREE.AdditiveBlending, // Brighter overlapping light
  side: THREE.DoubleSide, // Visible from inside the tube
  depthWrite: false, // Transparent objects behind the pillar remain visible
  opacity: 0.5,
});
The main settings are explained below.
map
The map property specifies the texture. A grayscale texture is especially reusable because the color property can tint its white areas without requiring another image.
blending
The blending property controls how the material is composited.
Three.js provides NoBlending, NormalBlending, AdditiveBlending, SubtractiveBlending, and MultiplyBlending. For more detailed control, it also provides CustomBlending.
This effect uses AdditiveBlending so overlapping areas become brighter and appear to glow.
side
The side property specifies which faces are rendered. The available values are FrontSide, BackSide, and DoubleSide. This cylinder uses DoubleSide so the inside of the tube is visible as well.
depthWrite
The depthWrite property determines whether a rendered surface writes its depth value to the depth buffer. It is set to false here so light effects farther from the camera can still contribute to the image.
With depthWrite: false, depth testing still takes place, but the material does not update the depth buffer. Objects behind it can therefore be drawn later and remain visible through the transparent areas. As a general rule, opaque materials write depth, while transparent materials usually do not.
In 3D rendering, a material should be treated as transparent whenever any part of it is not fully opaque. This includes a particle texture whose center has an alpha value of 100% while the area around it has an alpha value of 0%.
Once the geometry and material are ready, combine them into a mesh to complete the basic pillar.
// 3D object combining shape and appearance
const mesh = new THREE.Mesh(geometry, material);
For a richer result, create an outer and inner mesh from the same geometry, then make the inner mesh slightly smaller. Scrolling their textures in opposite directions gives the light more depth than a single cylinder would provide.
// Inner and outer layers sharing the same geometry
const outer = new THREE.Mesh(geometry, this._outerMaterial);
const inner = new THREE.Mesh(geometry, this._innerMaterial);

// Inner cylinder scaled down along the X and Z axes
inner.scale.set(0.95, 1, 0.95);

// Both layers grouped under the Pillar object
this.add(outer, inner);

// Opposing texture motion based on elapsed time
this._outerTexture.offset.x += delta * 0.2;
this._innerTexture.offset.x -= delta * 0.3;
Step 2. Create the swirl
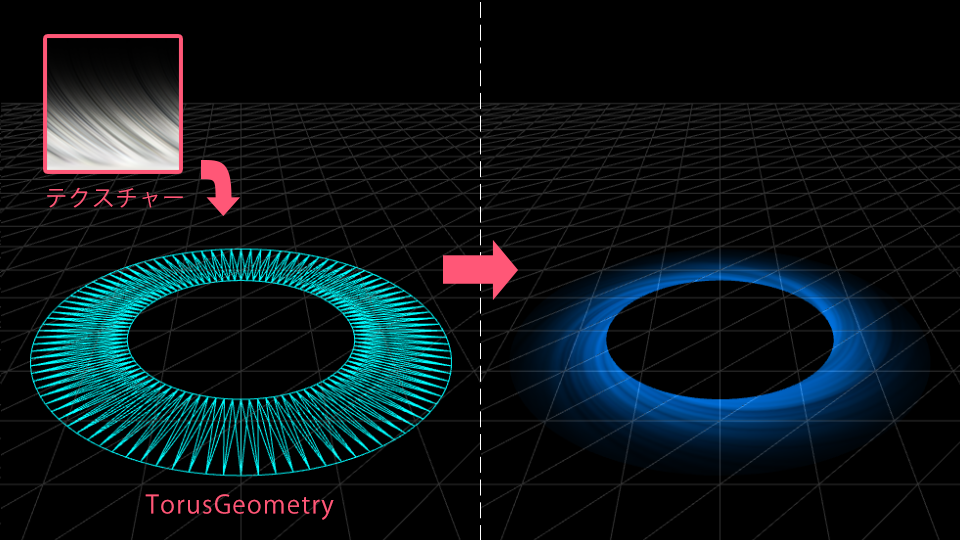
Create a ring
The ground-level swirl needs a doughnut-shaped ring, so it uses TorusGeometry. This geometry normally creates a three-dimensional torus, but setting the third argument to 2 produces a flat ring.
// Flat torus geometry for the swirl
const geometry = new THREE.TorusGeometry(
  4, // Overall radius
  1, // Tube radius
  2, // Minimum tube segments for a flat surface
  100, // Circumference segments
);
The material uses the same basic settings as the pillar, with a texture, color, and opacity suited to the swirl.
// Unlit material for the swirl
const material = new THREE.MeshBasicMaterial({
  color: 0x0080ff, // Texture tint
  map: texture, // Swirl pattern
  transparent: true,
  blending: THREE.AdditiveBlending, // Brighter overlapping light
  depthWrite: false, // Transparent objects behind the swirl remain visible
  opacity: 0.1,
});

// Swirl mesh combining the geometry and material
const torus = new THREE.Mesh(geometry, material);
Place it on the ground
TorusGeometry stands vertically by default, so rotate it by 90 degrees to make it parallel to the ground. The material uses the default FrontSide, so make sure the front faces upward.
// Rotation from an upright torus to a ground-aligned ring
torus.rotation.x = Math.PI / 2;
At this point, the effect occupies the same plane as the ground. This causes z-fighting, the flickering shown below. When two surfaces have nearly identical values in the depth buffer, the GPU cannot consistently determine which one is in front. As a result, the visible surface rapidly alternates.
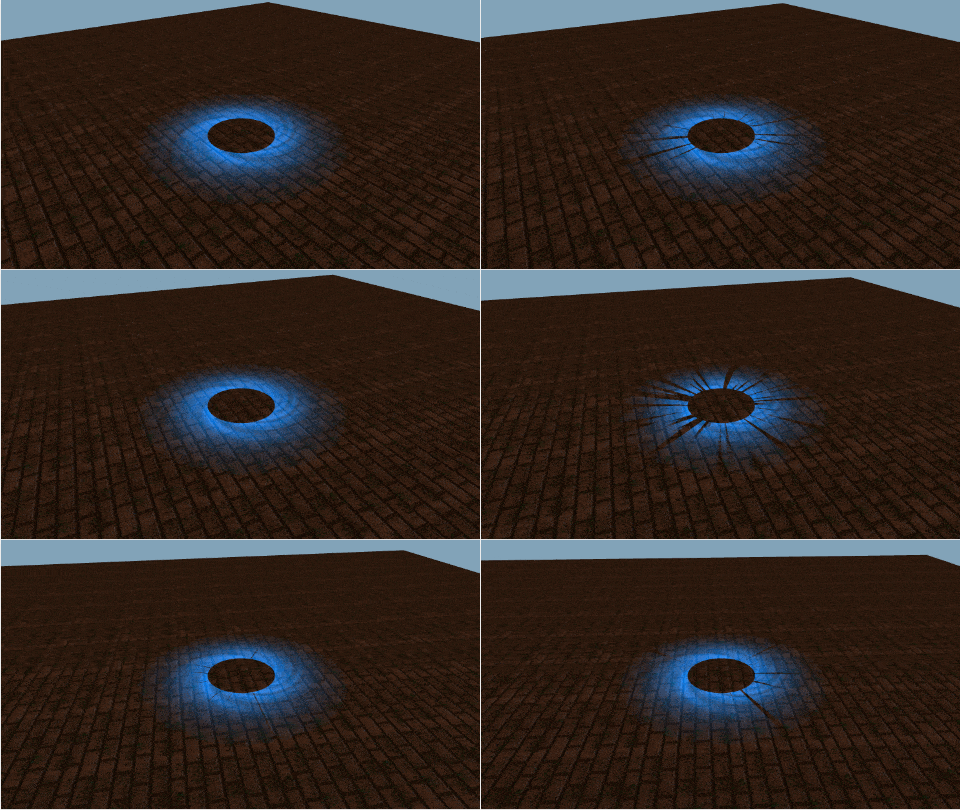
Move the mesh slightly above the ground to prevent this problem.
// Small vertical offset preventing z-fighting with the ground
torus.position.y = 0.02;
Animate the swirl
Use the elapsed time between frames, delta, to rotate the whole object and scroll the texture. Basing the movement on elapsed time keeps its speed consistent across different frame rates.
// Rotation and texture speed linked to the shared energy value
update(delta: number, energy: number) {
  // Faster motion during the pulse
  const speed = 0.1 + energy * 0.4;

  // Rotation of the entire swirl
  this.rotation.y -= delta * speed;

  // Scrolling swirl pattern
  this._texture.offset.x -= delta * speed;
}
The energy value represents the shared intensity of the effect. It is 0 during the resting state and rises to 0.8 during the brightest moment. The swirl rotates faster as this value increases, giving the animation a more pronounced rhythm.
Step 3. Create the particles
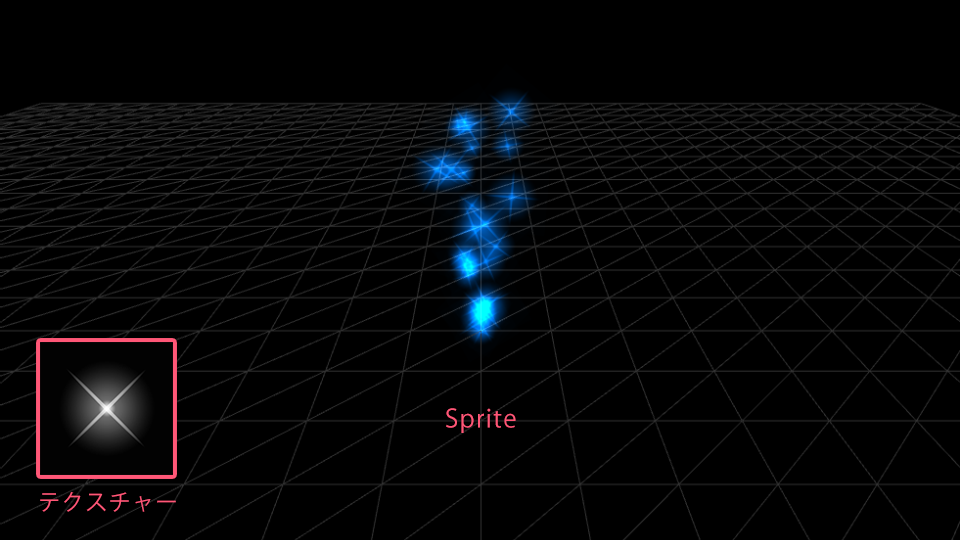
Create one particle
The particles use Sprite objects. A Sprite is a flat object that always faces the camera, which keeps its texture looking consistent from every viewing angle. This technique is commonly known as billboarding. A Sprite uses SpriteMaterial for its material.
// Image URL resolved by Vite
import imageParticle from "../img/particle.png";

// Texture for the sprite
const texture = new THREE.TextureLoader().load(imageParticle);

// sRGB color space for a color texture
texture.colorSpace = THREE.SRGBColorSpace;

// Base material shared by the particles
const material = new THREE.SpriteMaterial({
  map: texture, // Particle shape
  transparent: true,
  blending: THREE.AdditiveBlending, // Brighter overlapping particles
  depthWrite: false, // Particles behind the sprite remain visible
});

// Per-particle material clone with a shared texture
const sprite = new THREE.Sprite(material.clone());
This creates one particle. Two textures are used for the full effect: round orbs and cross-shaped sparks. Cloning the material for each particle makes it possible to control its color and opacity independently.
Make the particles rise
Combine upward movement with fade-in and fade-out animation to make particles appear to rise from the ground.
GSAP is a JavaScript library for creating and controlling animations. Its timeline feature arranges multiple animations on a shared time axis, making it possible to manage their sequence and start times together. Here, a timeline synchronizes each particle’s upward movement with changes to its opacity.
// Different rise duration for each particle
const duration = THREE.MathUtils.randFloat(6, 10);

// New destination height for each cycle
const getHeight = () => THREE.MathUtils.randFloat(5, 8);

gsap
  // Infinite loop with refreshed function-based values
  .timeline({ repeat: -1, repeatRefresh: true })
  // Movement from the ground to the air
  .fromTo(
    sprite.position,
    { y: 0.5 },
    { y: getHeight, duration, ease: "expo.in" },
    0,
  )
  // Hidden state at the beginning of the rise
  .set(sprite.material, { opacity: 0 }, 0)
  // Fade-in during the rise
  .to(
    sprite.material,
    { opacity: 1, duration: duration - 1, ease: "expo.in" },
    0,
  )
  // Fade-out above the ground
  .to(
    sprite.material,
    { opacity: 0, duration: 1, ease: "power4.in" },
    duration - 1,
  )
  // Different starting point for each particle
  .progress(Math.random());
Giving progress() a random initial value starts each particle at a different point in the timeline. With several particles, this staggered timing creates a continuous stream. Subtle sideways drift and rapid brightness changes make the motion feel more natural.
Finish the effect by combining the three elements
The three elements above are enough to build an effect, but the finished composition also includes a magic circle, a burst of particles, and bloom.
The magic circle consists of three PlaneGeometry meshes with SVG textures. Each layer uses a different scale and rotation direction. Like the pillar and swirl, the layers use AdditiveBlending to appear luminous.
When the effect first appears, the pillar rises from below the ground, the magic circle rises into place, and the ground effects expand outward.
After this entrance, two shared values coordinate the repeating pulse. energy represents the overall light intensity, while sparkle controls the brightness of the particles.
GSAP animates these values so the rotation speed, colors, opacity, point-light intensity, and particle brightness change together.
The following timeline emits a particle burst as the light grows stronger, then gradually returns the effect to its resting state.
// Shared values coordinating multiple effects
const motion = { energy: 0, sparkle: 0.2 };

// Repeating timeline with a pause between pulses
const pulse = gsap.timeline({ delay: 0.2, repeat: -1, repeatDelay: 1 });

pulse
  // Light build-up
  .to(motion, {
    energy: 0.8,
    sparkle: 1,
    duration: 1.2,
    ease: "power3.inOut",
  })
  // Activation particles emitted just before peak brightness
  .call(() => particleEmitter.emitWave(), [], "-=0.5")
  // Afterglow returning to the resting state
  .to(motion, {
    energy: 0,
    sparkle: 0.2,
    duration: 3,
    ease: "power1.out",
  });
Finally, apply bloom as a WebGPU post-processing effect.
Bloom blurs the brightest parts of the rendered scene. It composites the result over the original image, making light appear to spill into the surrounding area.
The strength property controls the intensity, while radius controls how far the glow spreads.
Increasing both values with energy synchronizes the bloom with the save point’s pulse.
// Pass rendering the scene from the camera
const scenePass = pass(scene, camera);

// Scene color for subsequent processing
const sceneColor = scenePass.getTextureNode();

// Bloom extracting and blurring bright areas
const bloomPass = bloom(sceneColor, 1, 0.5, 0.3);

// WebGPU post-processing pipeline
const postProcessing = new THREE.RenderPipeline(renderer);

// Original scene combined with bloom
postProcessing.outputNode = sceneColor.add(bloomPass);

// Bloom update inside the animation loop
bloomPass.strength.value = 1 + energy * 0.3;

bloomPass.radius.value = 0.5 + energy * 0.1;
Conclusion
A dedicated effect-authoring tool is not required to create an RPG-style save point. The effect can be implemented with Three.js and GSAP. The same fundamental techniques can be applied to many other effects, including energy waves and explosions. Try combining them to create effects of your own.