
Vite (French for “fast”) is a frontend build tool. It is a versatile and powerful tool that can be used in a wide range of environments, from simple web pages to applications built with frameworks such as React and Vue.js. Version 8, released in 2026, further improves both performance and the developer experience.
Vite is used to build static sites and SPAs with React, Vue.js, and similar libraries without relying on meta-frameworks such as Next.js, Nuxt, or Astro. It occupies a space similar to bundlers like webpack, but it does more than that.
This article explains how to use Vite for everything from static websites to applications that combine TypeScript, React, Tailwind CSS, and more, so you can set up a productive modern development environment.
Key features and how Vite works
In modern web development, almost nobody builds pages or apps entirely by hand with only HTML and JavaScript. Along with bundling and minifying the JavaScript and CSS files that ship to production, development workflows also need features such as real-time previews and error detection to improve both quality and productivity.
Vite is a tool designed to improve productivity in both development and build workflows. Here are its core features.
1. Development-time optimization
Vite uses the ES Modules mechanism built into modern browsers to run very quickly. Even large projects usually start in a few hundred milliseconds, and previews update almost in real time because only the files you actually need are transformed on demand. Its Pre-bundling mechanism automatically bundles and caches libraries in node_modules, which makes subsequent startups even faster.
2. Build-time optimization
During a production build, Vite generates optimized files in the dist/ directory. In Vite 8, two Rust-based tools are officially built into this process.
Oxc transpiles TypeScript and JSX into JavaScript that browsers can execute. Rolldown bundles and minifies multiple files into production assets. Compared with Vite 7 and earlier, which used esbuild and rollup, this is said to be up to 10 to 30 times faster. In projects at ICS, build times were reduced by more than 70 percent.
That is only part of what Vite includes. It also handles syntax transforms based on your browser support target, CSS processing, image optimization, and more. Plugins let you tailor the setup to your project and the libraries you use.
Basic workflow for publishing an HTML + JS page to GitHub Pages
Vite is very easy to use. To start, build a plain HTML + JavaScript page with Vite, without any framework, and publish it to GitHub Pages.
Note: This article is based on version 8.0, the latest release as of April 2026.
Initializing a project
To create a project, run the following command in your terminal (or Command Prompt). You do not need to install Vite in advance.
Using npm
npm create vite@latest
Using pnpm
pnpm create vite
Using yarn
yarn create vite
You will then be prompted with a few questions. Choose the simplest possible Vanilla JavaScript setup.
◆  Project name:
│  hello-vite  # 1. Enter the project name
◆  Select a framework:
│  ● Vanilla  # 2. Choose a framework (Vanilla means no framework)
│  ○ Vue
│  ○ React
│  ○ Preact
│  ○ Lit
│  ○ Svelte
│  ○ Solid
│  ○ Ember
│  ○ Qwik
│  ○ Angular
│  ○ Marko
│  ○ Others
◆  Select a variant:
│  ○ TypeScript
│  ● JavaScript # 3. Choose a variant (do not use TypeScript here)
◆  Install with npm and start now?
│  ● Yes / ○ No  # 4. Choose whether to install dependencies and start the dev server now (either is fine)
└
If you choose “Yes” for the last prompt, Vite will automatically install dependencies and start the development server.
  VITE v8.0.3  ready in 359 ms

  ➜  Local:   http://localhost:5173/
  ➜  Network: use --host to expose
  ➜  press h + enter to show help
If you choose “No”, start the development server with the following steps.
cd hello-vite # 1. Move to the newly created project folder
npm install   # 2. Install dependencies (first time only)
 # ... installation output omitted
npm run dev   # 3. Start the development server
Open the displayed URL in your browser (by default http://localhost:5173/) and you should see the sample page.
Editing code and previewing changes
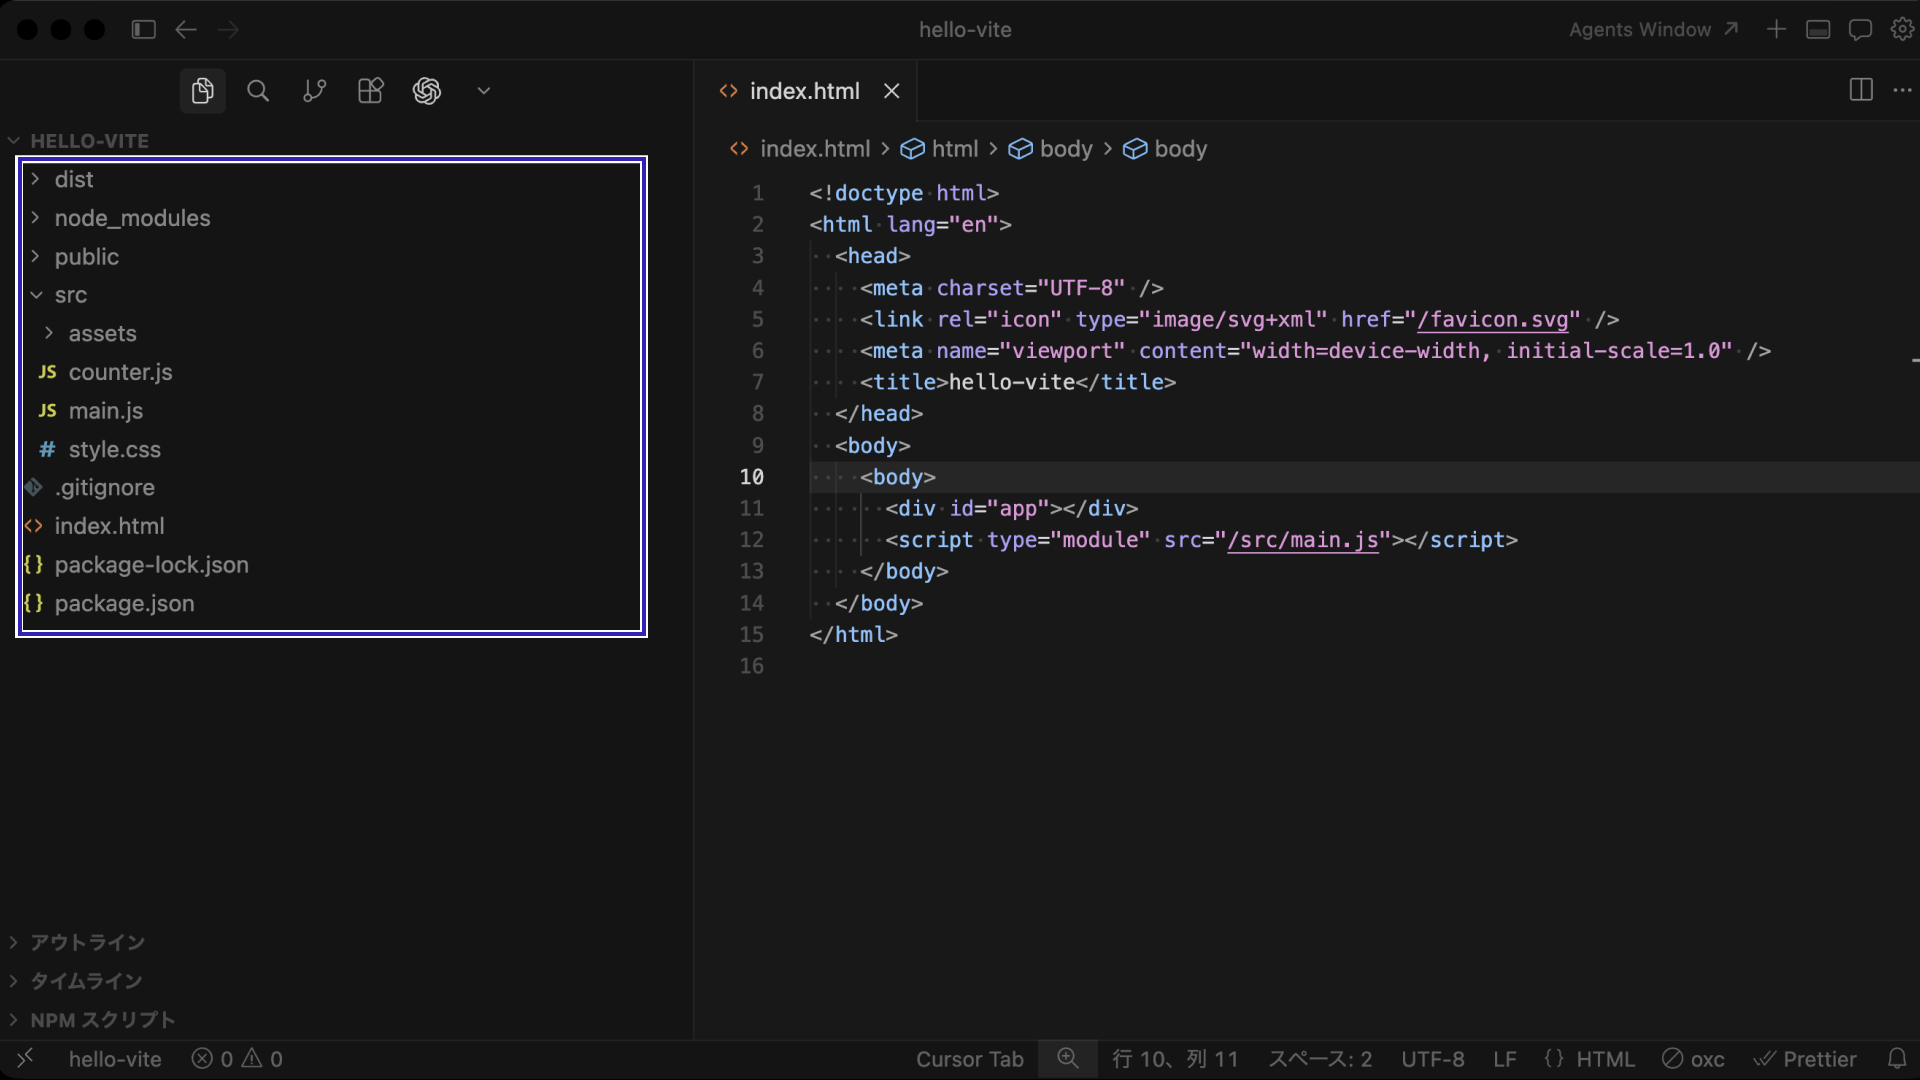
Open the generated project in an IDE or editor such as VS Code. The structure should look like this.
.html,.js,.css- Content files for the web page
package.json,package-lock.json- Files that define dependencies such as Vite and commands such as dev/build
node_modules- The folder that contains installed packages such as Vite
dist(created when you run a build)- The folder that contains the build output
- Deploy this folder to your server
With the development server running, edit and save the HTML or JavaScript, then look at the browser. Here, add Hello, Vite! to index.html and change the increment in counter.js from 1 to 2.
index.html
  <body>
    <!-- Add a heading below -->
    <h1>Hello, Vite!</h1>
    <div id="app"></div>
    <script type="module" src="/src/main.js"></script>
  </body>
src/counter.js
  // Change the increment from 1 to 2
  element.addEventListener("click", () => setCounter(counter + 2));
After you save the changes, the browser updates automatically. You should see “Hello, Vite!” and the counter should increase by 2 each time you click the button.
Building and previewing
Run the build command to create a production build. The output is written to the dist directory.
npm run build

# Example output
> hello-vite@0.0.0 build
> vite build

vite v8.0.3 building client environment for production...
✓ 9 modules transformed.
computing gzip size...
dist/index.html                  0.48 kB │ gzip: 0.31 kB
dist/assets/vite-BF8QNONU.svg    8.70 kB │ gzip: 1.60 kB
dist/assets/hero-5sT3BiRD.png   44.91 kB
dist/assets/index-CsUDhMuy.css   4.10 kB │ gzip: 1.46 kB
dist/assets/index-DCs2knzP.js    4.07 kB │ gzip: 1.78 kB

✓ built in 49ms
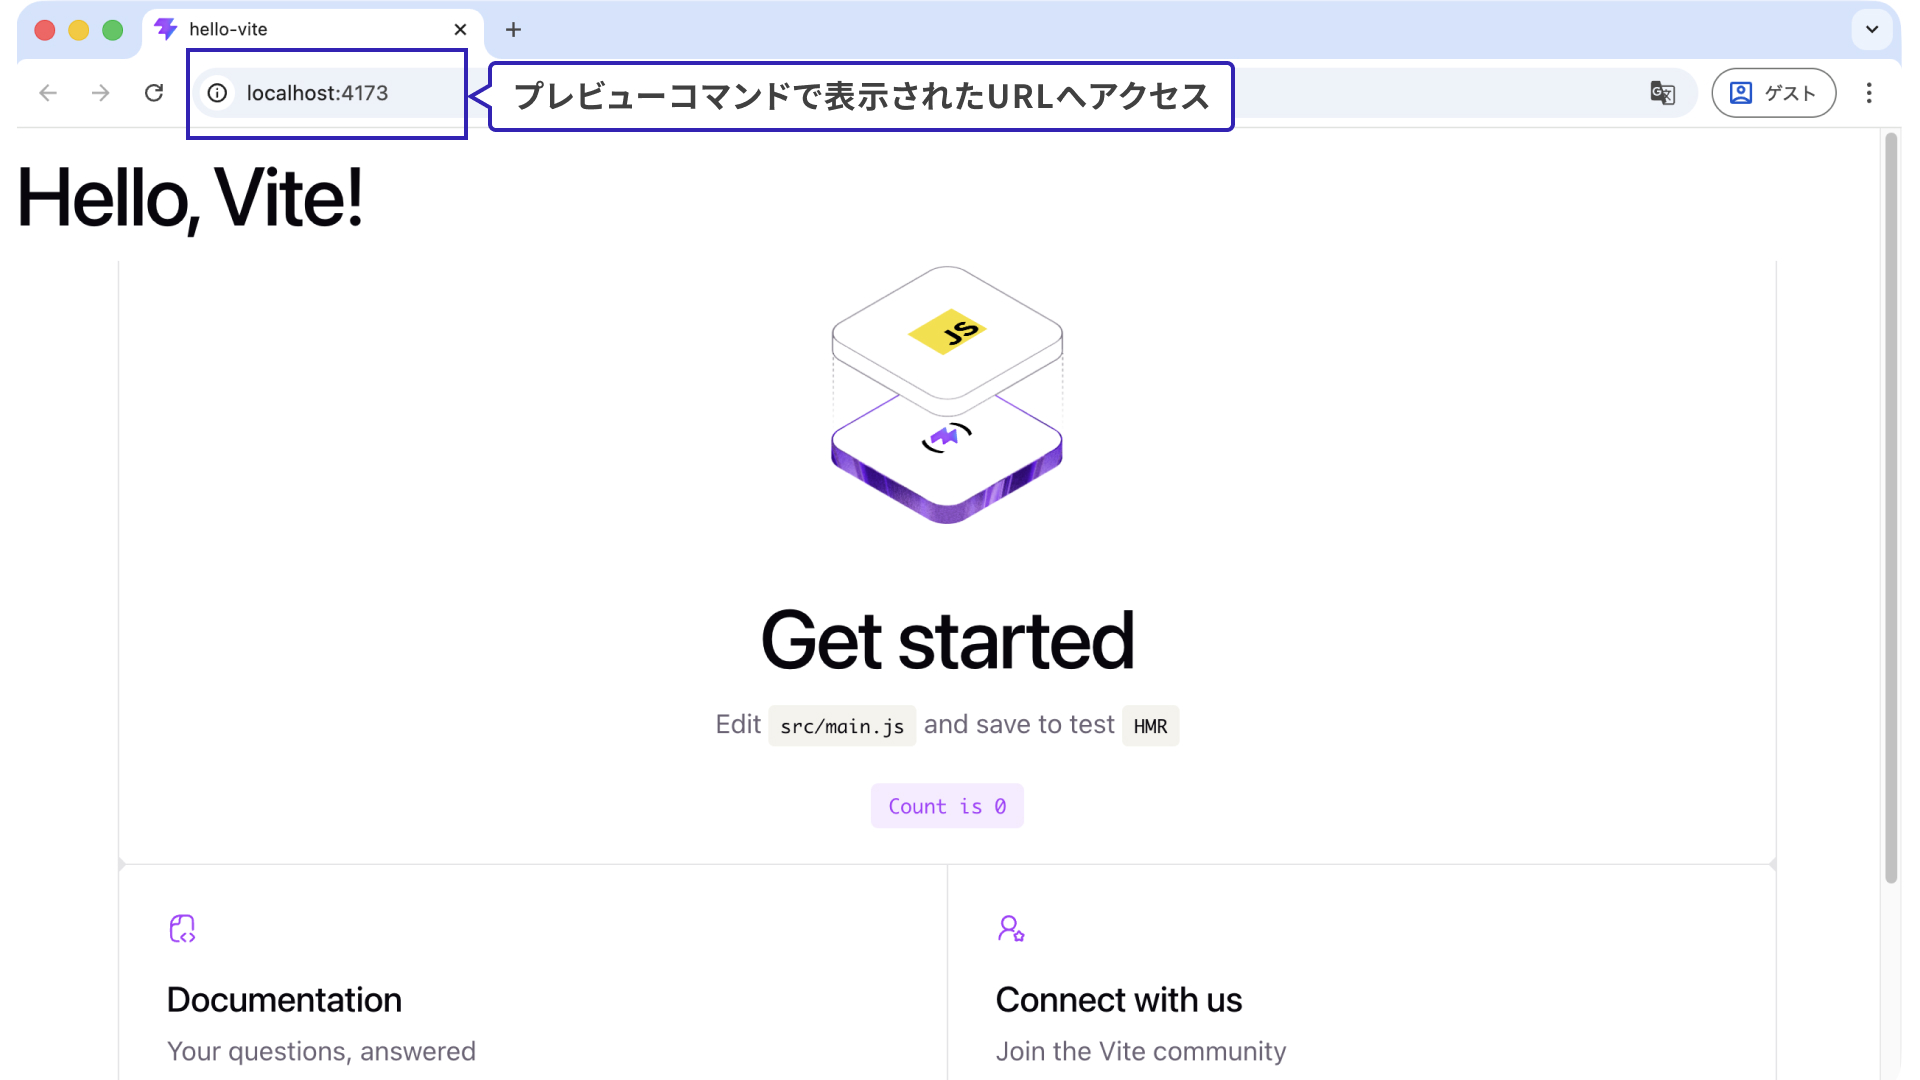
You can check the build output with the preview command.
npm run preview

# Example output
> hello-vite@0.0.0 preview
> vite preview

  ➜  Local:   http://localhost:4173/
  ➜  Network: use --host to expose
  ➜  press h + enter to show help
Open the displayed URL in your browser (by default http://localhost:4173/) and check the production build. If it shows the same content as the dev server started by dev, the build worked correctly.
Publishing to GitHub Pages
Publishing a Vite build to GitHub Pages requires a little configuration. If you inspect the built HTML, you will see that CSS and JavaScript are referenced with absolute paths that start with /.
Build output: dist/index.html
    <title>hello-vite</title>
    <script type="module" crossorigin src="/assets/index-DCs2knzP.js"></script>
    <link rel="stylesheet" crossorigin href="/assets/index-CsUDhMuy.css">
GitHub Pages URLs use the form https://<USERNAME>.github.io/<REPO>/, so if you upload the files as-is, the CSS and JavaScript will not load correctly. To fix this, create a vite.config.js file. This is also a good time to change the build output directory to docs to match a branch-based GitHub Pages setup.
Using a relative path for base
- This is a generic setting that does not depend on the repository name.
- If your project has multiple HTML files, you may need Vite’s multi-page configuration. See Multi-page support.
vite.config.js
import { defineConfig } from "vite";

export default defineConfig({
  base: "./", // ✨ Use a relative path here
  build: {
    outDir: "docs",
  },
});
Using the repository name for base
- This is the approach shown in the official documentation.
vite.config.js
import { defineConfig } from "vite";

export default defineConfig({
  base: "/<REPO>/", // ✨ Set the repository name here
  build: {
    outDir: "docs",
  },
});
Set the repository name in base, then run npm run build again. If docs/index.html contains "/<REPO>/", the configuration worked.
Build output: docs/index.html
    <title>hello-vite</title>
    <script type="module" crossorigin src="/hello-vite/assets/index-DEMHKKq_.js"></script>
    <link rel="stylesheet" crossorigin href="/hello-vite/assets/index-CsUDhMuy.css">
Finally, push the folder containing docs/ to GitHub.
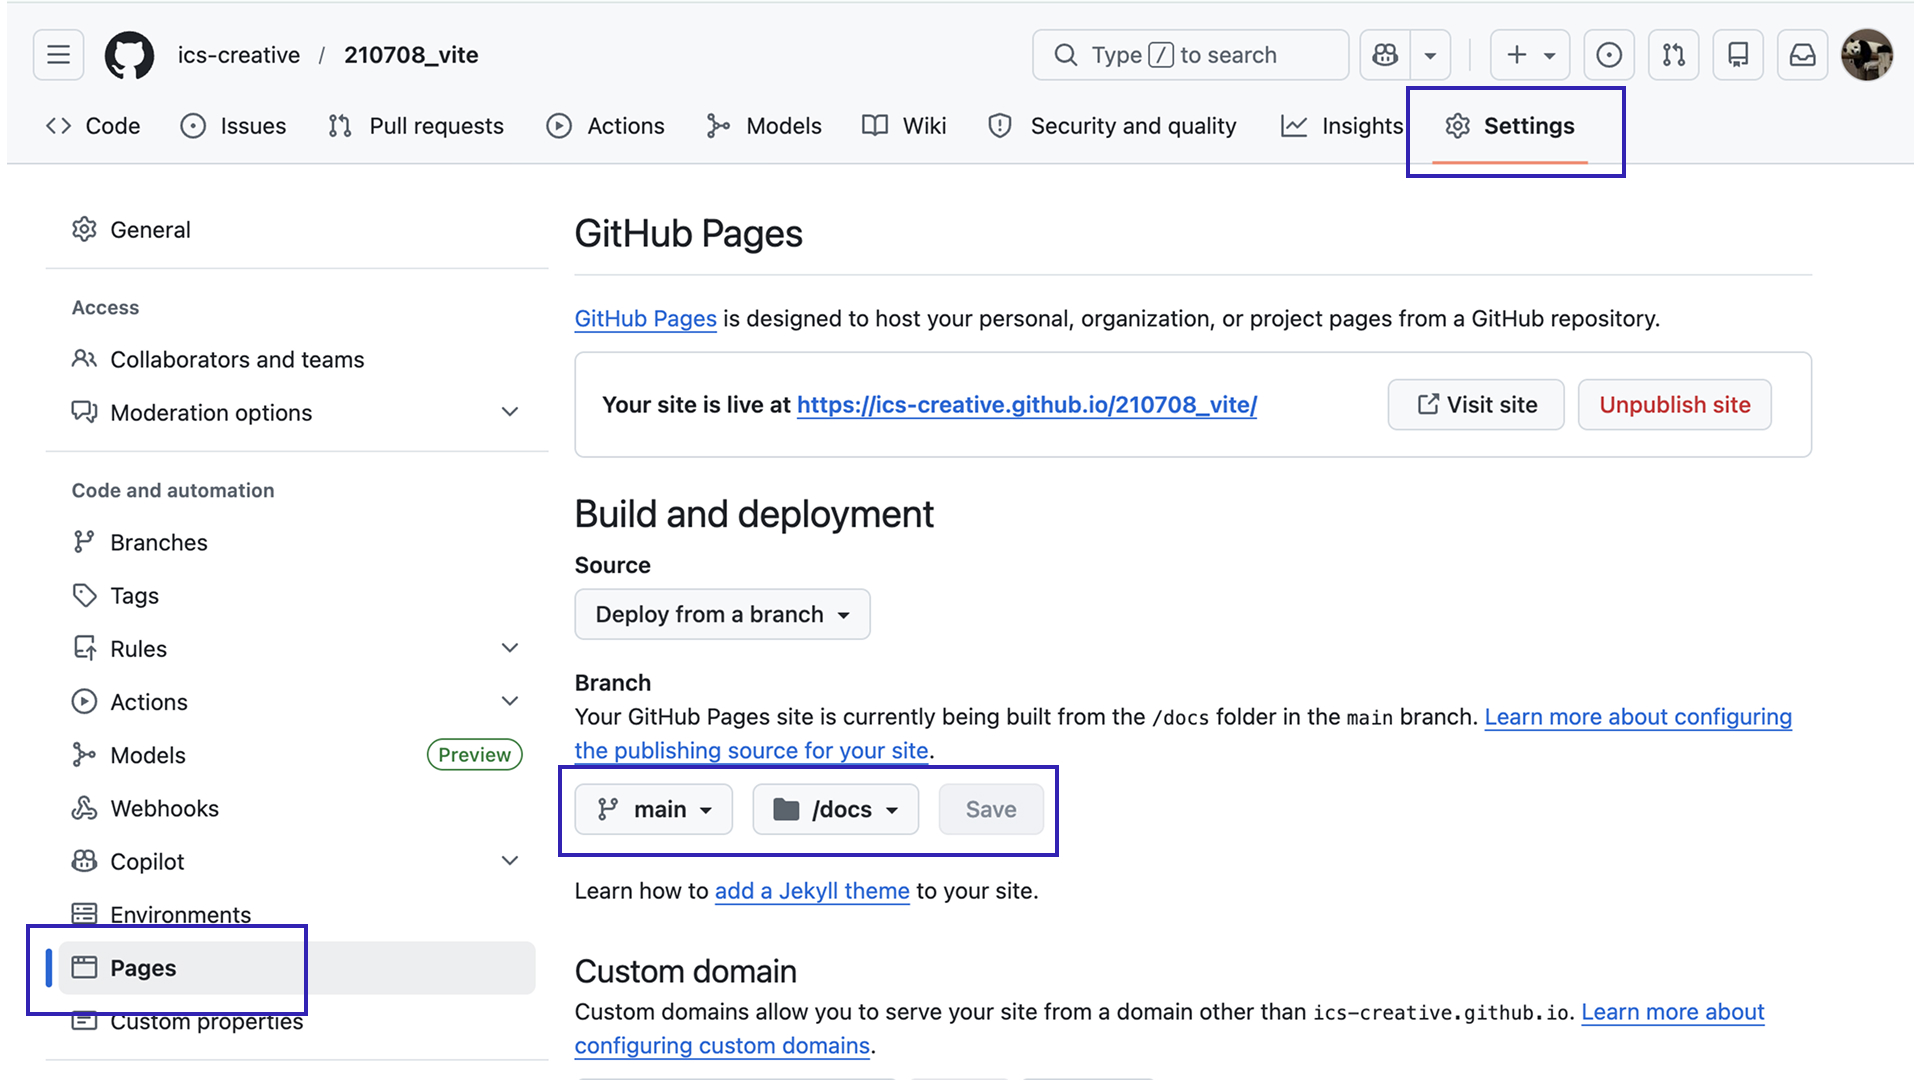
On GitHub, open the repository settings page (https://github.com/<USERNAME>/<REPO>/settings/pages) and configure Build and deployment like this.
- Source:
Deploy from a branch - Branch:
main/docs
Click Save to store the configuration. Your page will then be published at https://<USERNAME>.github.io/<REPO>/.
Next step: use GitHub Actions to build and deploy automatically
Building the site and publishing it to GitHub Pages every time you make a change is tedious. In practice, many teams use GitHub Actions to automate both the build and deployment process. GitHub Actions itself is not part of Vite, but the Vite documentation has a clear explanation in Deploying a Static Site. In most cases, you can copy the example workflow and it will work as-is. If you update the site frequently, it is worth setting up.
Note: If you deploy with GitHub Actions, you do not need to change outDir in vite.config.js. Remove that setting or set it back to the default value, "dist".
Working with assets such as images and fonts
In Vite, static assets such as images and fonts are generally handled in two ways.
- Reference assets in the
publicdirectory from HTML importassets from directories other thanpublicin JavaScript
Referencing assets in the public directory from HTML
public is a special directory in Vite. Files placed there are copied to the build output as-is, directly under the root of the output directory (dist by default).
When you reference them from HTML or CSS, use absolute paths that start with / and do not include public/ in the path.
<!-- Display image.png placed in /public/img/ -->
<img src="/img/image.png">
This is simple, but Vite cannot detect path typos as errors, and it can lead to caching problems—for example, when an updated image does not appear right away. In general, the next approach, using a directory other than public, is recommended.
Importing assets from directories other than public in JavaScript
Assets placed outside public are checked and processed automatically by Vite. They can live anywhere outside public, but src/assets/ is a common convention.
<!-- Display image.png placed in /src/assets/ -->
<img src="./src/assets/image.png">
Images referenced this way are collected into a single location during the build (dist/assets/), and their filenames are changed. If the path is wrong and the file does not exist, you get an error. When the file contents change, the hash at the end of the filename also changes, so you do not accidentally keep loading an old file.
When you reference assets from JavaScript, use an import statement.
import imgPass from "./assets/img/pass.png";
import imgFail from "./assets/img/fail.png";

// Show pass.png for a passing score and fail.png otherwise
const PASSING_SCORE = 80;
const showResult = (score) => {
  const img = new Image();
  img.src = score >= PASSING_SCORE ? imgPass : imgFail;
  document.body.appendChild(img);
}
Unlike in HTML or CSS, writing the path as a plain string does not make Vite treat it as an asset.
img.src = "./assets/img/pass.png"; // This will not work
Multi-page support
Vite is often associated with SPA (Single Page Application) development, but it can of course also build multi-page websites.
For example, suppose your site has a top page plus about.html and works/index.html.
.
├── index.html
├── about.html
└── works
    └── index.html
Setup is simple. Create multiple HTML files and link to them as usual (href should be an absolute path that starts with /).
However, in this state the dev server (npm run dev) works, but the built site (npm run preview) does not. To build it correctly, update vite.config.js like this.
import { resolve } from "node:path";
import { defineConfig } from "vite";

export default defineConfig({
  build: {
    rolldownOptions: {
      input: {
        main: resolve(import.meta.dirname, "index.html"),
        about: resolve(import.meta.dirname, "about.html"),
        works: resolve(import.meta.dirname, "works/index.html"),
      },
    },
  },
});
Remember that every HTML file has to be listed explicitly.
CSS
Vite also makes CSS easy to work with. You can load CSS from HTML with a <link> tag or from JavaScript with an import statement. Either way, CSS loaded as an asset is collected into a single location during the build (dist/assets/) and minified automatically.
<!-- index.html -->
<link rel="stylesheet" href="./style.css">
import "./style.css";
This is simple, but CSS can become hard to manage as pages or applications grow. Here are a few common solutions.
CSS Modules
CSS Modules split CSS by file and automatically manage selector names so they do not collide, making them easy to use from JavaScript, React, and similar environments. Vite supports CSS Modules out of the box.
To use a CSS file as a CSS Module, just name it *.module.css.
style.module.css
.pass {
  color: green;
}
.fail {
  color: red;
}
main.js
import styles from "./style.module.css";

// Display pass or fail with styling
const PASSING_SCORE = 80;
const showResult = (score) => {
  const result = document.createElement("p");
  const passed = score >= PASSING_SCORE;
  result.textContent = passed ? "Pass" : "Fail";
  result.className = passed ? styles.pass : styles.fail;
  document.body.appendChild(result);
}
If you inspect the built CSS, you can see that the class names were adjusted automatically. Because of this, styles do not clash even if different modules use the same class names.
Built CSS
._pass_135r0_1{color:green}
._fail_135r0_4{color:red}
Sass
Vite also handles Sass with very little setup. CSS itself has improved enough that Sass is less essential than it used to be, but it is still useful when you want to reuse assets and know-how from existing projects. To use Sass, install sass or sass-embedded and give your stylesheet a .scss extension.
npm install -D sass
style.scss
// Generate classes p-1 to p-5
@for $i from 1 through 5 {
  .p-#{$i} {
    padding: #{$i * 4}px;
  }
}
Tailwind CSS
Tailwind CSS is also common in modern web production and application development, and Vite supports it without any trouble.
To use Tailwind CSS, install tailwindcss and @tailwindcss/vite, then update vite.config.js.
npm install tailwindcss @tailwindcss/vite
vite.config.js
import { defineConfig } from "vite";
import tailwindcss from "@tailwindcss/vite";

export default defineConfig({
  plugins: [
    tailwindcss(),
  ],
});
Next, create a CSS file and import Tailwind CSS. You can place the file anywhere and name it however you like.
src/style.css
@import "tailwindcss";

/* Add theme customization and other settings here if needed */
Note: As of Tailwind CSS v4, released in January 2025, tailwind.config.js is no longer required in most cases. Settings such as theme customization can be written directly in CSS.
Finally, load the CSS file from your HTML file and you can use Tailwind utility classes.
index.html
<!doctype html>
<html lang="en">
<head>
  <link rel="stylesheet" href="/src/style.css">
</head>
<body>
  <div class="bg-red-200">
    <h1 class="text-3xl">Hello, Tailwind CSS!</h1>
  </div>
</body>
</html>
TypeScript
All of the examples so far have used JavaScript, but in real-world projects you will often use TypeScript. To use TypeScript with Vite, simply choose TypeScript when you create the project with npm create vite@latest.
◆  Select a variant:
│  ● TypeScript # Choose the TypeScript variant
│  ○ JavaScript
The initial project structure is almost the same as in the JavaScript template. Vite creates tsconfig.json, the TypeScript configuration file, and changes script file extensions to .ts. You can also use TypeScript for the config file by naming it vite.config.ts.
In a TypeScript project, running the build command also checks for errors. If you use a TypeScript-aware IDE or editor such as VS Code, errors will also appear directly in the editor.
tsconfig.json contains sensible defaults, so in most cases you can use it as-is. If you want to adjust the ES version with target or lib, see Supporting older and newer browsers because there are a few points to keep in mind.
React
If you want to use React, select React when you create the project with npm create vite@latest. You can choose JavaScript as well, but unless you have a specific reason not to, TypeScript is usually the better choice.
> npm create vite@latest
◇  Project name:
│  vite-react
│
◇  Select a framework:
│  React
│
◇  Select a variant:
│  ● TypeScript
│  ○ TypeScript + React Compiler
│  ... omitted
When you create a project from the React template, Vite configures the React plugin for you in vite.config.ts.
import { defineConfig } from "vite";
import react from "@vitejs/plugin-react";

export default defineConfig({
  plugins: [react()],
});
It also adds a lint command (npm run lint) by default, so you can check the code with ESLint. See Lint and format for more on linting.
Note: using React Compiler
React Compiler is a React feature released in October 2025 that automatically handles memoization that used to require manual control with useCallback and useMemo. To use React Compiler, choose the React Compiler variant when you create the project with npm create vite@latest.
> npm create vite@latest
◇  Project name:
│  vite-react-compiler
│
◇  Select a framework:
│  React
│
◇  Select a variant:
│  TypeScript + React Compiler
To add React Compiler to an existing project, install the related packages with the following command and add the configuration to vite.config.ts.
npm install -D @rolldown/plugin-babel @babel/core babel-plugin-react-compiler
import { defineConfig } from "vite";
import react, { reactCompilerPreset } from "@vitejs/plugin-react";
import babel from "@rolldown/plugin-babel";

export default defineConfig({
  plugins: [
    react(),
    babel({ presets: [reactCompilerPreset()] }),
  ],
});
Vue.js
If you want to use Vue.js, select Vue when you create the project with npm create vite@latest.
◇  Project name:
│  vite-vue
│
◇  Select a framework:
│  Vue
│
◆  Select a variant:
│  ● TypeScript
│  ○ JavaScript
│  ○ Official Vue Starter ↗
│  ○ Nuxt ↗ https://nuxt.com
│  ○ Vike ↗ https://vike.dev
If you only need a basic setup, choosing TypeScript is enough. For more complex applications, one of the other setup options may make more sense. Compared with React, the surrounding library choices in the Vue.js ecosystem are relatively settled, so there is usually less ambiguity about which libraries to pick.
For example, if you choose Official Vue Starter, Vue’s official create-vue tool lets you select supporting libraries such as the router and store. If you choose Replace Prettier with Oxfmt, you can also use Oxfmt, which is introduced in the next section.
◆  Select features to include in your project: (↑/↓ to navigate, space to
│  select, a to toggle all, enter to confirm)
│  ◻ JSX Support
│  ◻ Router (SPA development)
│  ◻ Pinia (state management)
│  ◻ Vitest (unit testing)
│  ◻ End-to-End Testing
│  ◻ Linter (error prevention)
│  ◻ Prettier (code formatting)
◆  Select experimental features to include in your project: (↑/↓ to navigate,
│  space to select, a to toggle all, enter to confirm)
│  ◻ Replace Prettier with Oxfmt
│  ◻ Vue 3.6 (beta)
If you edit the generated project in a VS Code-based IDE, install the Vue (Official) extension (formerly Volar).
Lint and format
Linting and formatting are essential in modern web development for keeping code consistent and maintaining quality. Some Vite templates set up ESLint for you, but otherwise you need to configure these tools yourself. Now that AI-generated code is routine, fast and reliable linting and formatting have a direct impact on productivity. Rather than the traditional ESLint and Prettier combination, this section introduces Oxlint and Oxfmt.
Oxlint and Oxfmt are the linter and formatter included in the Oxc toolchain. Both are fast Rust-based tools designed with ESLint/Prettier compatibility in mind.
The following steps show how to introduce Oxlint and Oxfmt into a new project. If your existing project already has ESLint and Prettier in use, see the migration guides instead.
If a template such as React has already installed ESLint, remove it first using steps like the following.
# Note: This may vary depending on the template and installation options.
# Check the actual project contents and adjust as needed.

# Delete the ESLint config file in the project root
rm eslint.config.js

# Remove ESLint dependency packages from package.json
npm uninstall @eslint/js eslint eslint-plugin-react-hooks eslint-plugin-react-refresh typescript-eslint
Install Oxlint and Oxfmt.
npm install -D oxlint oxfmt
Add oxlint and oxfmt scripts to package.json. It is convenient to create a fix command that runs oxlint --fix and oxfmt together.
"scripts": {
  "lint": "oxlint",
  "fix": "oxlint --fix && oxfmt"
}
In VS Code, the Oxc extension shows lint errors in real time.
Supporting older and newer browsers
By default, Vite generates code that works well in major browsers, but sometimes you may need to support older browsers or adopt newer language features more aggressively. This section explains how to control the available language features and supported browsers.
Before changing any settings, it helps to understand Vite’s defaults. In a TypeScript project, the behavior is influenced by two files: tsconfig.json and vite.config.ts.
Default tsconfig.json
{
  "compilerOptions": {
    "target": "ES2023",
    "useDefineForClassFields": true,
    "module": "ESNext",
    "lib": ["ES2023", "DOM", "DOM.Iterable"],
    "types": ["vite/client"],
    "skipLibCheck": true,

// ... omitted
tsconfig.json lets you adjust the ECMAScript version used for type checking via lib. For example, if you want to use Object.groupBy, which was introduced in ES2024, you need to change lib to ES2024.
The other setting, target, usually does not need to be changed in normal use. Originally, target determines the JavaScript version that tsc outputs when it compiles TypeScript, but Vite uses Oxc for the build, so tsconfig’s target is ignored.
The important point is that tsconfig.json affects only type checking and does not affect the build output. The setting that controls the build output is build.target in vite.config.ts.
Default build target in vite.config.ts
export default defineConfig({
  build: {
    target: "baseline-widely-available",
  },
});
build.target controls the JavaScript version emitted in the build output. By default, it is set to baseline-widely-available. baseline is a compatibility indicator, also discussed in ウェブの新機能はいつまで待てば実践投入できるか (Japanese). widely-available means “30 months have passed since all major browsers supported the feature.” As of April 2026, this corresponds to ['chrome111', 'edge111', 'firefox114', 'safari16.4'] using the January 2026 Baseline snapshot, though those concrete values may change in future Vite releases.
In many cases, the default baseline-widely-available is enough. Still, you can change it if you need to support browsers older than the default target or explicitly define the minimum browser versions used in QA.
For example, with the default target the following code that uses ??= (the nullish coalescing assignment operator) is emitted as-is. If you target Safari 13, which does not support ??=, Vite transforms it into older equivalent code.
Code before the build
let num: number | null = null;
num ??= 42;
console.log(num);
Code after the build
// Output with the default setting. This causes an error in older browsers.
// (The variable name changing to "e" is just the result of minification.)
var e=null;e??=42,console.log(e);

// Output when targeting Safari 13
// This may be slightly longer or slower, but the behavior is equivalent and it works in older browsers.
var e=null;e!=null||(e=42),console.log(e);
Note: features beyond syntax still need polyfills
Changing build.target is enough for transformable syntax such as ??=, but newer features beyond syntax still require a polyfill. For example, Object.groupBy is not a syntax transform, so you need to load a polyfill. There are two main ways to do this: @vitejs/plugin-legacy or core-js.
- Using
@vitejs/plugin-legacy
This uses Vite’s official plugin. Install @vitejs/plugin-legacy and add it to vite.config.ts. Although this plugin was originally meant to support much older browsers that do not support ESM, the following setup can also generate only the missing polyfills for modern browsers.
npm i -D @vitejs/plugin-legacy
import { defineConfig } from "vite";
import legacy from "@vitejs/plugin-legacy";

export default defineConfig({
  plugins: [
    legacy({
      modernTargets: ["safari >= 13", "chrome >= 80", "firefox >= 78"],
      modernPolyfills: true,
      renderLegacyChunks: false,
    }),
  ],
  // build.target is derived automatically from the plugin settings, so remove it
});
With this configuration, the build outputs a file such as polyfills-xxx.js alongside index-xxx.js, and the HTML loads it automatically.
- Using
core-js
The plugin approach is easy, but it can include polyfills you do not actually need. In the previous example, only Object.groupBy is used, but its internal dependencies can still produce a file close to 20 KB.
If you can identify the exact features you need, using core-js is often more efficient. Install core-js, then import the required polyfill in main.ts.
npm install core-js
// Import only what you need
import "core-js/features/object/group-by";

// You can also import a larger bundle like this,
// but be careful because it often includes more than you need.
// import "core-js/stable";
Changing build.target and adding polyfills lets you broaden browser support, but neither approach can cover every new feature. If you want to prevent accidental use of unsupported features, consider checking with eslint-plugin-compat as well. As of April 2026, Oxlint does not yet have an equivalent feature.
Conclusion
This article introduced the core features of Vite and showed the basic workflows for everything from simple static web pages to applications built with React and Vue.js.
ICS has used Vite in many projects since first adopting it in 2021. In particular, Vite 8 has made development even more efficient thanks to its performance improvements.
Vite’s official documentation is also carefully translated into Japanese. Use this article as a starting point, then consult the official docs as needed for your own projects.