Three.js is a JavaScript library you can use in commercial projects that makes it easy to create 3D content. If you build 3D graphics with raw WebGPU alone, even displaying a single cube requires a large amount of JavaScript and WGSL, along with specialized knowledge. With Three.js, you can create 3D content much more easily with standard JavaScript knowledge, which makes WebGPU far more approachable.
Web-based 3D experiences have been drawing attention since the Flash era of the 2000s. Today, in addition to the standard technology WebGL, WebGPU is also available and is being adopted for games, visualization, and many other use cases. Three.js supports WebGPU as well, making it an essential technology for creating memorable web content.
In this article, we will look at what Three.js can do while learning how to write code with it.
Examples
Here are a few examples of how Three.js is used in practice.
Dynamic procedural terrain is an animation demo built with Three.js. It combines terrain textures, blur-like effects, and other visual techniques to create a dreamlike world.
HexGL is a browser-based racing game reminiscent of F-ZERO. The quality is remarkably high for something that runs in a browser. Give it a try.
Start with the Complete Code
After seeing those examples, you should now have a sense of the kinds of visuals Three.js can create. From here, we will start with the completed code and then break down the key points.
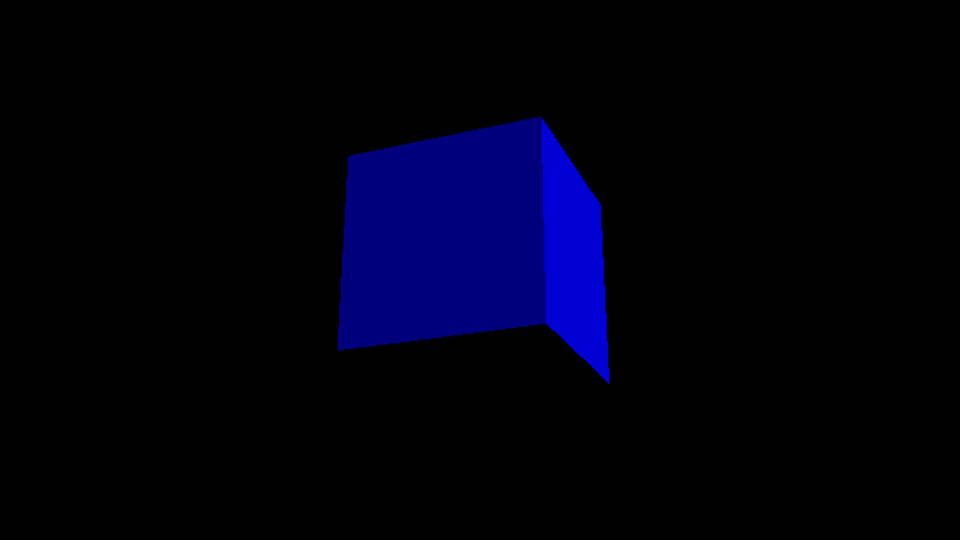
This is a simple sample that displays a cube and rotates it. Let’s build the same thing locally and run it ourselves.
This demo uses three.js r182 (three/webgpu), which was the latest release as of February 2026.
Create an HTML File
In your working directory, create a file named index.html and paste in the following completed code.
<!DOCTYPE html>
<html>
<head>
  <meta charset="UTF-8" />
  <!-- Load three.js -->
  <script type="importmap">
    {
      "imports": {
        "three": "https://cdn.jsdelivr.net/npm/three@0.182.0/build/three.webgpu.js",
        "three/webgpu": "https://cdn.jsdelivr.net/npm/three@0.182.0/build/three.webgpu.js"
      }
    }
  </script>
  <script type="module">
    import * as THREE from "three/webgpu";

    const width = 960;
    const height = 540;
    const canvas = document.querySelector("#myCanvas");

    // Create a renderer
    const renderer = new THREE.WebGPURenderer({
      canvas,
      antialias: true
    });
    renderer.setSize(width, height);
    renderer.setPixelRatio(devicePixelRatio);
    renderer.setAnimationLoop(tick);

    // Create a scene
    const scene = new THREE.Scene();
    scene.background = new THREE.Color(0x000000); // Black

    // Create a camera (field of view, aspect ratio, near plane, far plane)
    const camera = new THREE.PerspectiveCamera(45, width / height, 1, 10000);
    // Set the camera's initial position (x, y, z)
    camera.position.set(0, 0, 1000);

    // Create a box (width, height, depth)
    const geometry = new THREE.BoxGeometry(500, 500, 500);
    const material = new THREE.MeshStandardMaterial({color: 0x0000FF});
    const box = new THREE.Mesh(geometry, material);
    // Add it to the scene
    scene.add(box);

    // Directional light
    const light = new THREE.DirectionalLight(0xFFFFFF);
    light.intensity = 2; // Double the light intensity
    light.position.set(1, 1, 1); // Light direction
    // Add it to the scene
    scene.add(light);

    function tick() {
      // Rotate the box
      box.rotation.x += 0.01;
      box.rotation.y += 0.01;

      // Render
      renderer.render(scene, camera);
    }
  </script>
</head>
<body>
  <canvas id="myCanvas"></canvas>
</body>
</html>
From here on, let’s go through the main points section by section.
Set Up the Imports
Because Three.js is a JavaScript library, you need to load it before you can use it.
To use Three.js, you load it with ES Modules. In the <script type="importmap"> block, specify the CDN URLs for Three.js. In this article, we also add three/webgpu, the entry point for the WebGPU build, to the import map.
<script type="importmap">
  {
    "imports": {
      "three": "https://cdn.jsdelivr.net/npm/three@0.182.0/build/three.module.js",
      "three/webgpu": "https://cdn.jsdelivr.net/npm/three@0.182.0/build/three.webgpu.js"
    }
  }
</script>
Then, inside <script type="module"></script>, import the WebGPU build of Three.js at the top as shown below. Be careful with the type attributes on <script type="importmap"> and <script type="module">; if either one is wrong, the code will not run.
import * as THREE from "three/webgpu";

// Write your code here
For more on ES Modules, see the article ES Modules入門 - JavaScriptのモジュールを使う方法.
At this point, the setup is complete.
1. Create a Renderer
To render with WebGPU, create a renderer. Pass it a reference to the canvas element from the HTML.
import * as THREE from "three/webgpu";

// ...

const canvas = document.querySelector("#myCanvas");

// Create a renderer
const renderer = new THREE.WebGPURenderer({
  canvas,
  antialias: true
});
By default, the renderer is small, so use the setSize() method to set its dimensions. In this demo, the width is 960px and the height is 540px.
const width = 960;
const height = 540;
// ...
renderer.setSize(width, height);
Also set the device pixel ratio so the result looks sharp on mobile devices. Without this, it will look blurry on phones and tablets.
renderer.setPixelRatio(devicePixelRatio);
Older articles sometimes show window.devicePixelRatio || 1. That fallback was needed because browsers from around 2012 did not always implement devicePixelRatio, but modern browsers do, so || 1 is no longer necessary.
2. Create a Scene
Create a scene. The scene is where objects, lights, and other elements live.
// Create a scene
const scene = new THREE.Scene();
scene.background = new THREE.Color(0x000000); // Black
Set the background color of the 3D space to black with the background property.
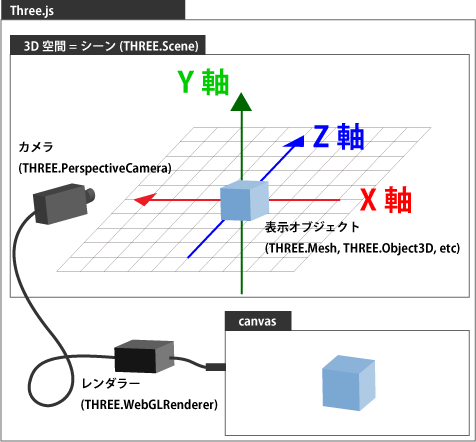
3. Create a Camera
In Three.js, you create a camera, and everything visible from that viewpoint is drawn to the canvas element through the renderer.
Create the camera by passing four values to THREE.PerspectiveCamera: the field of view, aspect ratio, near clipping plane, and far clipping plane.
const width = 960;
const height = 540;
// ...

// Create a camera (field of view, aspect ratio, near plane, far plane)
const camera = new THREE.PerspectiveCamera(
  45,
  width / height,
  1,
  10000
);

// Set the camera's initial position (x, y, z)
camera.position.set(0, 0, 1000);
4. Create a Cube
A cube is created with a display object called a mesh. To create a mesh, you need both a geometry (the shape) and a material (the surface properties).
A geometry contains vertex data and face data. Three.js includes many different geometry classes, but in this article we use BoxGeometry, which generates box-shaped geometry such as cubes and rectangular prisms.
// Create a box (width, height, depth)
const geometry = new THREE.BoxGeometry(500, 500, 500);
A material contains information such as color and surface appearance. In this example, we want to display a blue box, so we create the material like this:
const material = new THREE.MeshStandardMaterial({color: 0x0000FF});
Use the geometry and material to create a mesh, then add the mesh to the scene.
const box = new THREE.Mesh(geometry, material);
// Add it to the scene
scene.add(box);
5. Create a Light
At this point, the scene is still completely dark, so let’s add a light.
// Directional light
const light = new THREE.DirectionalLight(0xFFFFFF);
light.intensity = 2; // Double the light intensity
light.position.set(1, 1, 1); // Light direction
// Add it to the scene
scene.add(light);
The THREE.DirectionalLight class represents a directional light. A directional light shines from a constant direction, like sunlight. Lights only take effect after being added to the scene. Here we also change the light position so that it shines diagonally. The arguments to the set() method represent the X, Y, and Z directions.
// Change the light position
light.position.set(1, 1, 1);
6. Render
The final step is rendering. In Three.js, renderer.setAnimationLoop() lets Three.js manage the loop appropriately. Nothing is actually drawn to the canvas until you call renderer.render().
renderer.setAnimationLoop(tick);

// ...

function tick() {

  // Render
  renderer.render(scene, camera);
}

7. Animation
Inside the tick() function, update the box rotation a little bit on each frame to create a rotation animation.
renderer.setAnimationLoop(tick);

// ...

function tick() {
  // Rotate the box
  box.rotation.x += 0.01;
  box.rotation.y += 0.01;

  // Render
  renderer.render(scene, camera);
}
When you run the code, the cube should rotate. This is the basic pattern for animation in Three.js.
Conclusion
We were able to display a cube, but that alone is not enough to make compelling content. To create something like the examples from the beginning of this article, you need to continue learning Three.js. I often hear people around me say that they tried Three.js but then got stuck because they were not sure what to study next.
And that is understandable. Three.js can be used in many different ways, so there is a wide range of topics to learn. To help with that, I summarized the key points and learning directions for studying Three.js in the diagram below.
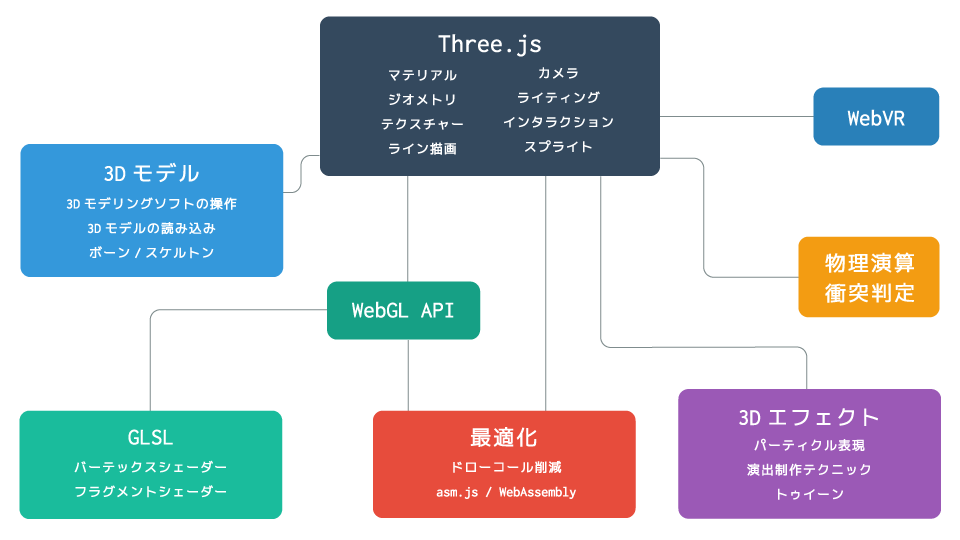
Some people may want to study broadly across many areas, while others may want to specialize in one field. Either approach is valid. A good next step is to start with the area that interests you most. For a more structured path, ICS MEDIA has also put together Three.js入門サイト. No newline at end of file